
This post may contain affiliate links. As an Amazon Associate, I earn from qualifying purchases. For more information, please visit my Privacy Policy.
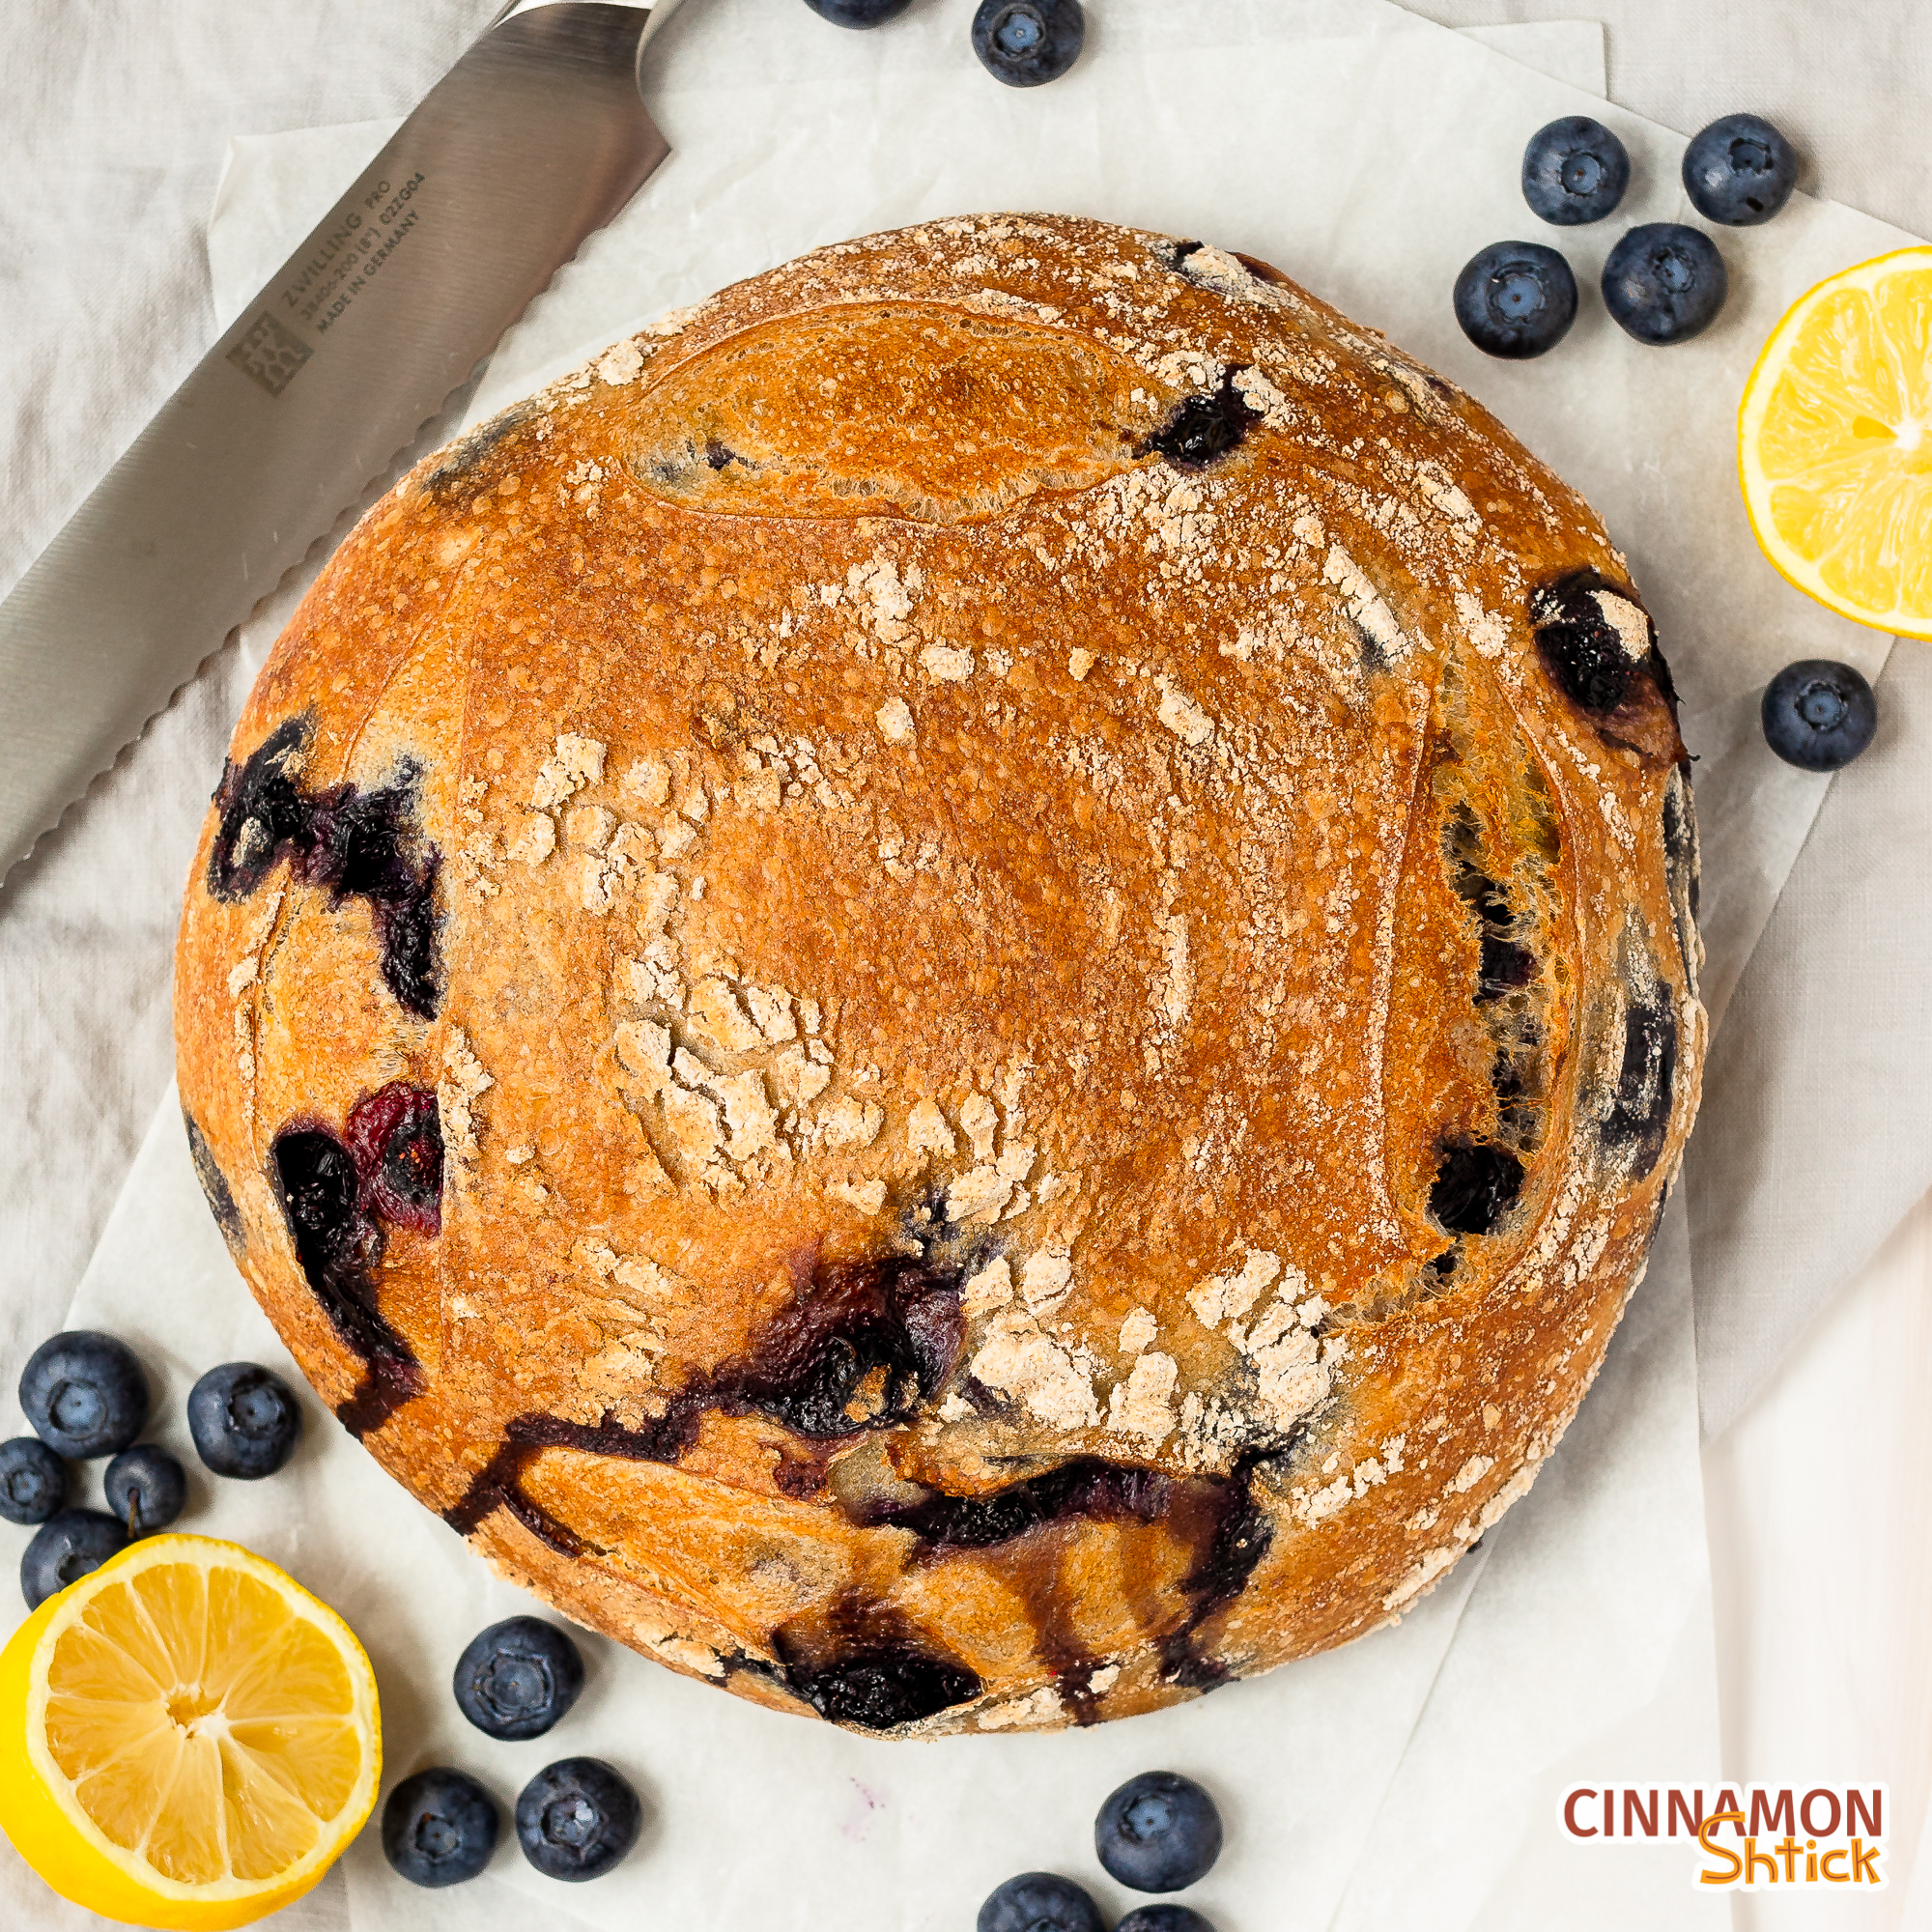
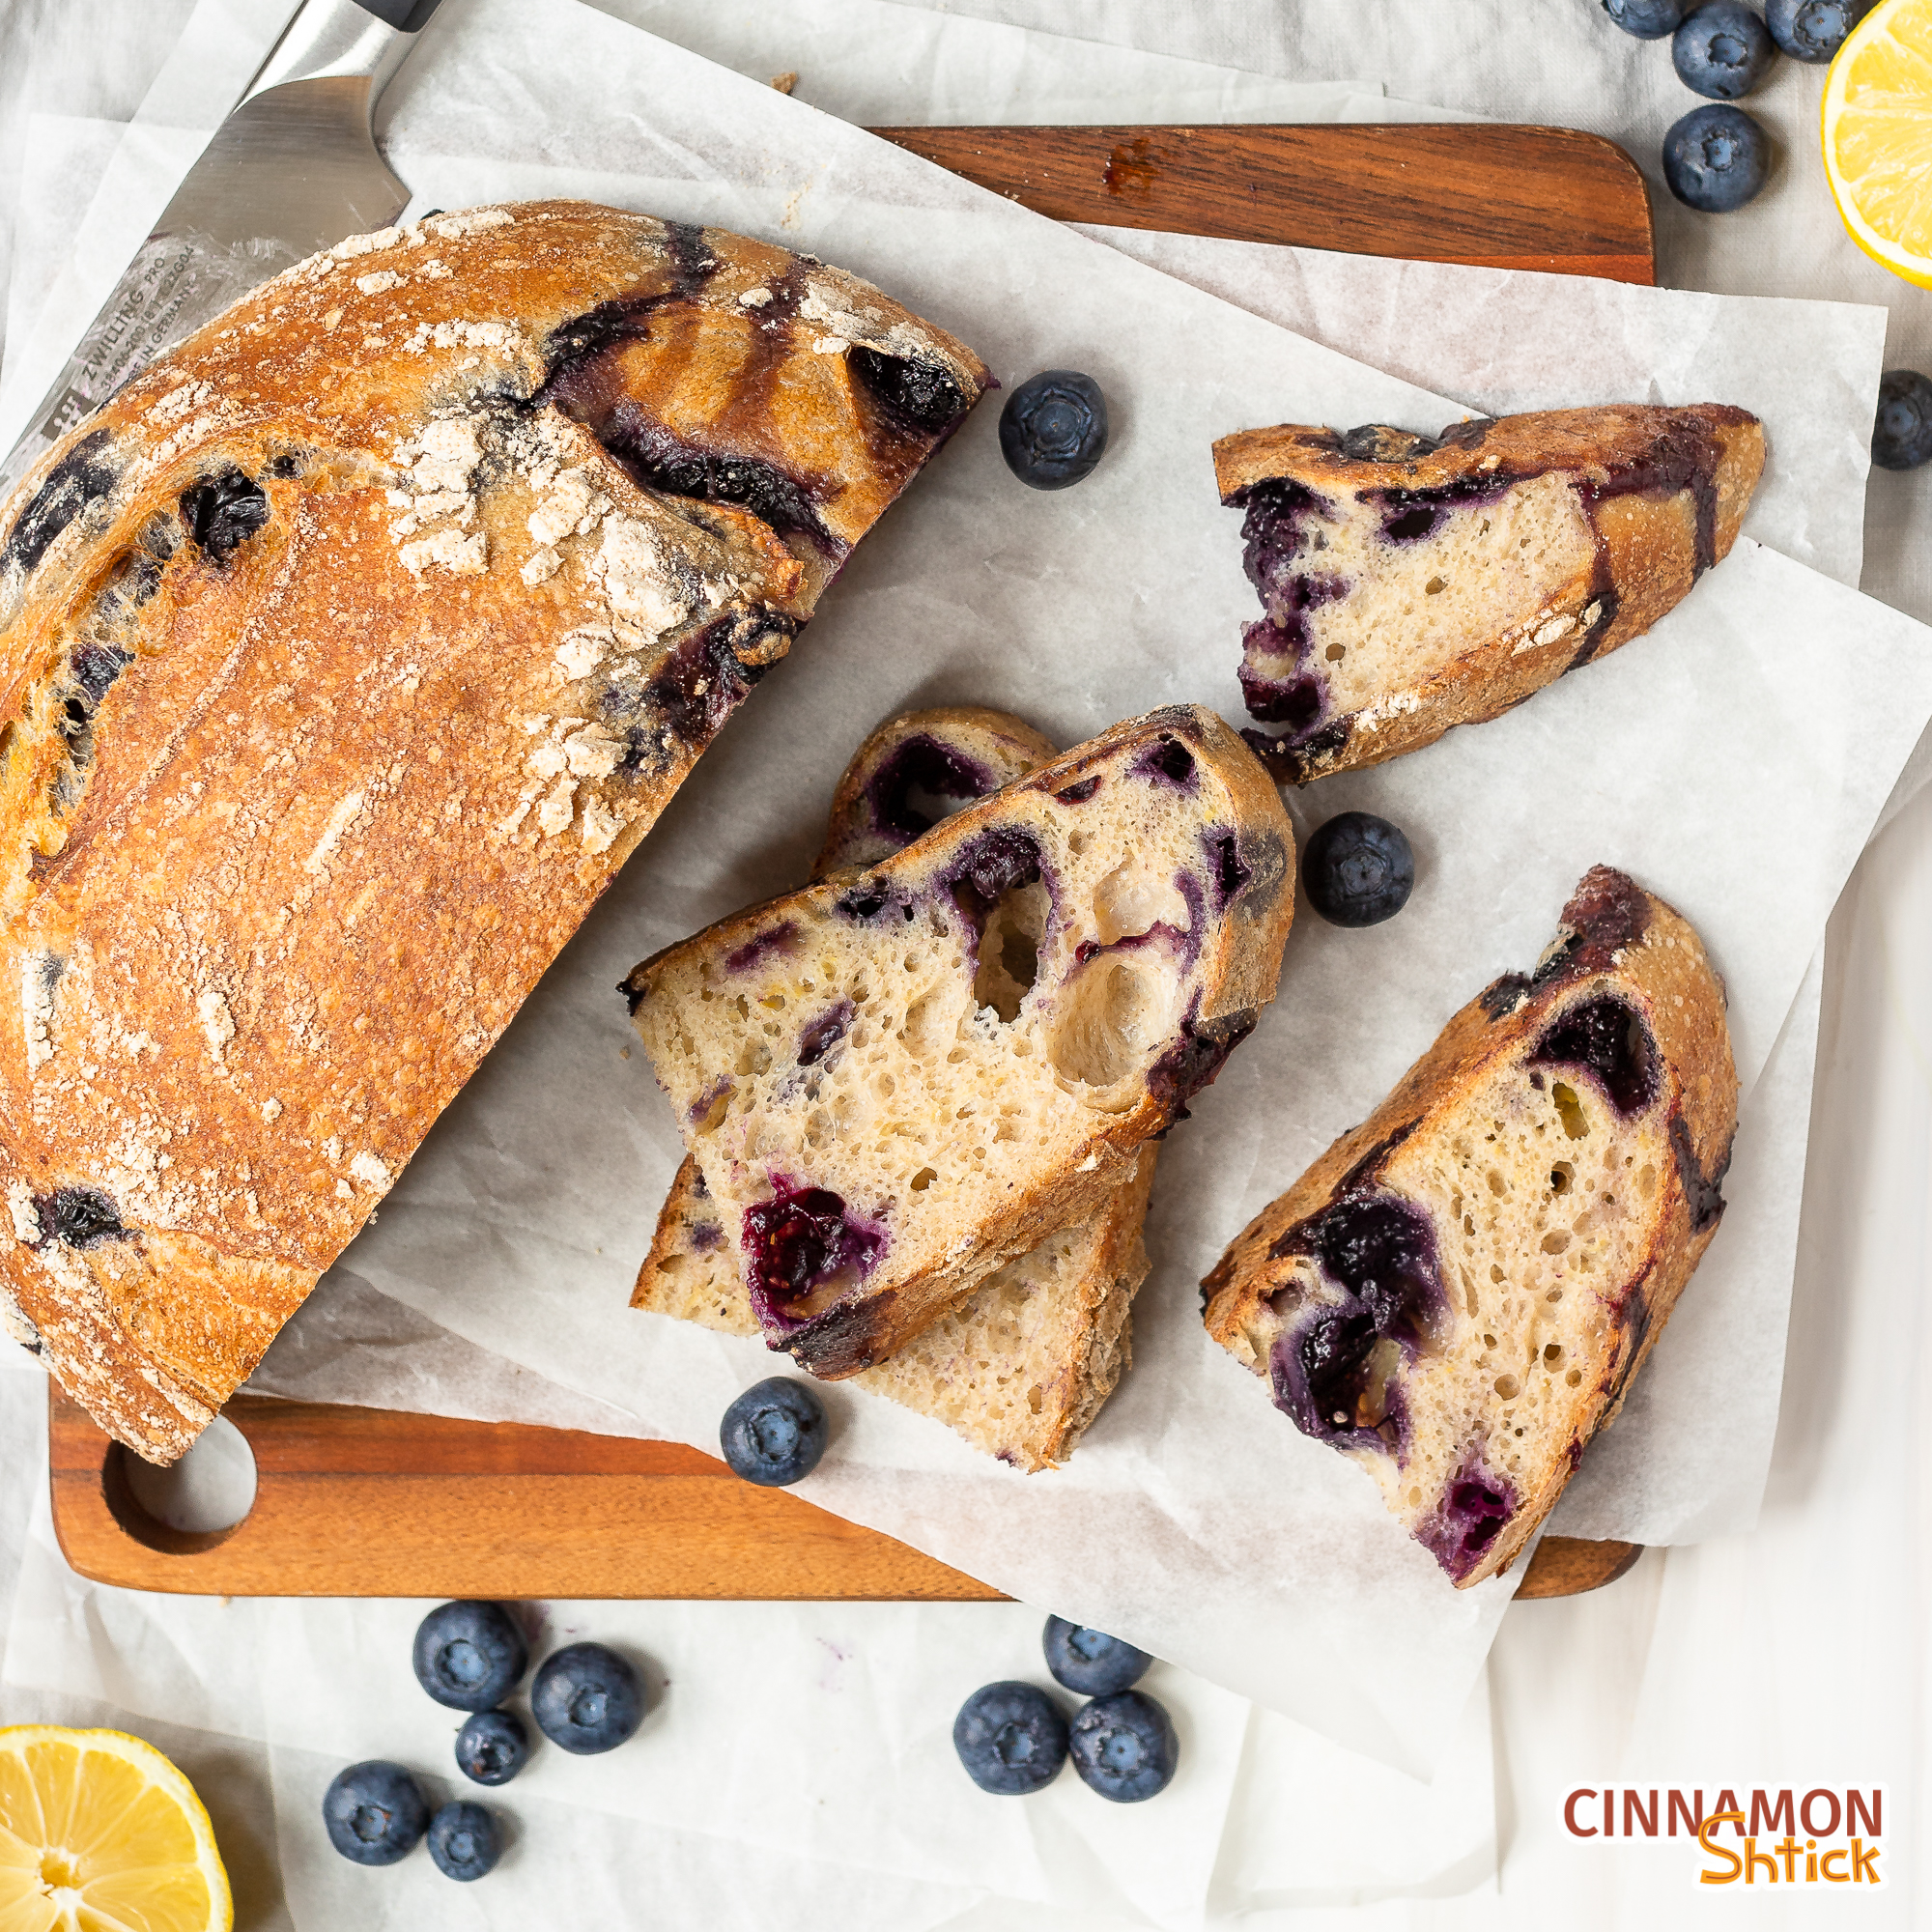
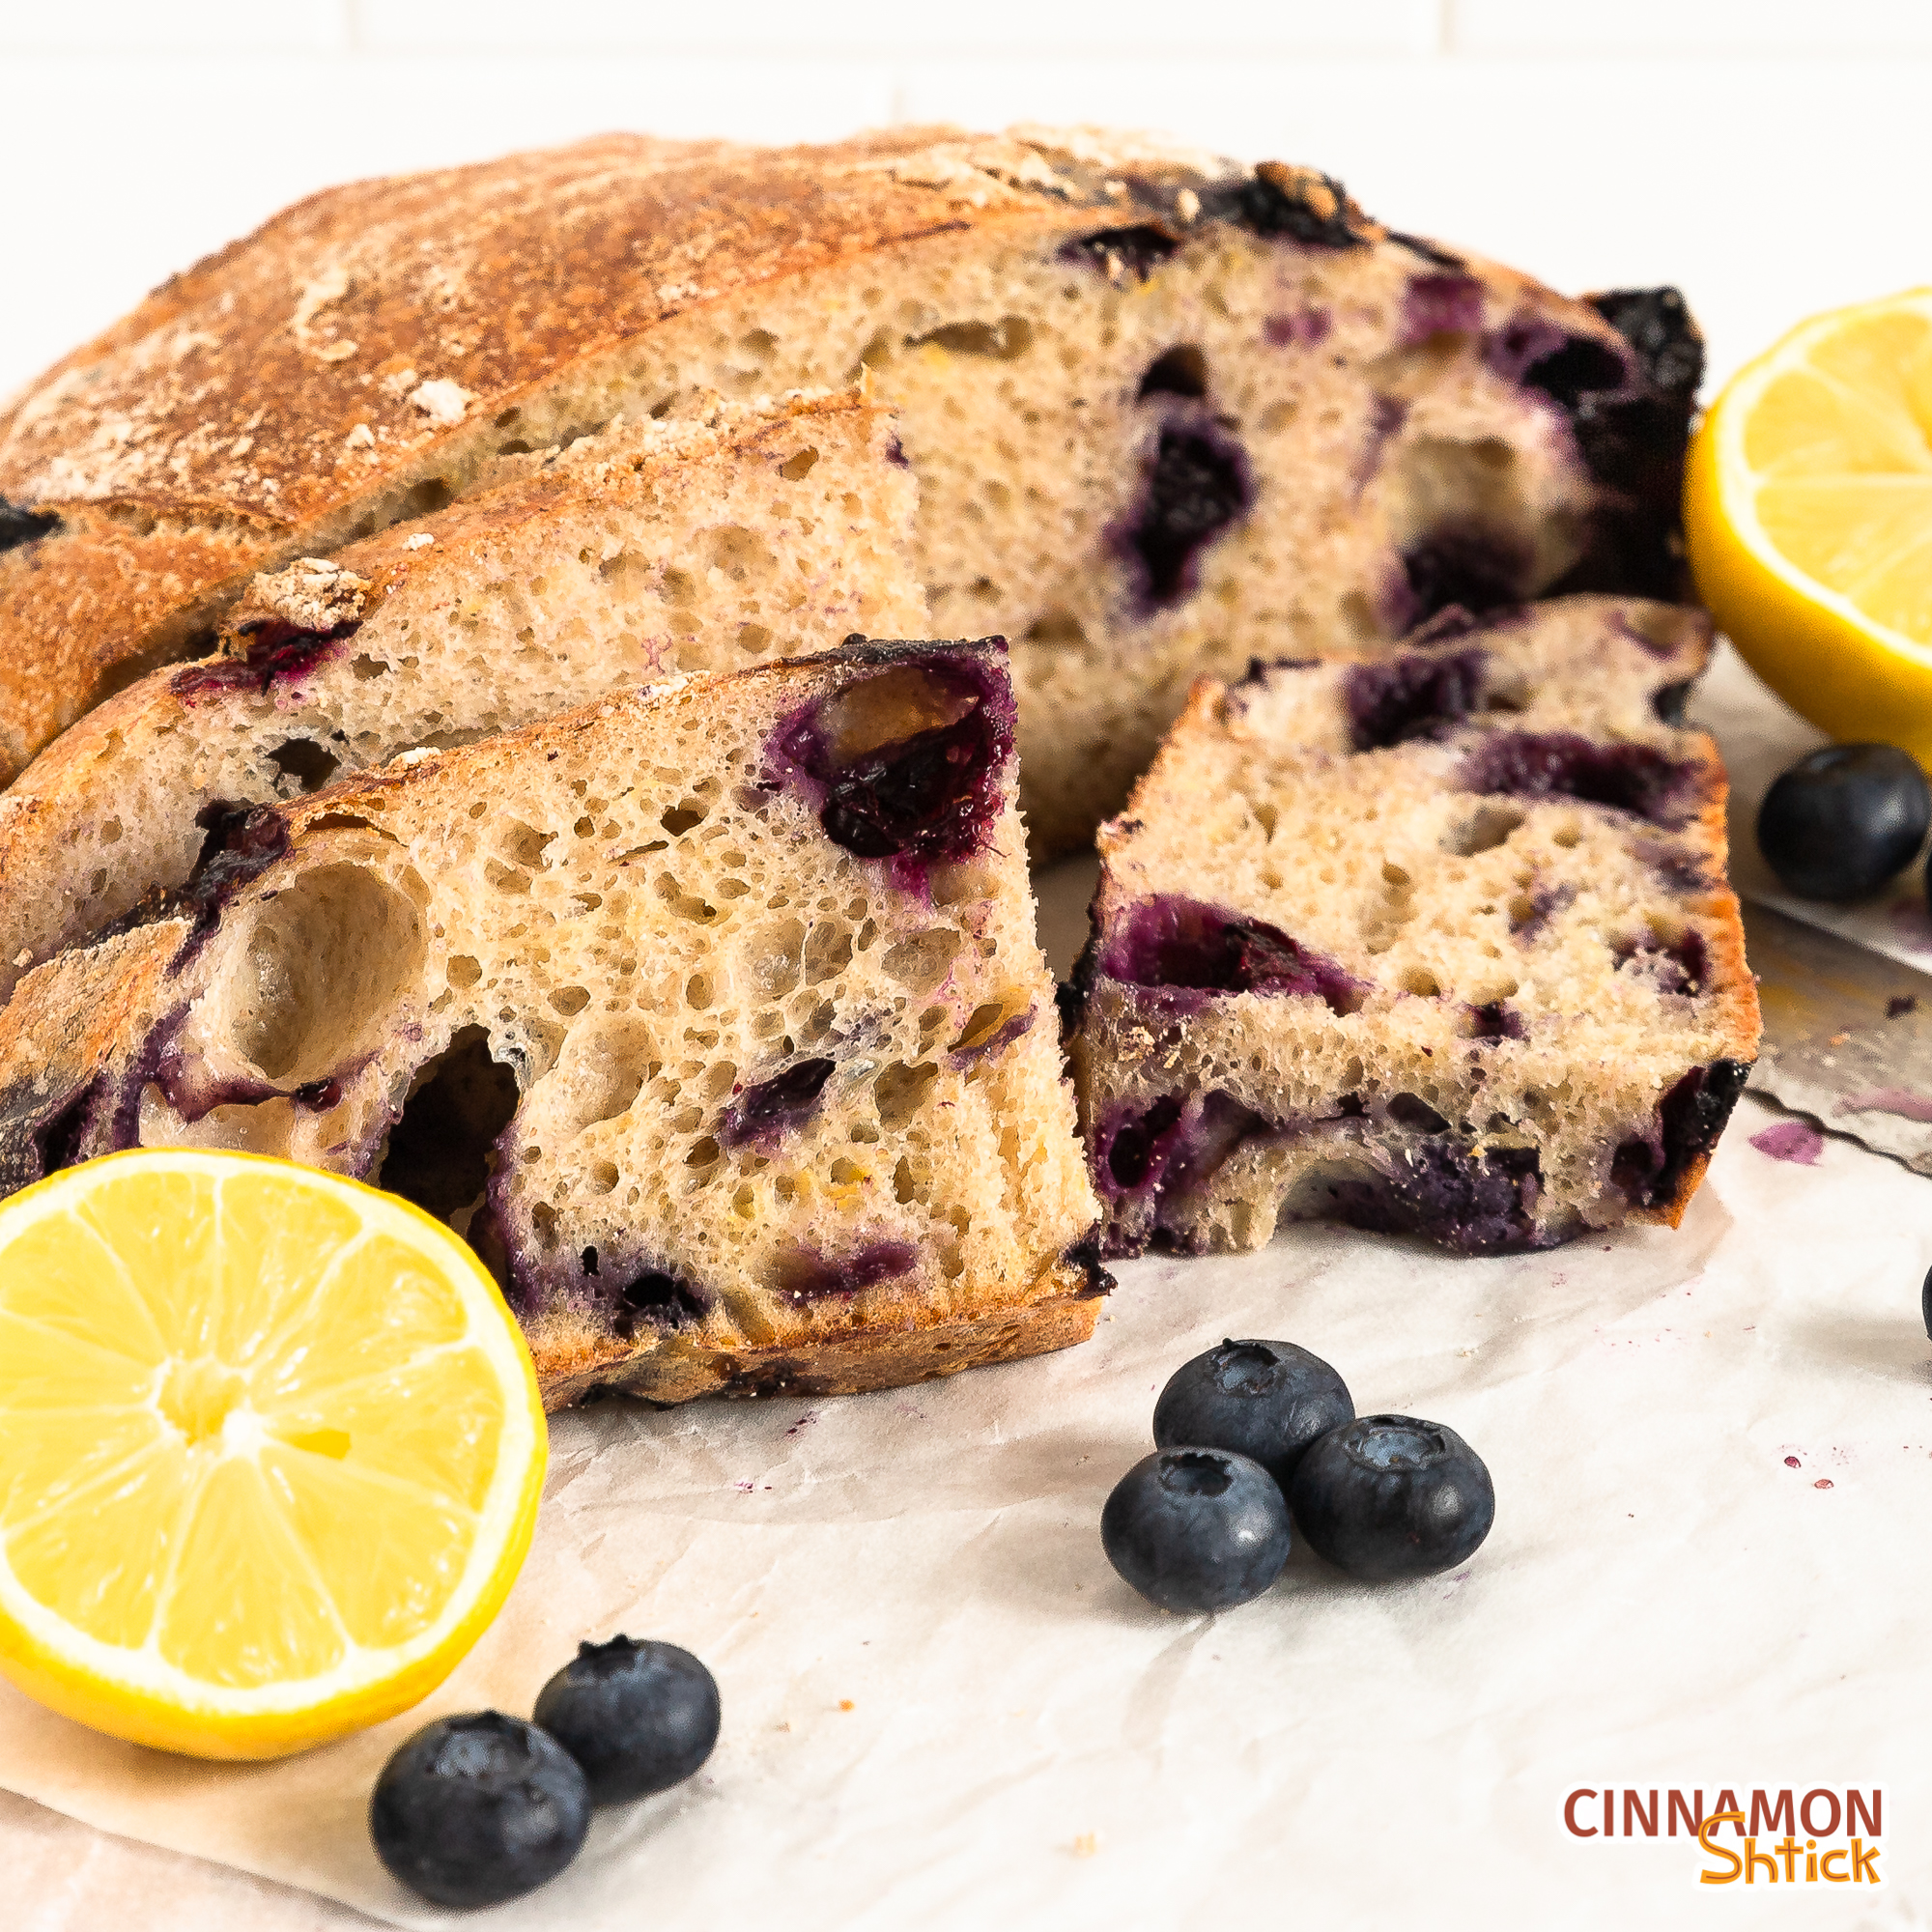
This recipe combines two of my ongoing obsessions: sourdough and blueberries. Once you’ve made a couple sourdough breads, you can play around with different types of flours, seeds and even fruits! This bread is a traditional, rustic sourdough bread, loaded with lemon zest and fresh blueberries. Lemon Blueberry Sourdough Bread is delish on its own, with a salted butter, cheese, or toasted with some jam.
Origin of Lemon Blueberry Sourdough Bread
Like many others, I got into making sourdough bread during the beginning of the pandemic last year. My starter, Hank, is thriving! If you’re new to sourdough and want to create a starter, check out my Sourdough Starter Guide where I explain how to create and maintain a starter.
Most of my sourdough breads lately are based on a recipe that my new Instagram friend, Susan, shared. She is my sourdough muse and is constantly making gorgeous breads, among other things. Follow her at @want.and.knead. I mean, how great is her IG handle!?! Brilliant.
I have played around with different bread formulas, flours and mix-ins. Because it’s high blueberry season, and I cannot stop buying fresh blueberries whenever I’m at the market, I decided to toss some into a sourdough bread to see what would happen. Magic is what happened — MAGIC! Then I thought it would nice to toss in some lemon zest. The tangy sourdough with the lemon is really wonderful. The sweet blueberries add just enough contrast. So, so good!!!
How to Make Lemon Blueberry Sourdough Bread
If you’re new to making sourdough bread, be sure to read the recipe over before beginning. Making sourdough bread is not difficult at all. And, even though it takes some time, most of that time is literally hands-off time while the dough rests and ferments.
The best piece of advice I can give anyone working with sourdough is to make sure your starter is at its active point when you go to mix the dough. My kitchen temperature is usually around 75° F, and it generally takes 5-8 hours for my starter to be at its most active after I feed it. Depending on the temperature of your starter, the temperature of the water you feed it with, and the temperature of your kitchen, it could take less or more time. Generally, 6-8 hours should be the best time frame, but, again, that is dependent on temperature variables and the strength and health of your starter.
Here’s the timeline I work with when making this Lemon Blueberry Sourdough Bread:
9:30 a.m.: Feed Starter
I usually feed my starter between 8:30 and 9:30 in the morning, and again around 9:30 at night. Make sure to feed it so that you have 80 grams of starter for the dough plus however much extra you maintain for your ongoing starter. I usually make sure to have enough starter, after using the 80 grams for this recipe so that I have 20 grams left which I just leave to rest on the counter as usual after I take the 80 grams that I need. Then I feed that remaining 20 grams with 20 grams each of flour and water at night before I go to bed to continue my starter.
2:00 p.m.: Autolyse
Autolyse simply means mixing some or all of the flour in a recipe with some or all of the liquid in the recipe. In a nutshell, autolyse starts gluten development even though the dough is not yet being kneaded. It also helps with elasticity in the dough. If your schedule only allows for a 20 minute autolyse, that should work. If your schedule requires you to autolyse when you feed your starter in the morning, that too should work. Autolysing can be very flexible. The point is to get all the flour hydrated and to let it rest for some period of time, usually at least 20 minutes. I like giving it an hour and a half, although I have also just given it 20 minutes. A couple times, just due to my schedule, I gave it 4 hours..
For this recipe, we autolyse all of the flour with most of the water. For the flour, I use part bread flour and part all-purpose flour to average out the protein content and gluten formation. You can certainly play with different ratios or try all all purpose or all bread flour. I also added some whole wheat into the mixture to add a little nuttiness to the flavor, which I love with the lemon in the bread. You could substitute more white flour for the whole wheat if you want, or even use rye instead — or with — the whole wheat flour. Spelt is also a wonderful substitute or addition to whole wheat. Play around!
To mix the flours and water, I use a Danish dough whisk, which is such an awesome bread making tool because you can use it to mix and scrape the side of the bowl. A wood spoon or your wet hands will also work. Keep a dough scraper in a bowl of water handy too. Use it to scrape down the sides of the bowl.
An Important Note about Water Temperature
A common mistake many bakers make is that they do not measure the temperature of the water before mixing it with the flour. This is often times why bakers do not obtain ideal results when baking sourdough bread. This is such an easy thing to do. Many sourdough breads ferment at an ideal temperature of 78° F. Based on an ideal temperature of 78° F, here’s the formula:
Goal temperature (78° F) multiplied by 4 = 312° F.
From 312° F, subtract the temperature of your flour (yes, stick a thermometer in your flour), then subtract the temperature of the kitchen where you will leave the dough to rest, then subtract the temperature of your starter (again, stick a thermometer in it), and then subtract 6° F (which represents heat added to the dough from the friction of kneading). The result is the temperature your water should be when you mix it with your flour.
So, for example, when I made this bread, I took 312 and subtracted from it 74 (temperature of my flour), and from that I subtracted 75 (temperature of my kitchen), and from that I subtracted 74 (temperature of my starter), and from that I subtracted 6 (standard degree of friction from kneading) and got 83. I therefore made sure that my water was 83° F when I mixed it with the flour.
3:30 p.m.: Mix the Dough
To the autolysed flour, add the starter. I recommend using either a Danish dough whisk or your hands. If using your hands, lightly wet them in water before touching the dough. Just massage the starter in by clawing your hand. Get the starter mixed in as much as you can.
Then sprinkle the salt and the rest of the water (which can be at room temperature — since it’s a small amount, I do not worry too much about its actual temperature) over the top of the dough. Use went hands again with a clawing motion to incorporate the salt and the water.
Knead the dough by lifting one side over the rest of the dough and using your fist to bring it into the mound of the dough, turning the bowl as you go. Knead the dough for a few minutes. The dough will start to come together and feel slightly elastic. Again, use a dough scraper to scrape down the sides of the bowl when you are done kneading. Cover the dough with a tea towel or plastic wrap. (I use plastic wrap and poke a few holes in the top with a toothpick just so some air can get in and circulate.)
4:30 p.m.: First Set of Folds and Add in Lemon Zest and Blueberries
Uncover the bowl. Sprinkle the top with ¼ of the blueberries and ¼ of the lemon zest. Do one fold, grabbing the dough from the underside from the top of the bowl and stretch it gently to fold it over the middle of the mound of dough. (Blueberries and zest will fall to the sides of the bowl. Just toss them back to the center.) Rotate the bowl 45 degrees clockwise, add ⅓ of the remaining blueberries and ⅓ of the remaining zest to the top of the dough, and perform the same type of stretch and fold. Again, rotate the bowl again 45 degrees clockwise and add ½ the remaining blueberries and ½ the remaining zest and do another stretch and fold. Rotate the bowl one more time, top the dough with the rest of the blueberries and zest, and do one more stretch and fold. Use your dough scraper to scrape down the sides of the bowl. Cover the bowl again (same way as after mixing the dough) and allow to sit for 30 minutes.
5:00 p.m.: Second Set of Folds
Uncover the bowl and do another set of four stretch and folds. Use your dough scraper to scrape down the sides of the bowl. Cover the bowl again and allow to sit for 30 minutes.
5:30 p.m.: Third Set of Folds
Uncover the bowl and do a final set of four stretch and folds. Use your dough scraper to scrape down the sides of the bowl. Cover the bowl again and allow to sit for 60 minutes.
6:30 p.m.: Pre-Shape Dough
Using a dough scraper, pour the dough onto a floured surface. Stretch an edge up and pull it over the middle of the dough. Work your way around the dough, pinching the ends into the center of the mound to form a round dough. Allow the dough to rest uncovered so that the exposed top portion dries out slightly.
7:00 p.m.: Shape Dough
Flour your banneton. I recommend using rice flour to flour the banneton. A trick I learned from Baking Professor and Chef Matthew James Duffy is to mix equal parts of white rice flour with rye flour and generously coat the banneton with that mixture. (He throws in a drop of bran also, which also adds nice flavor to the top crust.) Although rice flour helps avoid sticking better than wheat flours, the taste is nothing great. Adding in rye and bran gives the crust a nice flavor while working with the rice flour to avoid sticking.
Either an oval or round shape banneton works. I personally like a round (boule) for this Lemon Blueberry Sourdough Bread. Use a bench scraper to carefully flip the dough over so the sticky side is on top. Dust with flour. For a boule, shape the dough as you did for the pre-shape. Make sure you create plenty of tension on the outside of the dough. Lift the dough and flip it. Use the countertop and your cupped hands to pull the dough towards you to create tension on the outside of the dough. Carefully lift the dough and place it upside down in the prepared banneton so the seam side is up. Pinch the seams or thread the dough to create more tension. Allow the dough to rest, uncovered, for 30 minutes.
7:30 p.m.: Overnight Rest
Wrap the banneton in plastic wrap. Place in refrigerator overnight, 12-16 hours.
8;30 a.m.: Preheat Oven
Place a Dutch oven in your oven. Preheat to 500° F.
9:30 a.m.: Bake
Remove the banneton from the refrigerator and remove the plastic wrap. Cut a piece of parchment paper slightly larger than the size of the banneton. Cover the banneton with the parchment paper and place a flat cutting board (or plate) on top of the parchment paper. Holding the banneton from the bottom in one hand and the cutting board in place over the banneton, flip it over so that the banneton is turned upside down on the parchment on the cutting board. Carefully release the banneton. Remove the Dutch oven from the oven. Score the bread and quickly transfer it to the bottom of the Dutch oven by carefully sliding the parchment paper onto the Dutch oven.
Spray the top of the bread with water or place 3 ice cubes in your Dutch oven and quickly put the cover in place. Transfer the closed Dutch oven to the oven and bake for 25 minutes. Remove the Dutch oven cover, reduce the oven temperature to 450° F and bake an additional 10-15 minutes. Once out of the oven pull the bread off the parchment and transfer to wire rack to cool completely before slicing.
Other Sourdough Recipes
Be sure to check out my other sourdough and sourdough discard recipes:
- Sourdough Focaccia
- Spelt, Whole Wheat and Rye Sourdough
- Semolina Spelt Sourdough
- Lemon Poppyseed Sourdough Pullman Bread
- Vegan Cinnamon Raisin Sourdough Bread
- Fluffy Sourdough Challah
- Sourdough Discard Garlic Knots
- Sourdough Discard Sandwich Bread
- Sourdough Discard Pizza
- Sourdough Discard Pretzels
- Sourdough Discard Cinnamon Sugar Pretzels
- Sourdough Chocolate Chip Cookies
- Sourdough Blueberry Muffins
Frequently Asked Questions About Making Lemon Blueberry Sourdough Bread
What types of flours can I use?
For an all white bread, I suggest using half the total amount of flour of all purpose and the other half bread flour. In other words, 200 grams of all purpose and 200 grams of bread flour. If you prefer a chewier bread, use more bread flour than all purpose flour. If adding a whole grain flour such as whole wheat, I suggest keeping the proportions as in the recipe. For a more complex flavor, you can try 35 grams whole wheat plus 35 grams of rye. Or use 70 grams of rye instead of the whole wheat.
What size banneton should I use?
For a boule, I recommend an 8-inch round banneton. For an oval, nothing bigger than a 10 inch by 6 inch.
How do I know if I need to add an extra set of folds?
After the third (or even the second) set off folds, the dough should be stretchy and elastic, and there should be noticeable air bubbles in the dough. If you do not experience any of this by the time of the third fold, do another set of folds.
What is the best way to store the baked Lemon Blueberry Sourdough bread?
For most of my sourdoughs, I bake to serve. I usually cut the bread into quarters and slice up as needed. Many people store their bread wrapped in a tea bowl or a wax bags like Bee’s wrap. I store small amounts of leftover bread wrapped in plastic on the counter where it lasts at least several days. I revive it by either toasting slices or placing the bread, wrapped in aluminum foil, in a 400° F oven for about 10 minutes. I then open up the foil to let the crust crisp up again for about 5 minutes. If I have extra quarters of bread, I wrap them individually in plastic wrap and pop them in the freezer where they last at least a couple of months, although I usually pull them out for eating within a month. I wrap the frozen bread in aluminum foil and place in the oven at 400° F for about 15 minutes, then unwrap the top to let the crust crisp up for about 5 minutes.
Why are the ingredients listed only by weight?
I bake all my recipes only by weight and provide cup measurements solely as a convenience. I firmly believe that all bakers should be weighing ingredients because it is more precise and will render the desired outcome. Every person who measures a cup of flour will end up with a different amount of flour. Cup measuring is simply imprecise. Exact amounts are particularly important for bread making, and even more so for sourdough bread making. If you are making sourdough bread by measuring your ingredients, please stop! Get a scale and weigh your ingredients!
Lemon Blueberry Sourdough Bread
Ingredients
- 230 grams all purpose flour
- 100 grams bread flour
- 70 grams whole wheat flour
- 80 grams ripe starter
- 320 grams water* (divided)
- 10 grams fine sea salt
- Zest of 2 large lemons
- 1 cup fresh blueberries (rinsed, drained well, and patted dry with paper towels)
Instructions
- In a large bowl, combine the flours and 310 grams water. (Water should be room temperature.) Mix just until the water is absorbed by the flour. Cover with plastic wrap and allow to rest for 20 minutes up to 6 hours. (I recommend 90 minutes.)
- Add the starter and mix in using a Danish dough whisk or your wet hands. Sprinkle the salt over the top and drizzle the remaining 10 grams water over the top. Dimple the salt and water in with your hands, using a clawing motion, until fully combined. Knead the dough in the bowl, folding the dough and using your fist to punch it into the rest of the dough, constantly rotating the bowl, until the dough is not very sticky and uniform. It will be sticky, so keep your hands lightly wet while kneading.
- Bulk ferment for 3-3½ hours, during which time do three sets of four folds after the 60, 90 and 120 minute marks. For the first fold, sprinkle ¼ of the lemon zest and blueberries just before each fold. (If the dough feels week, do another set of folds and rest for 30 more minutes.)
- On a lightly floured surface, pre-shape the dough and allow it to rest, uncovered, for 30 minutes.
- Shape into desired shape and place shaped dough into banneton lightly dusted with rice flour. Make sure to create tension on the outside of the dough before placing it into the banneton. Allow the dough to rest uncovered for 20 minutes.
- Wrap the banneton in plastic wrap and refrigerate it overnight for 12-18 hours.
- In the morning, place a Dutch oven in the oven and preheat it 500° F.
- Just before you plan to bake the bread, take the banneton out of the refrigerator and remove the plastic wrap. Place a piece of parchment paper over the banneton, and place a cutting board on top of the parchment paper. Flip it over and lift up the banneton. (If the bread is sticking to the banneton, gently try to release it.)
- Score the bread as desired. Remove the Dutch oven from the oven, uncover it, and carefully slide the parchment into the hot Dutch oven. Spray water all over the bread or add 3 ice cubes and immediately cover the Dutch oven. Bake 25 minutes. Remove Dutch oven lid and reduce temperature to 450° F. Bake an additional 10-15 minutes. Allow the bread to cool to room temperature before slicing.
Notes
- For best results, make sure you plan to mix the dough when your starter is at its most active, usually 5-8 hours after feeding it, depending on temperature of your room, starter and water.
- Serve the bread with a nice salted butter, cheese or jam. It's wonderful any time of day, but is truly lovely for breakfast or brunch.
7 Comments
I havent tried adding fruits on my sourdough bread, glad to see your recipe to try this.
I’ve never made my own sourdough bread. It came out yummy. My family enjoyed it.
This is such a great twist on sourdough! I just love the way the sweet blueberries and tart lemon complemented the tangy sourdough.
love adding blueberries to sourdough…
YUM! This looks really tasty.
I’m currently a few minutes from my last S&F, and haven’t noticed any discernible rise in the dough. I’m curious what rise was expected at the end of BF and after the 30 min rest, since there is no proofing afterwards, rather the next step goes straight to Pre-shape, etc…The dough felt progressively silky and smooth during S&F’s; will do a 4th for added strength. Thank you!
It will not rise very much. It’s more about how the dough looks — slightly bubbly, diming in the bowl. With inclusions, especially ones that add water like blueberries, the dough will not rise significantly.