

This post may contain affiliate links. As an Amazon Associate, I earn from qualifying purchases. For more information, please visit my Privacy Policy.
Learning how to make challah is not difficult, but there are definitely some great tips and tricks a baker can pick up over time. I have gotten so many great questions about how to make challah: Why is my challah dense? Why didn’t my challah rise? What kind of yeast should I use when making challah? How do I know when the dough is kneaded? How do I know when the dough is ready to bake?
While the tips in this post are focussed on challah, they can and should be applied to most bread recipes that use commercial yeast. If you make any of my challah or babka recipes, I highly urge you to familiarize yourself with all of these tips.
Why it is important to follow the “bread rules”
All the tips included here are generally applied when making most types of breads with commercial yeast. Once you master these tips, you should be able to tackle virtually any bread recipe.
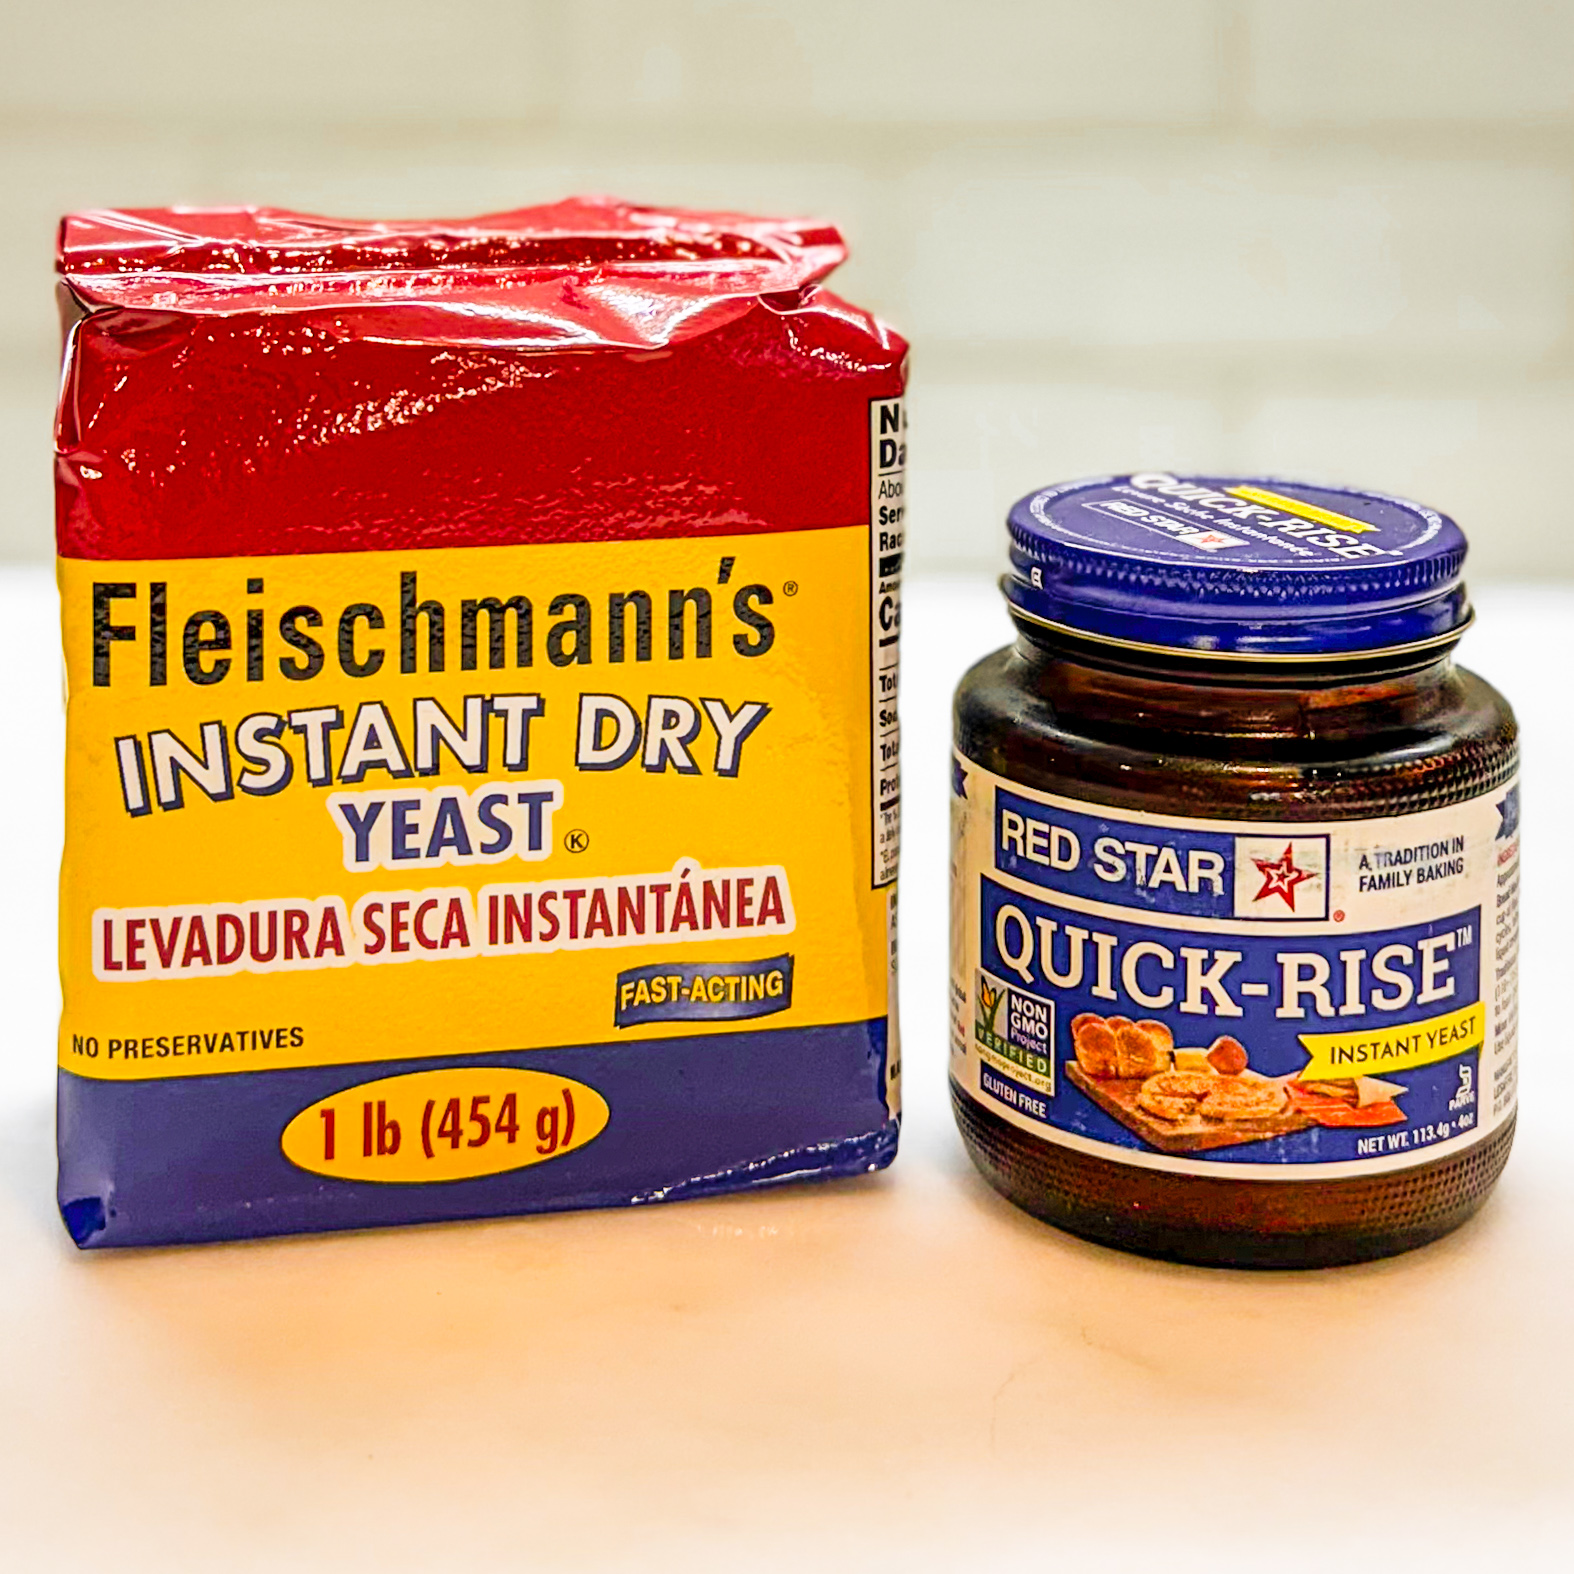
Tip #1: Active dry yeast vs. instant yeast vs. fresh yeast
Some bakers do not bake bread often, so they tuck their yeast away for some period of time which could render unfresh yeast. Likewise, sometimes when we buy yeast and use it before the expiration date, it could actually be dead. It is therefore a good idea to test your yeast to make sure it is alive. This is something you should absolutely do when using active dry yeast. You can usually skip this when using instant, rapid rise yeast or fresh yeast.
Let’s break down the three major types of commercial yeast:
- Active dry yeast. This is the variety that is most common to home bakers. Active dry yeast consists of granules that are each covered in a wax coating. In order to melt away the wax and activate active dry yeast, it is important to mix with warm water, generally 90° F to 115° F. I say “generally” because every brand is different, so be sure to read the instructions on the package or the brand’s website. When using active dry yeast, beware that up to approximately 25% of each package may contain dead yeast. That means that not all the yeast will be active. Because active dry yeast may contain some dead granules, it can take a little longer (maybe 15-30 minutes) for dough to rise as opposed to using instant or quick rise yeast.
- Instant yeast or quick rise yeast. These two terms are interchangeable, and various brands use one term or the other. Instant or quick rise yeast look similar to active dry yeast in that they are granules, although instant or quick rise is usually finer than active dry. The difference is that, unlike active dry yeast, these granules are not coated in wax. Another key difference is that 100% of instant or quick rise yeast is alive. It is generally not necessary to test instant or quick rise yeast, although it is not a bad idea to do so.
- Fresh yeast. It is less common to find fresh yeast in grocery stores these days, but most Whole Foods carry it. Many bakeries will also sell you a small piece of fresh yeast for home baking. Fresh yeast is wonderful to work with. There is no need to do anything with it before using it, and the temperature of the ingredients does not matter when using it. The downside to fresh yeast is that it has a very short shelf life. Most recipes are not written for fresh yeast because it is not generally accessible.
How to store yeast
Even if you purchase packets or a jar of yeast from room temperature in the supermarket, it is a wise idea to store yeast in the refrigerator. If you purchase a jar of yeast, definitely store the opened jar in the refrigerator. People also store yeast in the freezer, which extends the shelf life longer than storing in the refrigerator.
These days I tend to use instant yeast in all my baking. I vary between Red Star quick rise and Fleischmann’s instant. Many people claim that Red Star is superior, but I have been getting better results with Fleischmann’s. Oh, and I often find a 2 pound package of Fleischmann’s instant yeast from places like Costco and BJs for less than $6 — a true bargain! I usually gift one pound of it away and store the other pound in a closed container in the refrigerator.
Tip #2: Weigh Your Ingredients
One of my first posts on this blog was Weighing vs. Measuring, which explains why it is so much better, easier and beneficial to weigh ingredients rather than measure them with cups. I will not repeat here what I said there, but I will remind you that weighing ingredients is the absolute best way to consistently achieve the desired result in any baked good — especially breads.
Tip #3: Measure Flour Correctly
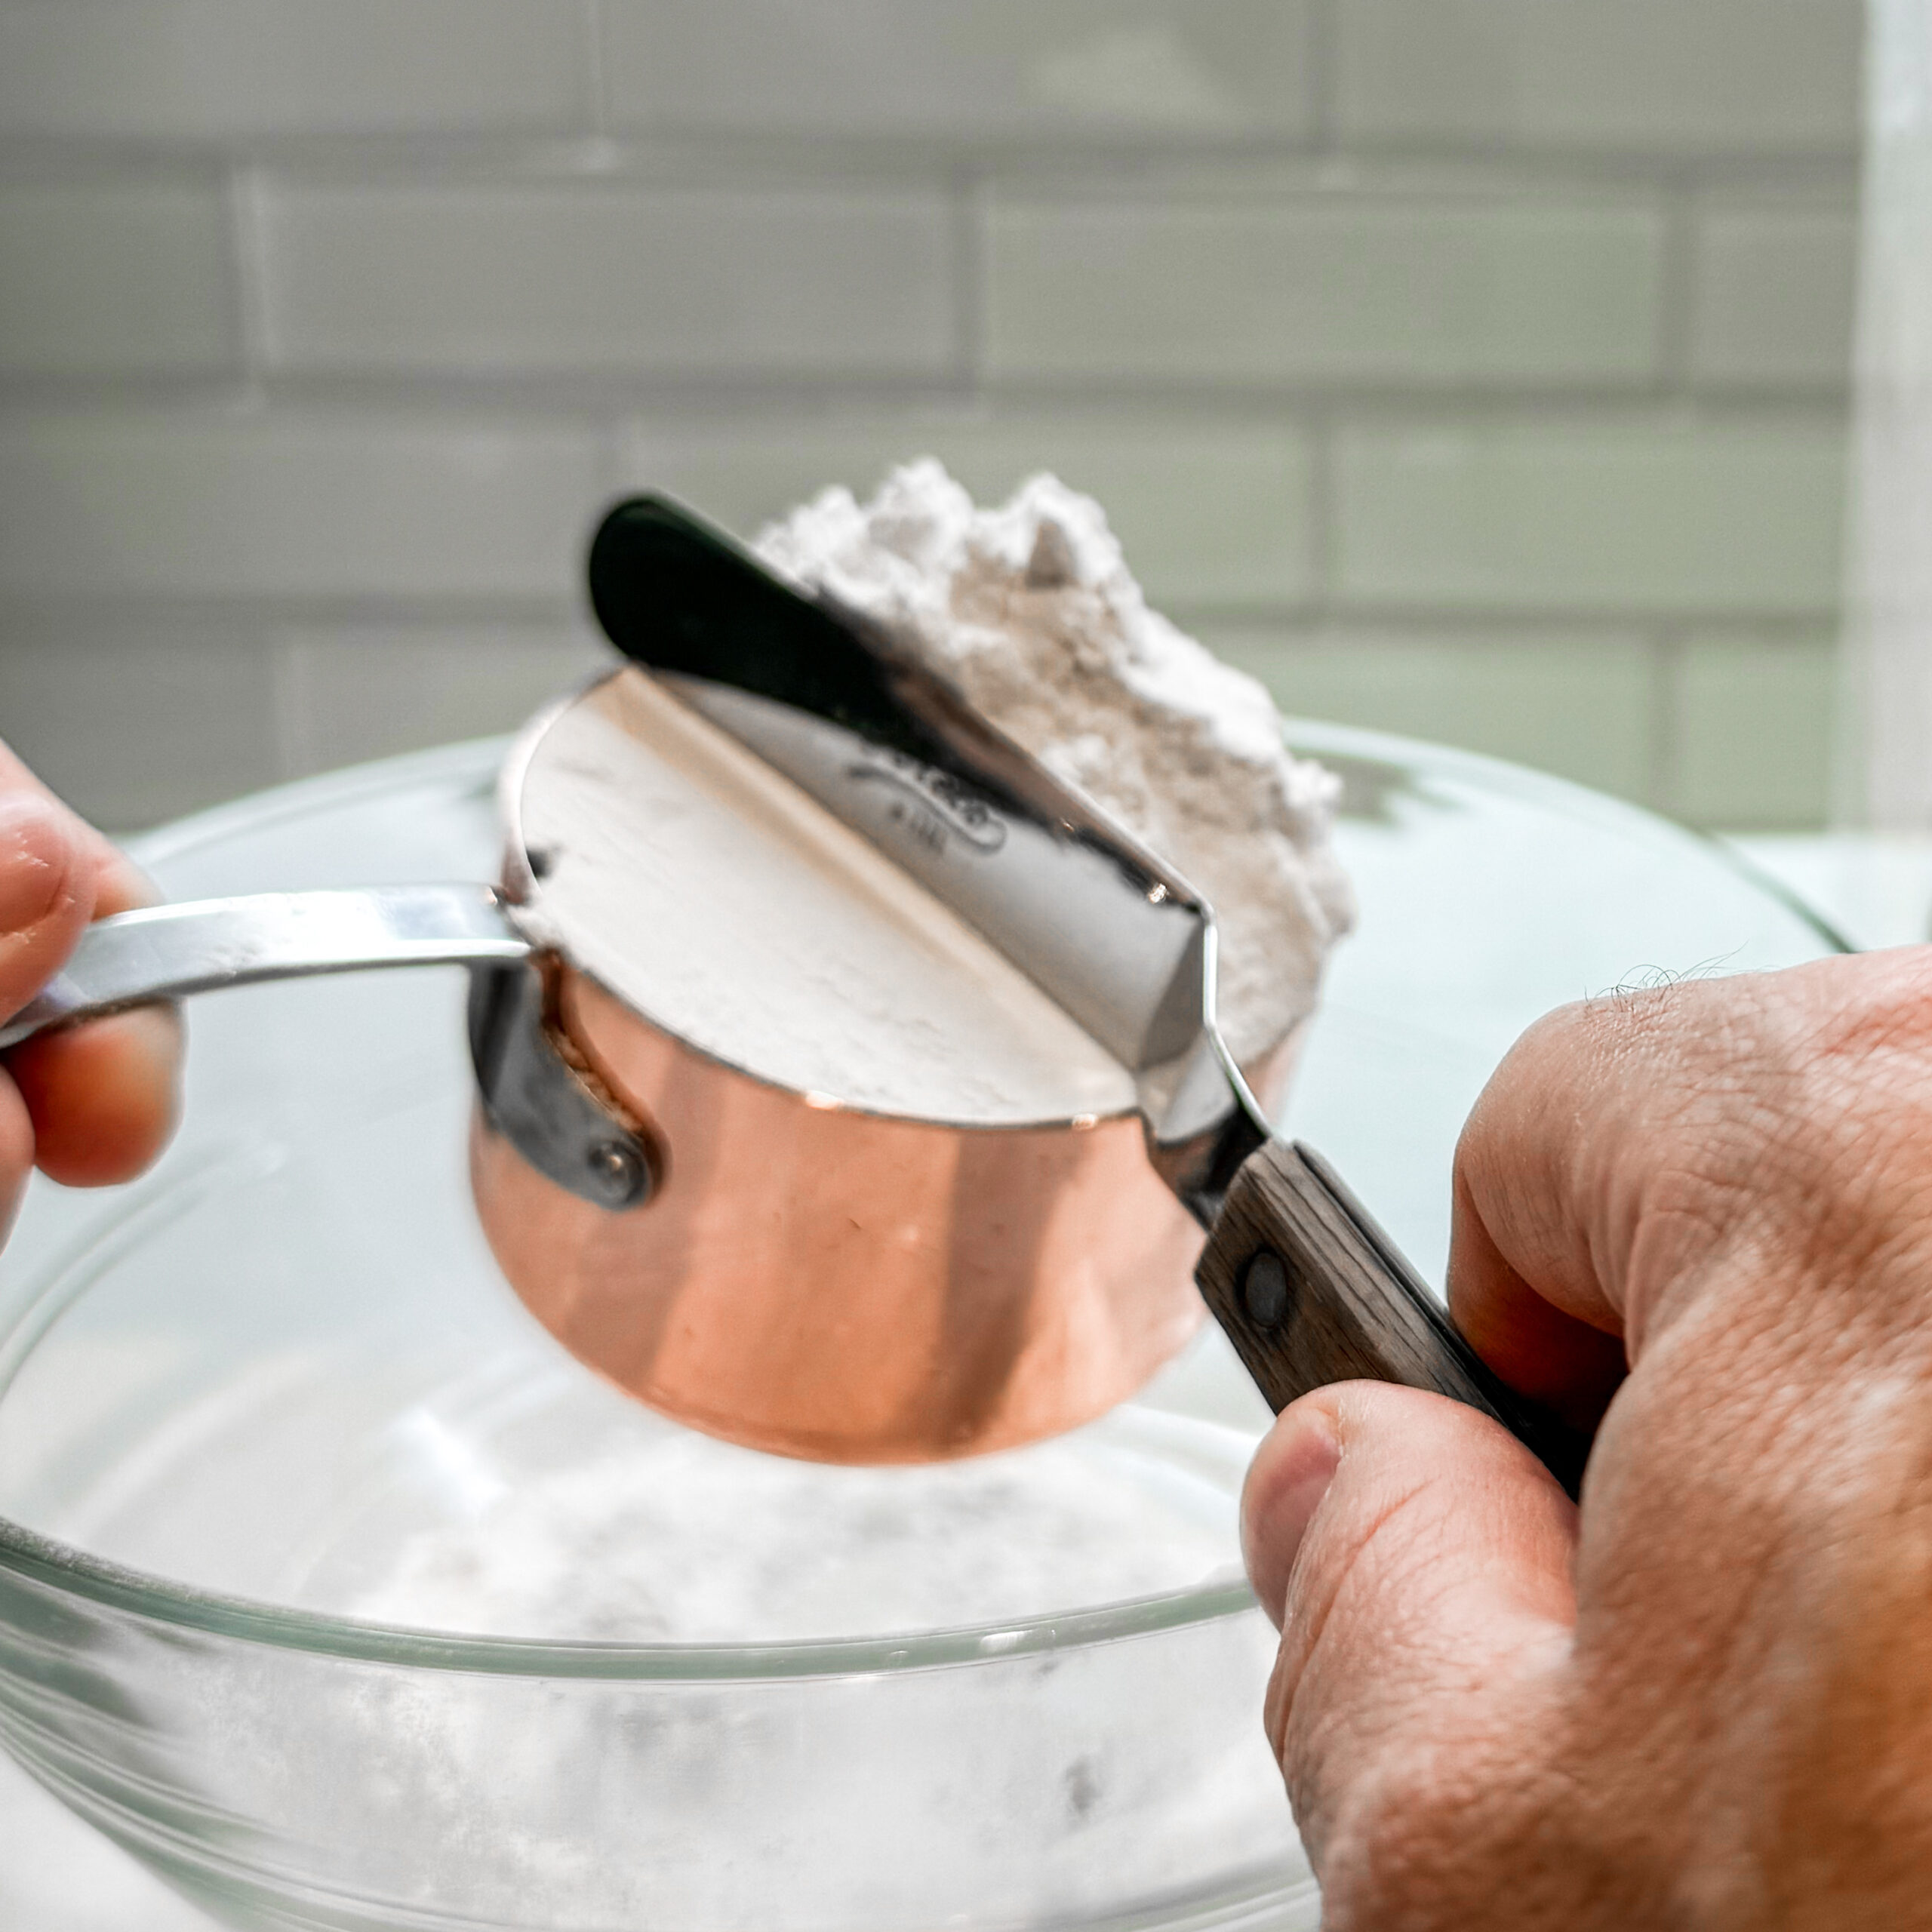
This is not a tip I should include because you all should be weighing your flour. However, because I know many of you will (foolishly) ignore my sage advice to weigh your flour, do yourself a favor and at least learn how to measure flour properly with a measuring cup. I constantly see people complaining that their challah was dry or too dense. More likely than not, that is because they put too much flour in the recipe. When I ask how they measured their flour, they tell me that they scooped it out with the measuring cup and/or packed it into the cup. Do not do these things! Seriously!

If you are going to use measuring cups (don’t!), lightly spoon the flour into the measuring cup, and then use something with a straight edge like a metal spatula or the back of a knife to level it off. That is a properly measured cup of flour.
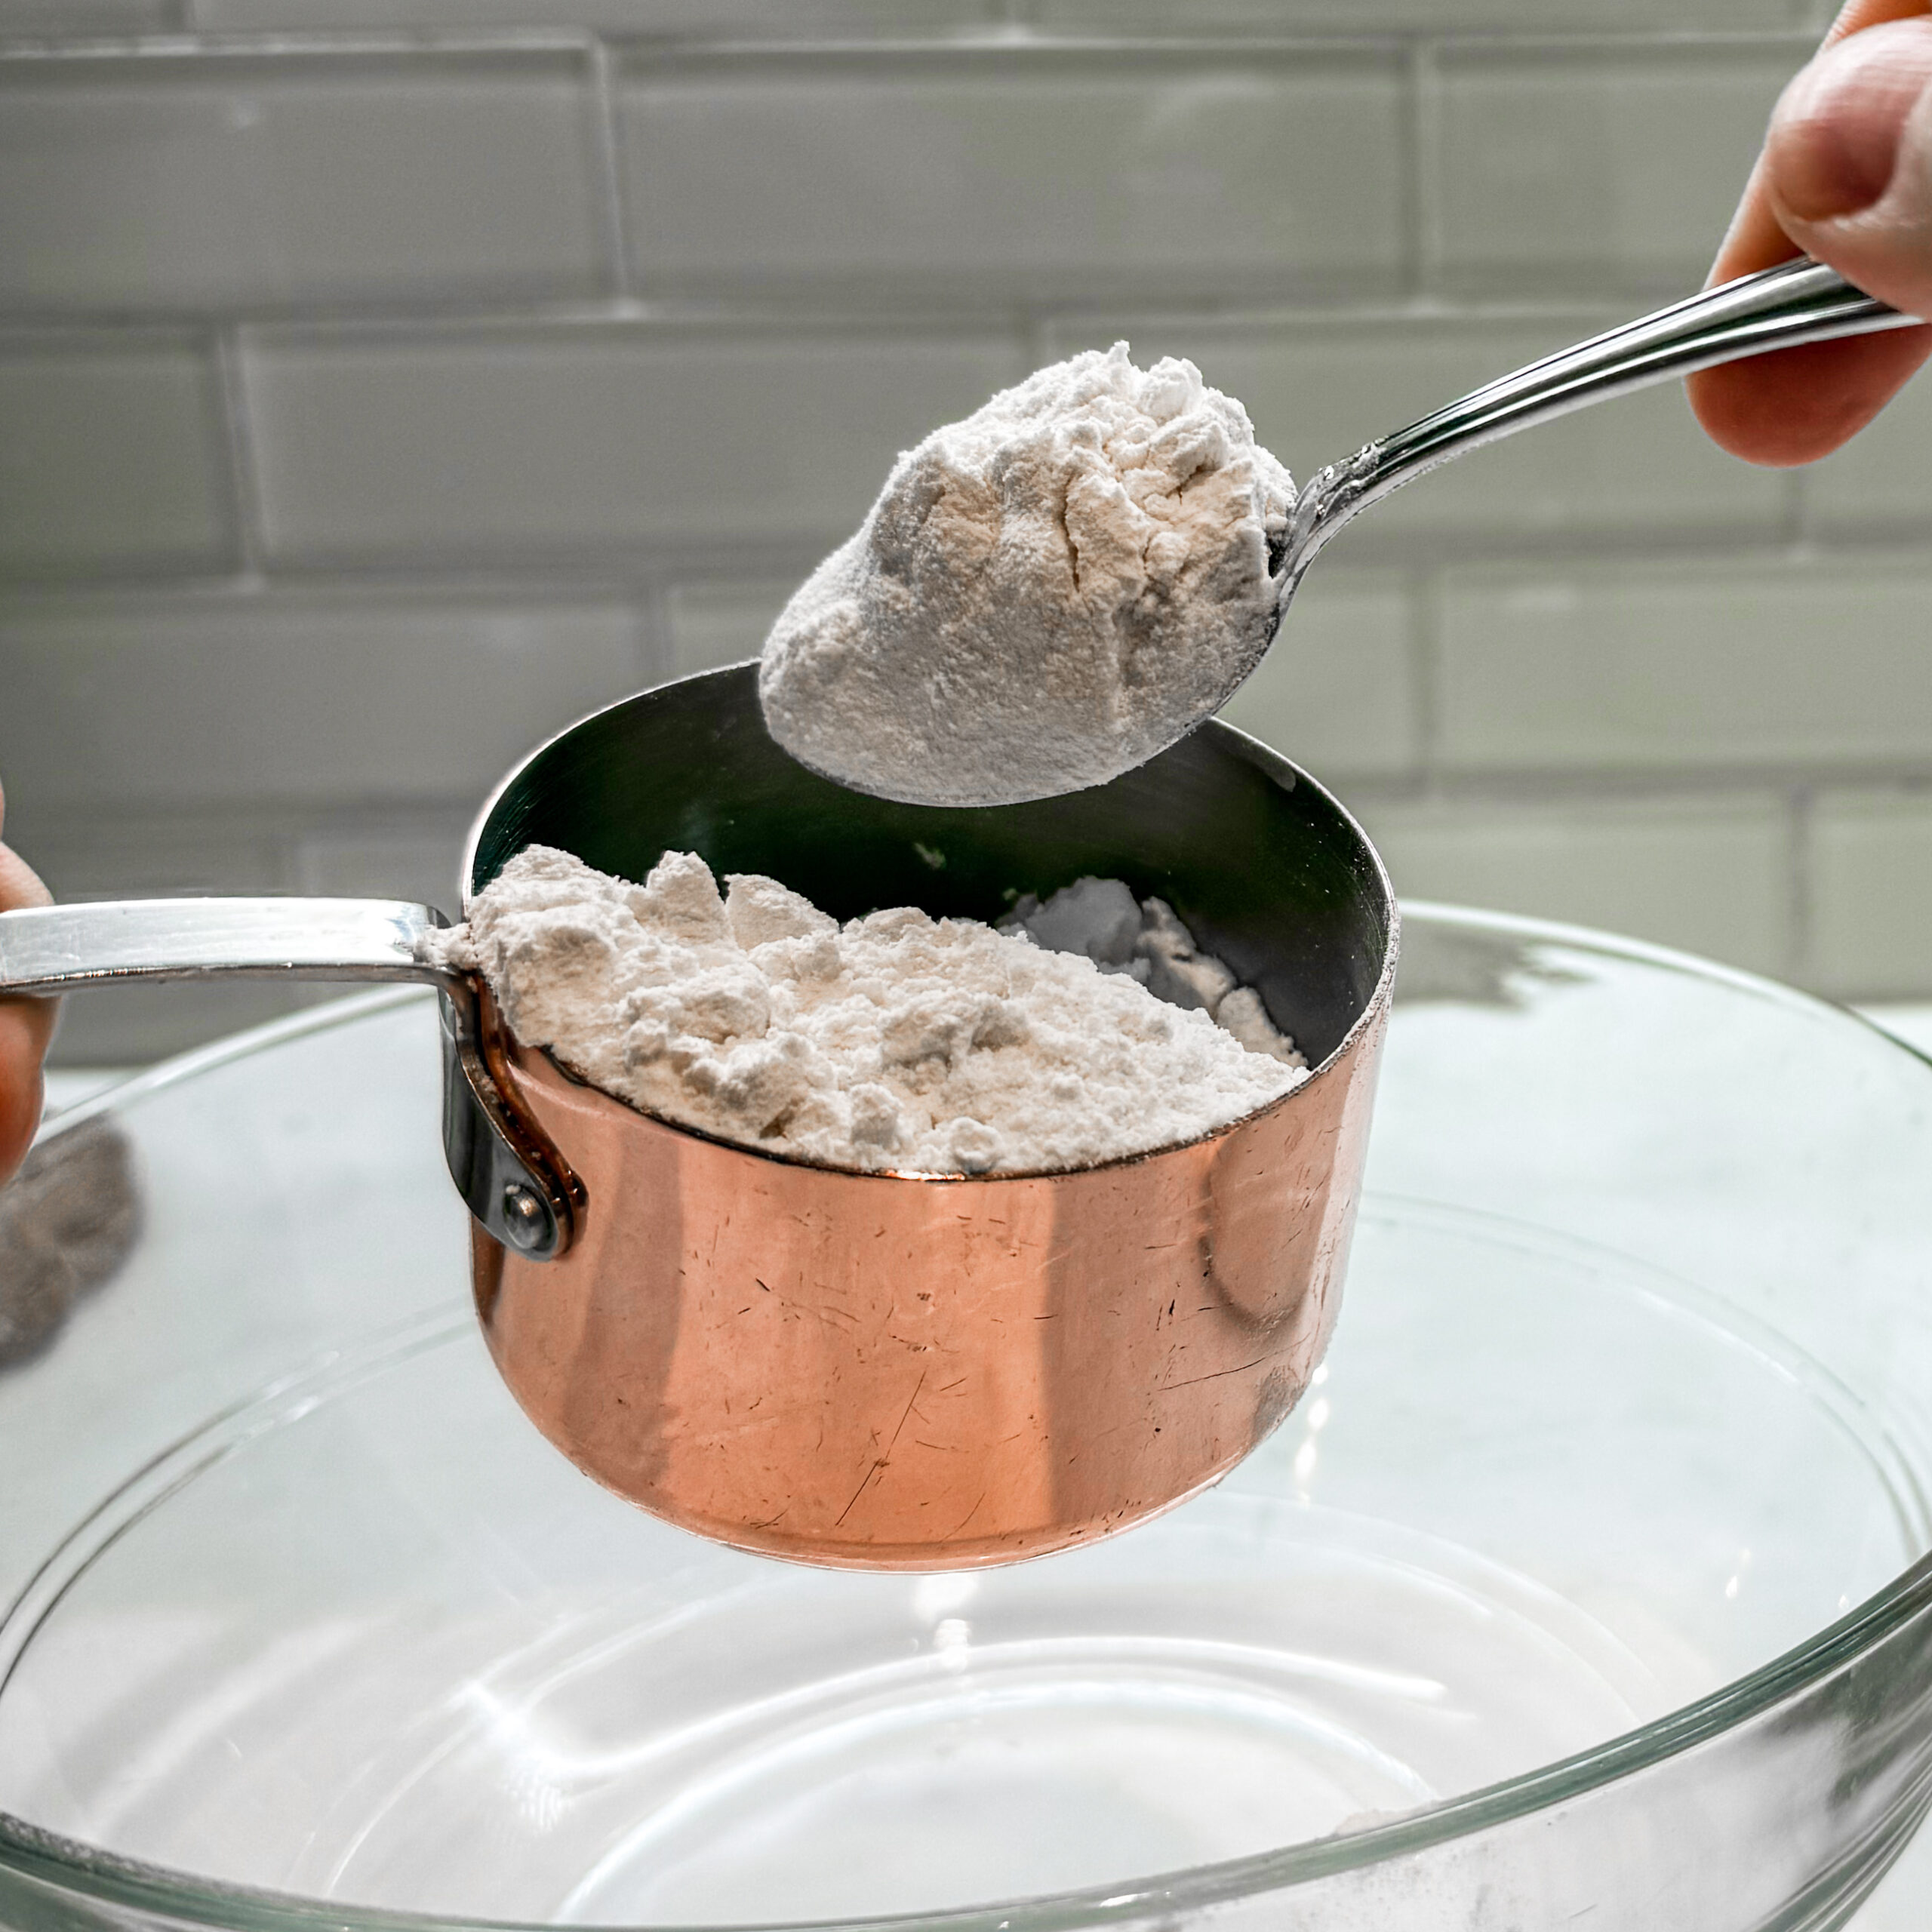
If you want to test this out, scoop a cup of flour using your measuring cup and weigh it. Now lightly spoon a measuring cup with flour, level it, and weigh it. You will see a noticeable difference in the weight. That excess weight means you have more flour in the scooped cup. That extra flour is drying out your dough and making it dense.
Tip #4: Pay Attention to Hydration
The hydration of the dough (meaning the percentage of liquid to flour in the recipe) is incredibly important in any bread recipe. The biggest factor usually ignored is that humidity affects hydration of your dough. If you are in a particularly humid climate (even if indoors with your air conditioning blasting), you may need to use a drop less water than the recipe calls for. Likewise, if you are in a very dry climate, you may need to add a drop more water — usually not more than one teaspoon or so. The best way to judge the hydration is by getting to know your dough. Challah dough, in particular, once fully kneaded, should be just slightly tacky — not sticky. Personally, I err on the side of it being too tacky or even sticky to avoid a dry loaf. See Tip #8 for how I deal with sticky dough when braiding.
Tip #5: Knead the Dough Thoroughly
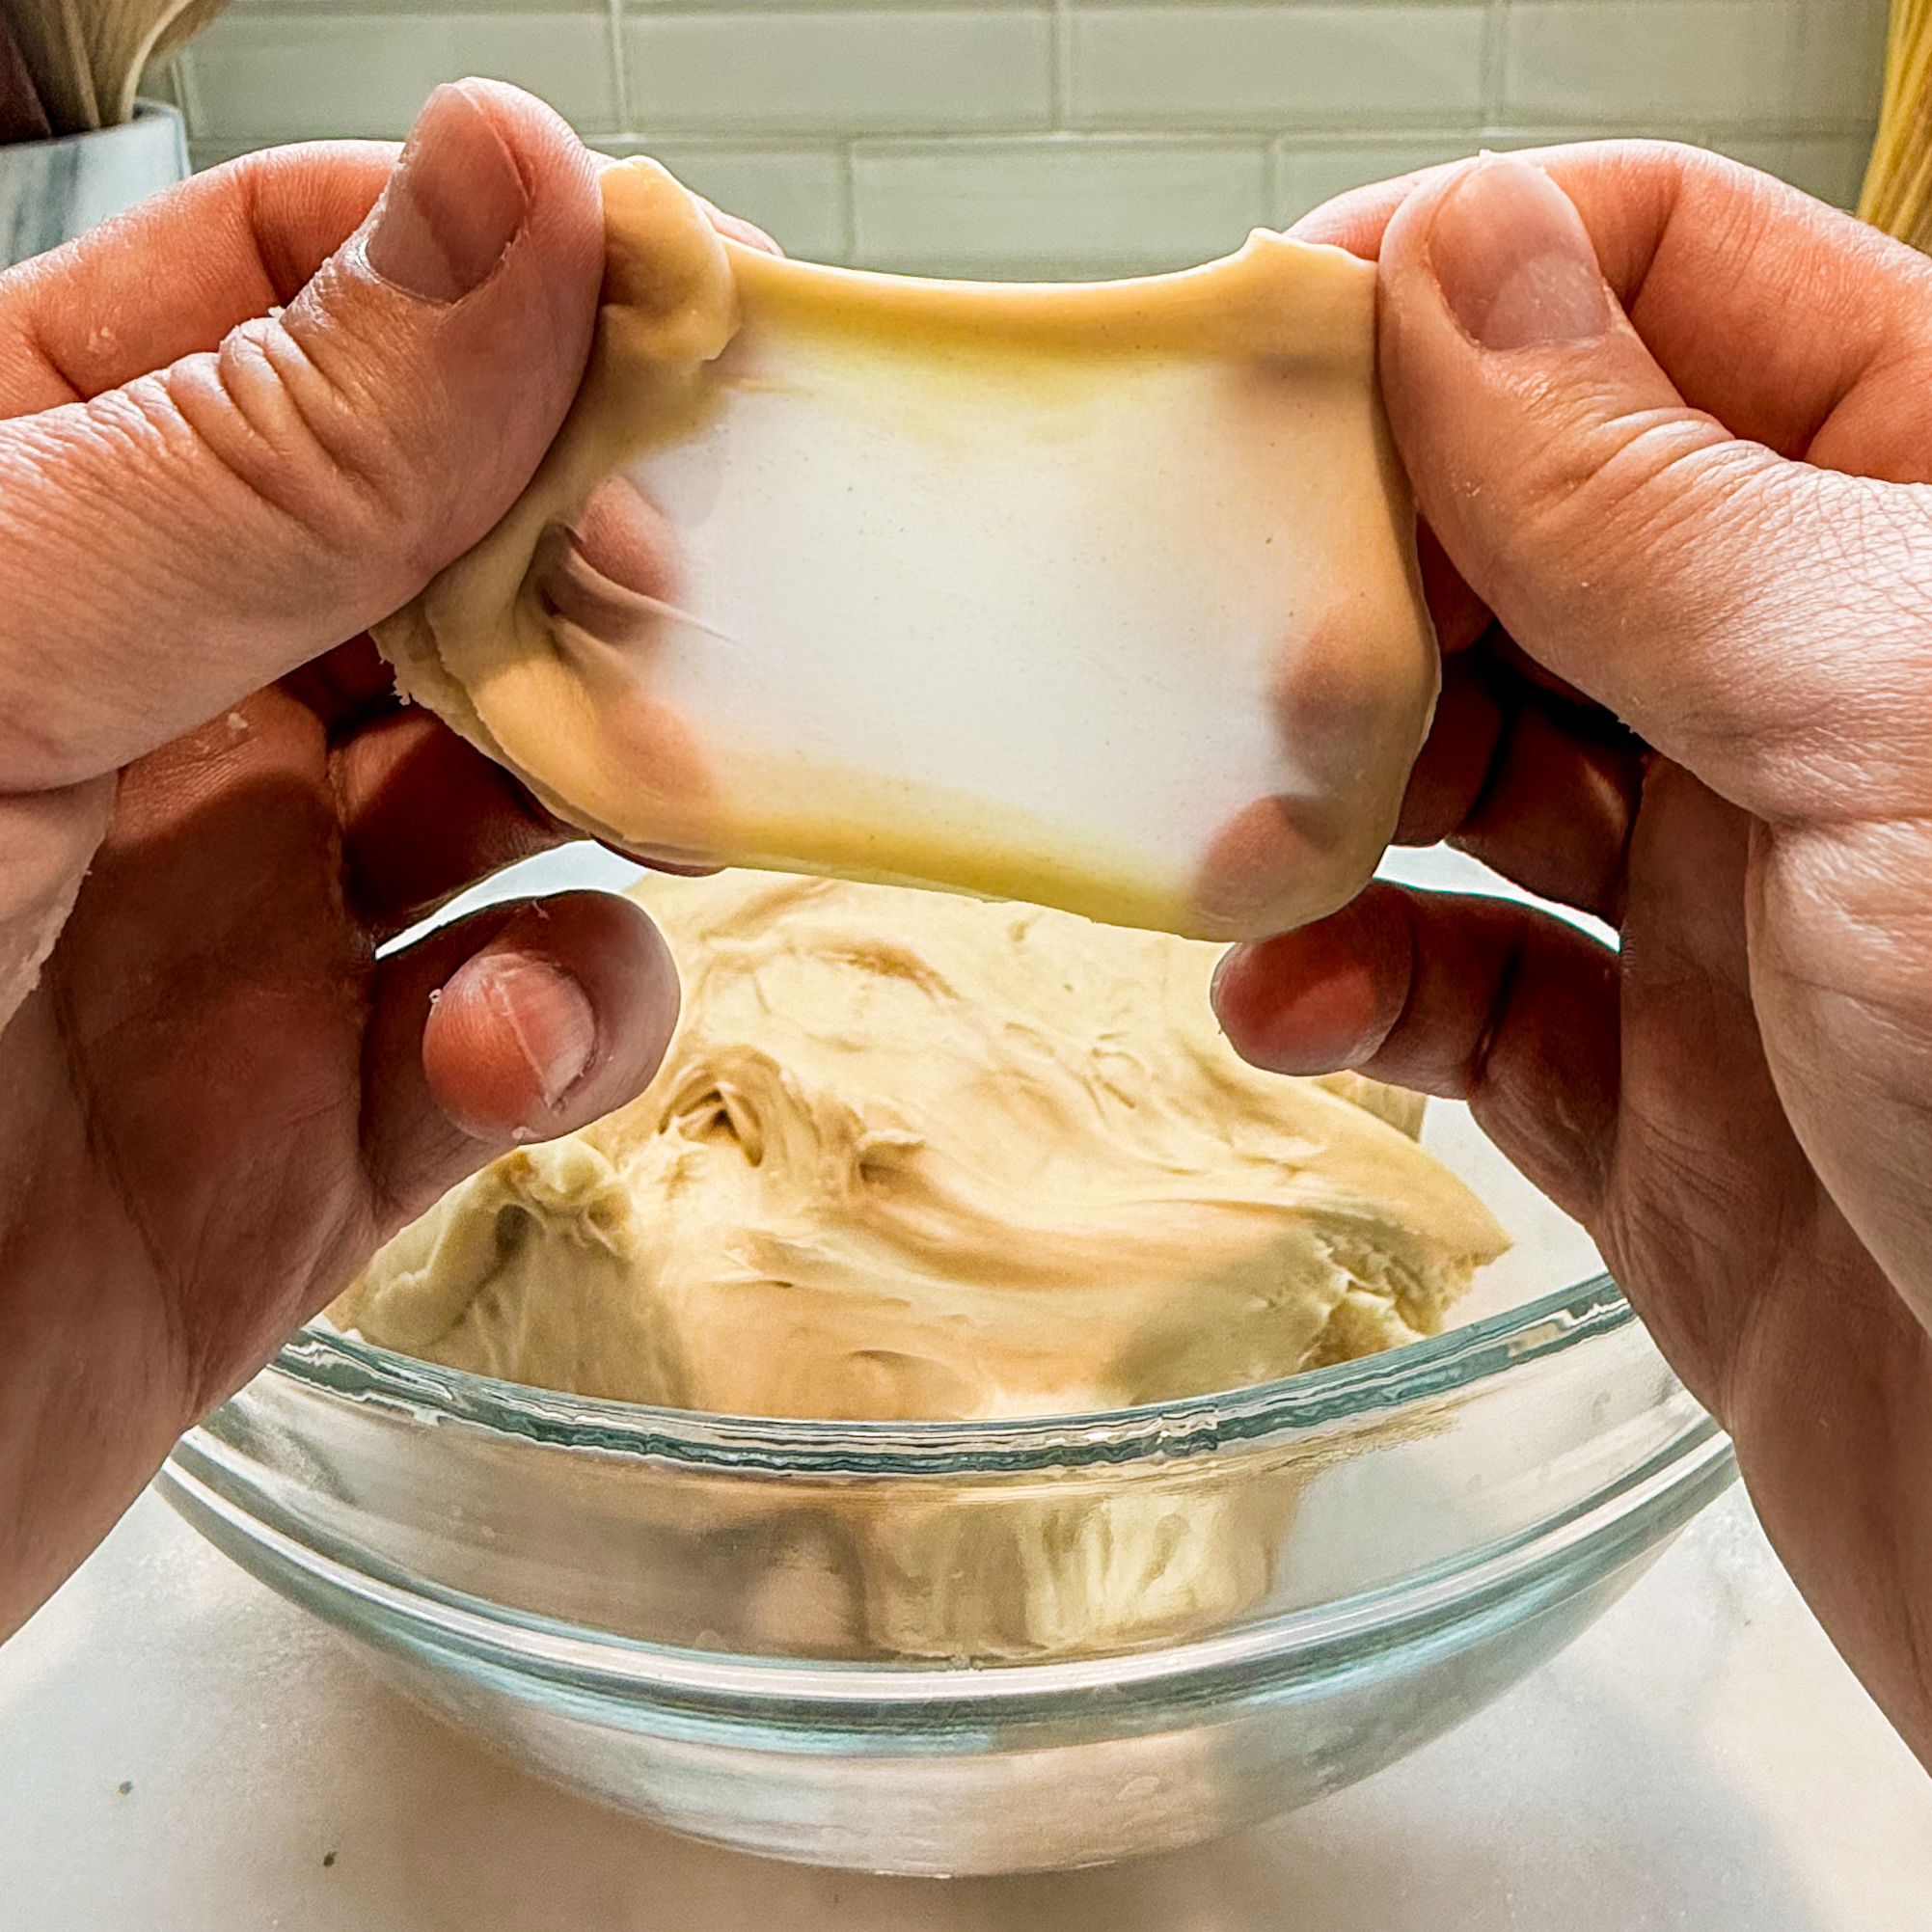
When making challah and most bread doughs, it is imperative to knead the dough very well. All purpose flour and bread flour (in other words, wheat flours) contain two specific proteins which, when combined with a liquid (such as water) and agitated, form gluten.
Gluten is what gives these breads the consistency we know and love. Kneading the dough helps develop the gluten proteins to create longer strands. You know you are done kneading if the dough passes the windowpane test. That means that, when you take a small piece of dough and gently stretch it between your fingertips, the dough should appear translucent without ripping. If it rips easily, continue kneading until the dough passes the windowpane test.
The amount of time it takes to pass the windowpane test varies, depending on the level of hydration of your dough and whether you are kneading by hand or by machine. Most home bakers knead with a KitchenAid mixer or a bread machine. My recipes are written for the KitchenAid. My challah recipes mix wonderfully in bread machines. I can tell you from experience that kneading my Challah recipe by hand can take between 20-30 minutes (a good arm workout), and using a different mixer such as the Ankarsrum (which is a real powerhouse of a mixer and allows you to make much more dough at a time) can take approximately 10-15 minutes longer than when using a KitchenAid.
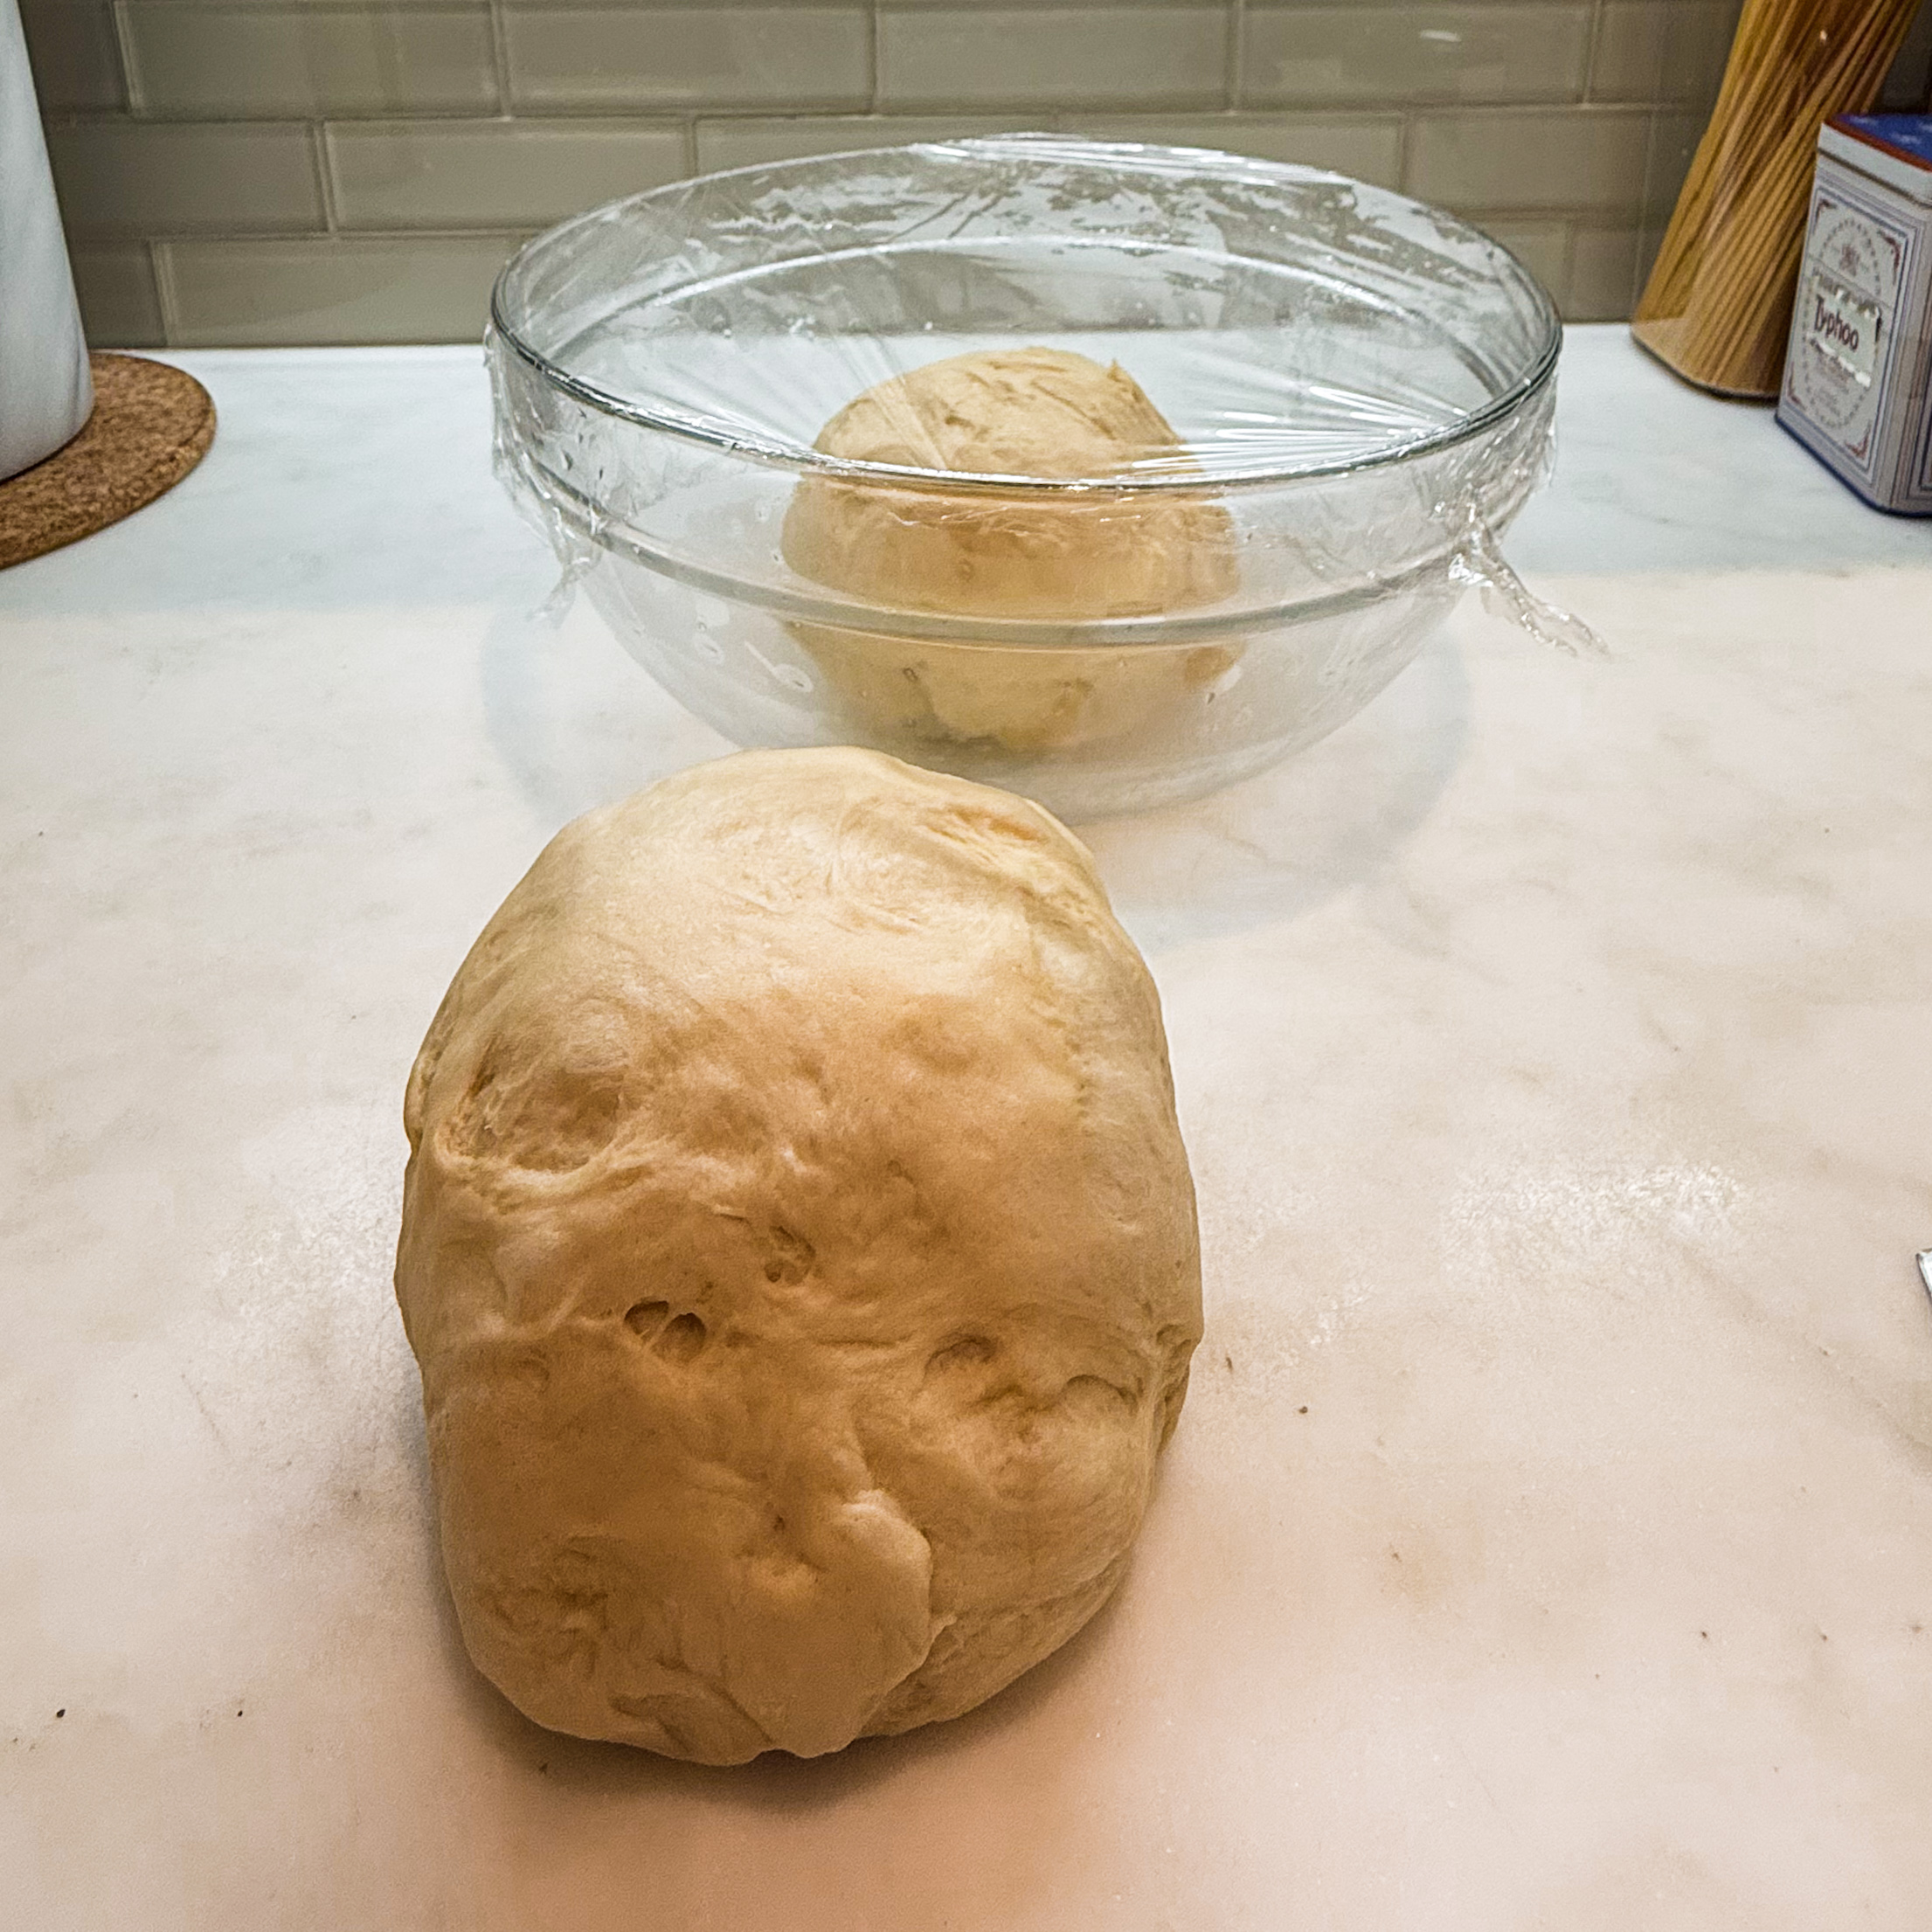
Tip #6: Patiently Allow the Dough to Bulk Ferment
Especially if you mix and knead your dough with a mixer or bread machine, making challah or any bread is really not a hands-on, time consuming project. Most of the time spent making any bread is time spent away from the kitchen. The first rise, also called bulk fermentation, allows the dough to rest and develop flavor. You know the first rise is complete when the dough has basically doubled in size. That doubling is caused by air being trapped within the dough. Once it has doubled in size, gently deflate it and give it a few kneads so that the temperature and yeast within the dough are spread evenly.
Do not skimp on the rise time, and remember that the time stated in a recipe is in general terms. There are several factors that factor into how long it will take the dough to rise, the most important of which is temperature. If your kitchen is on the warmer side, the dough will rise quicker. But, if your kitchen is on the cooler side, it will take longer for the dough to rise. If you have sensitive taste buds, keep in mind that, the longer the dough rises (i.e., ferments), the more flavor it will have. I, therefore, sometimes will refrigerate my dough overnight so that it rises much, much slower, thereby developing more flavor.
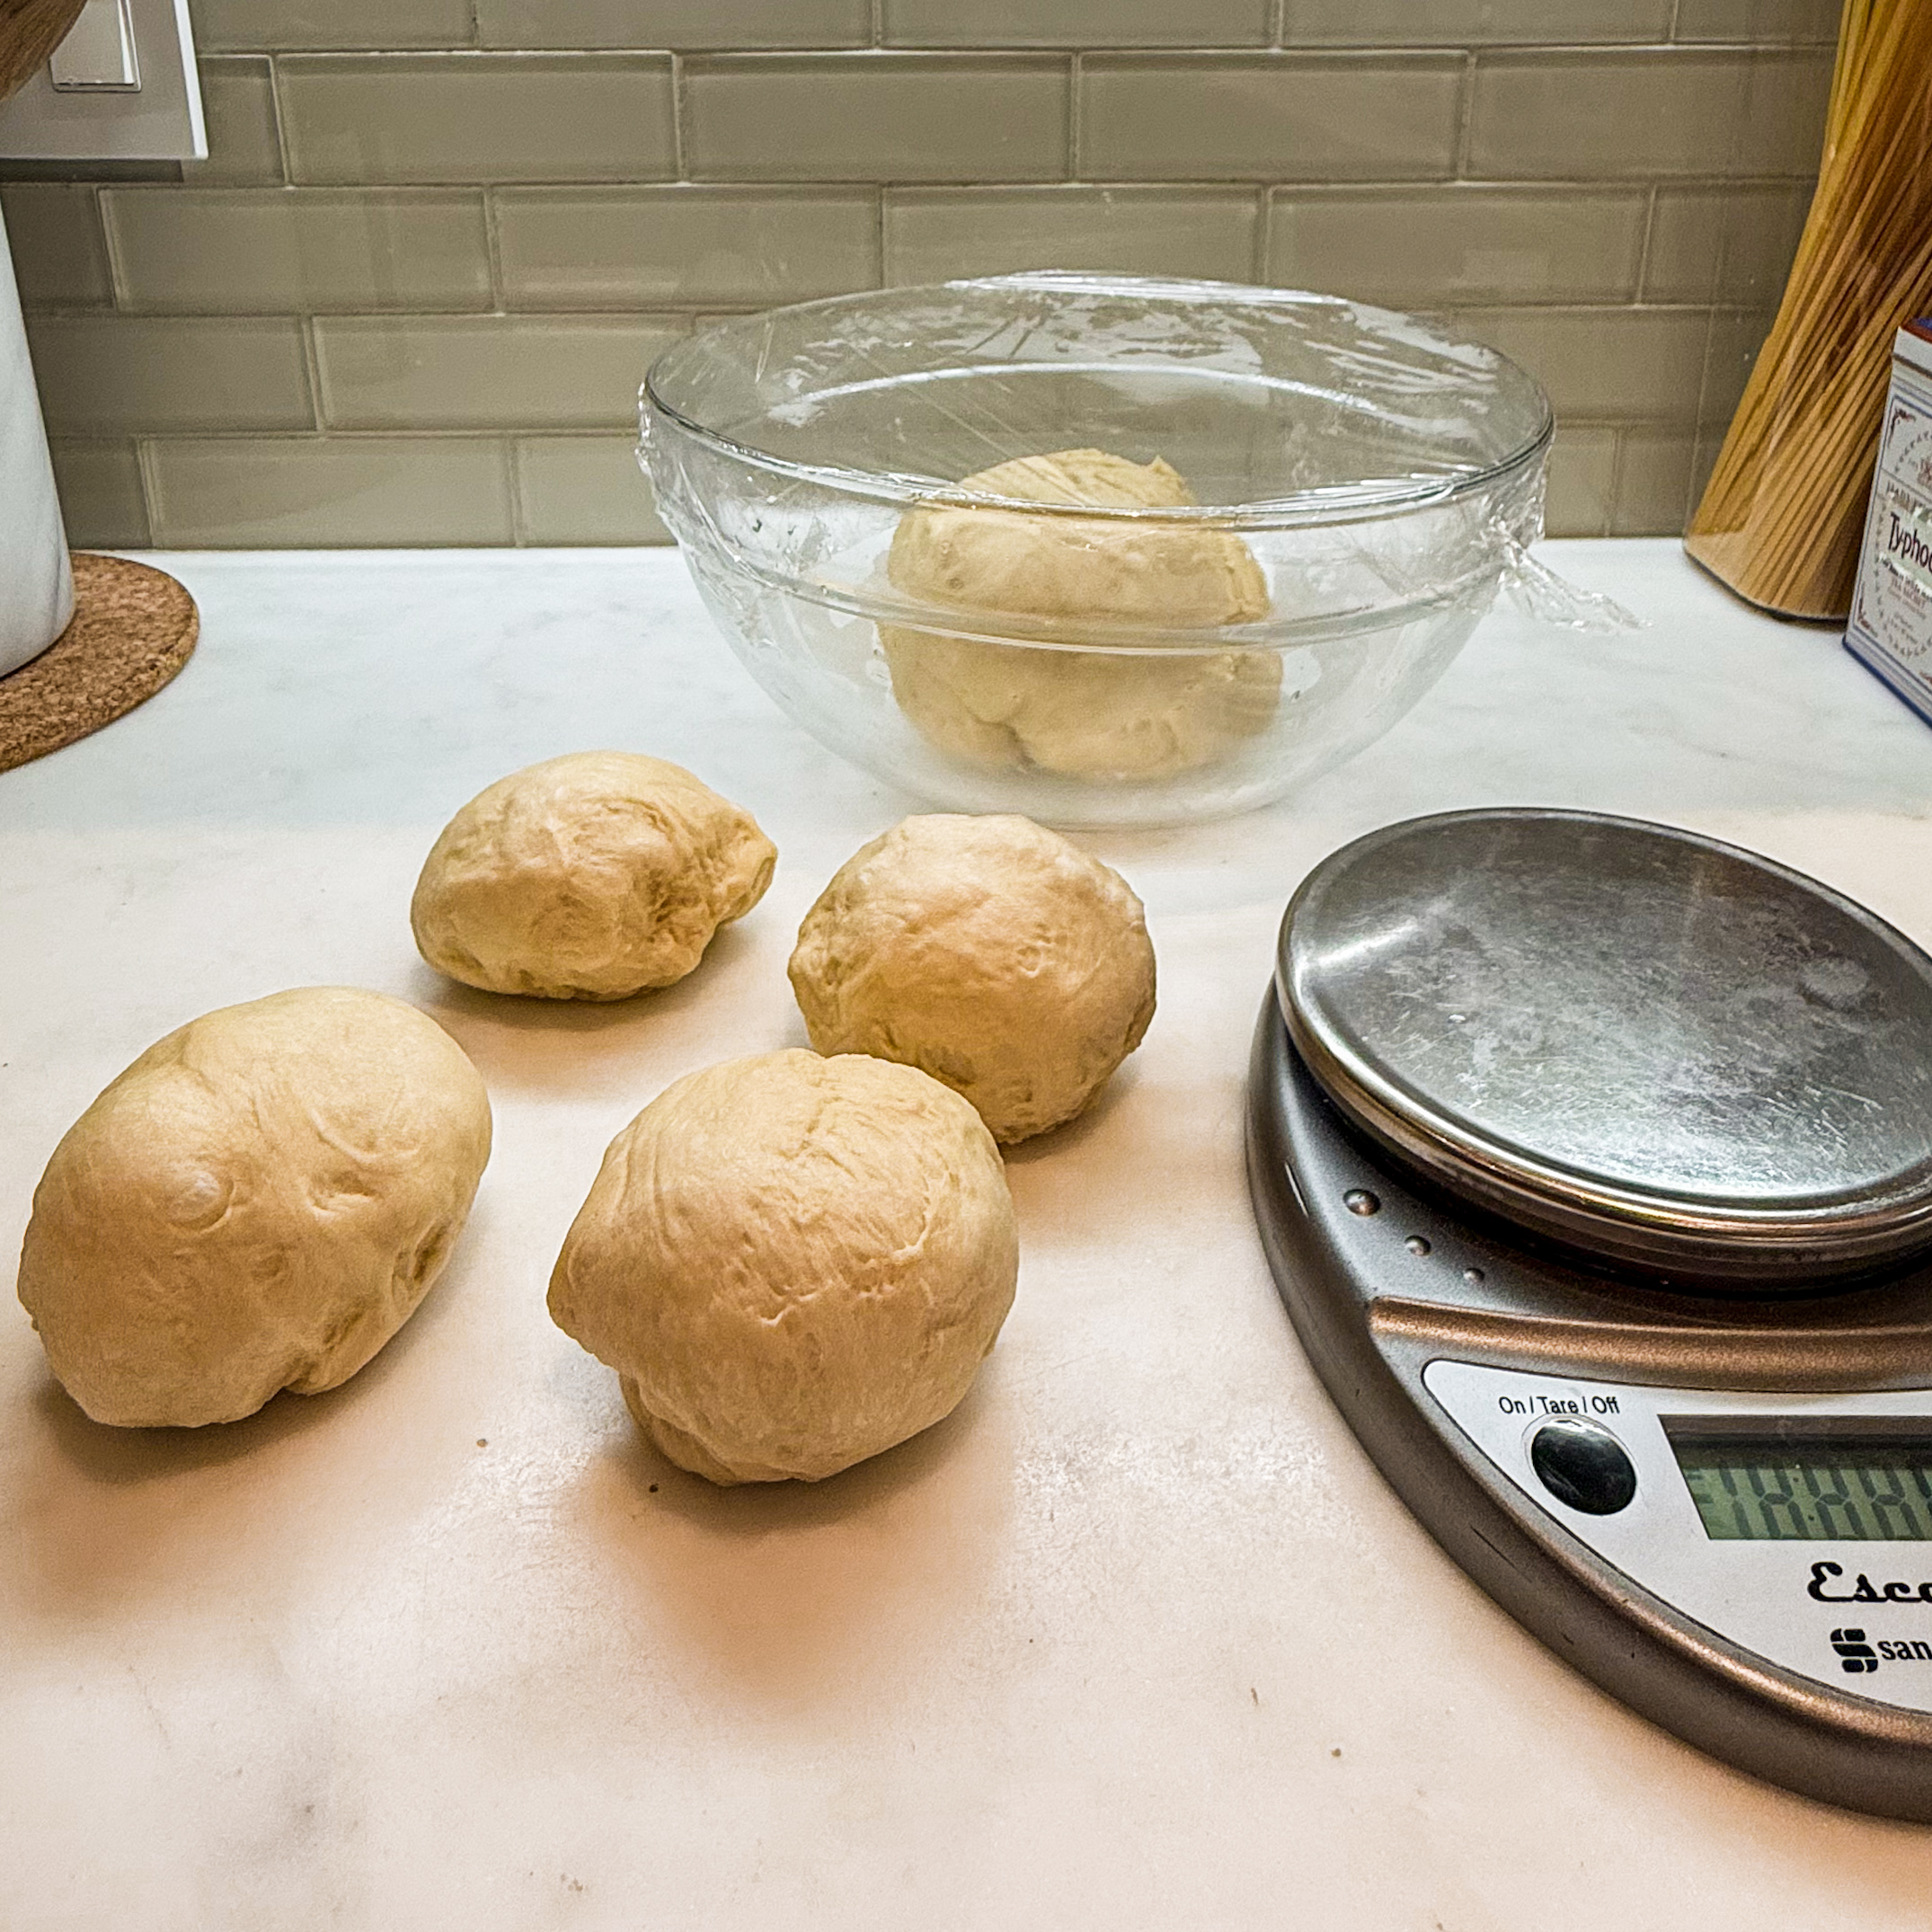
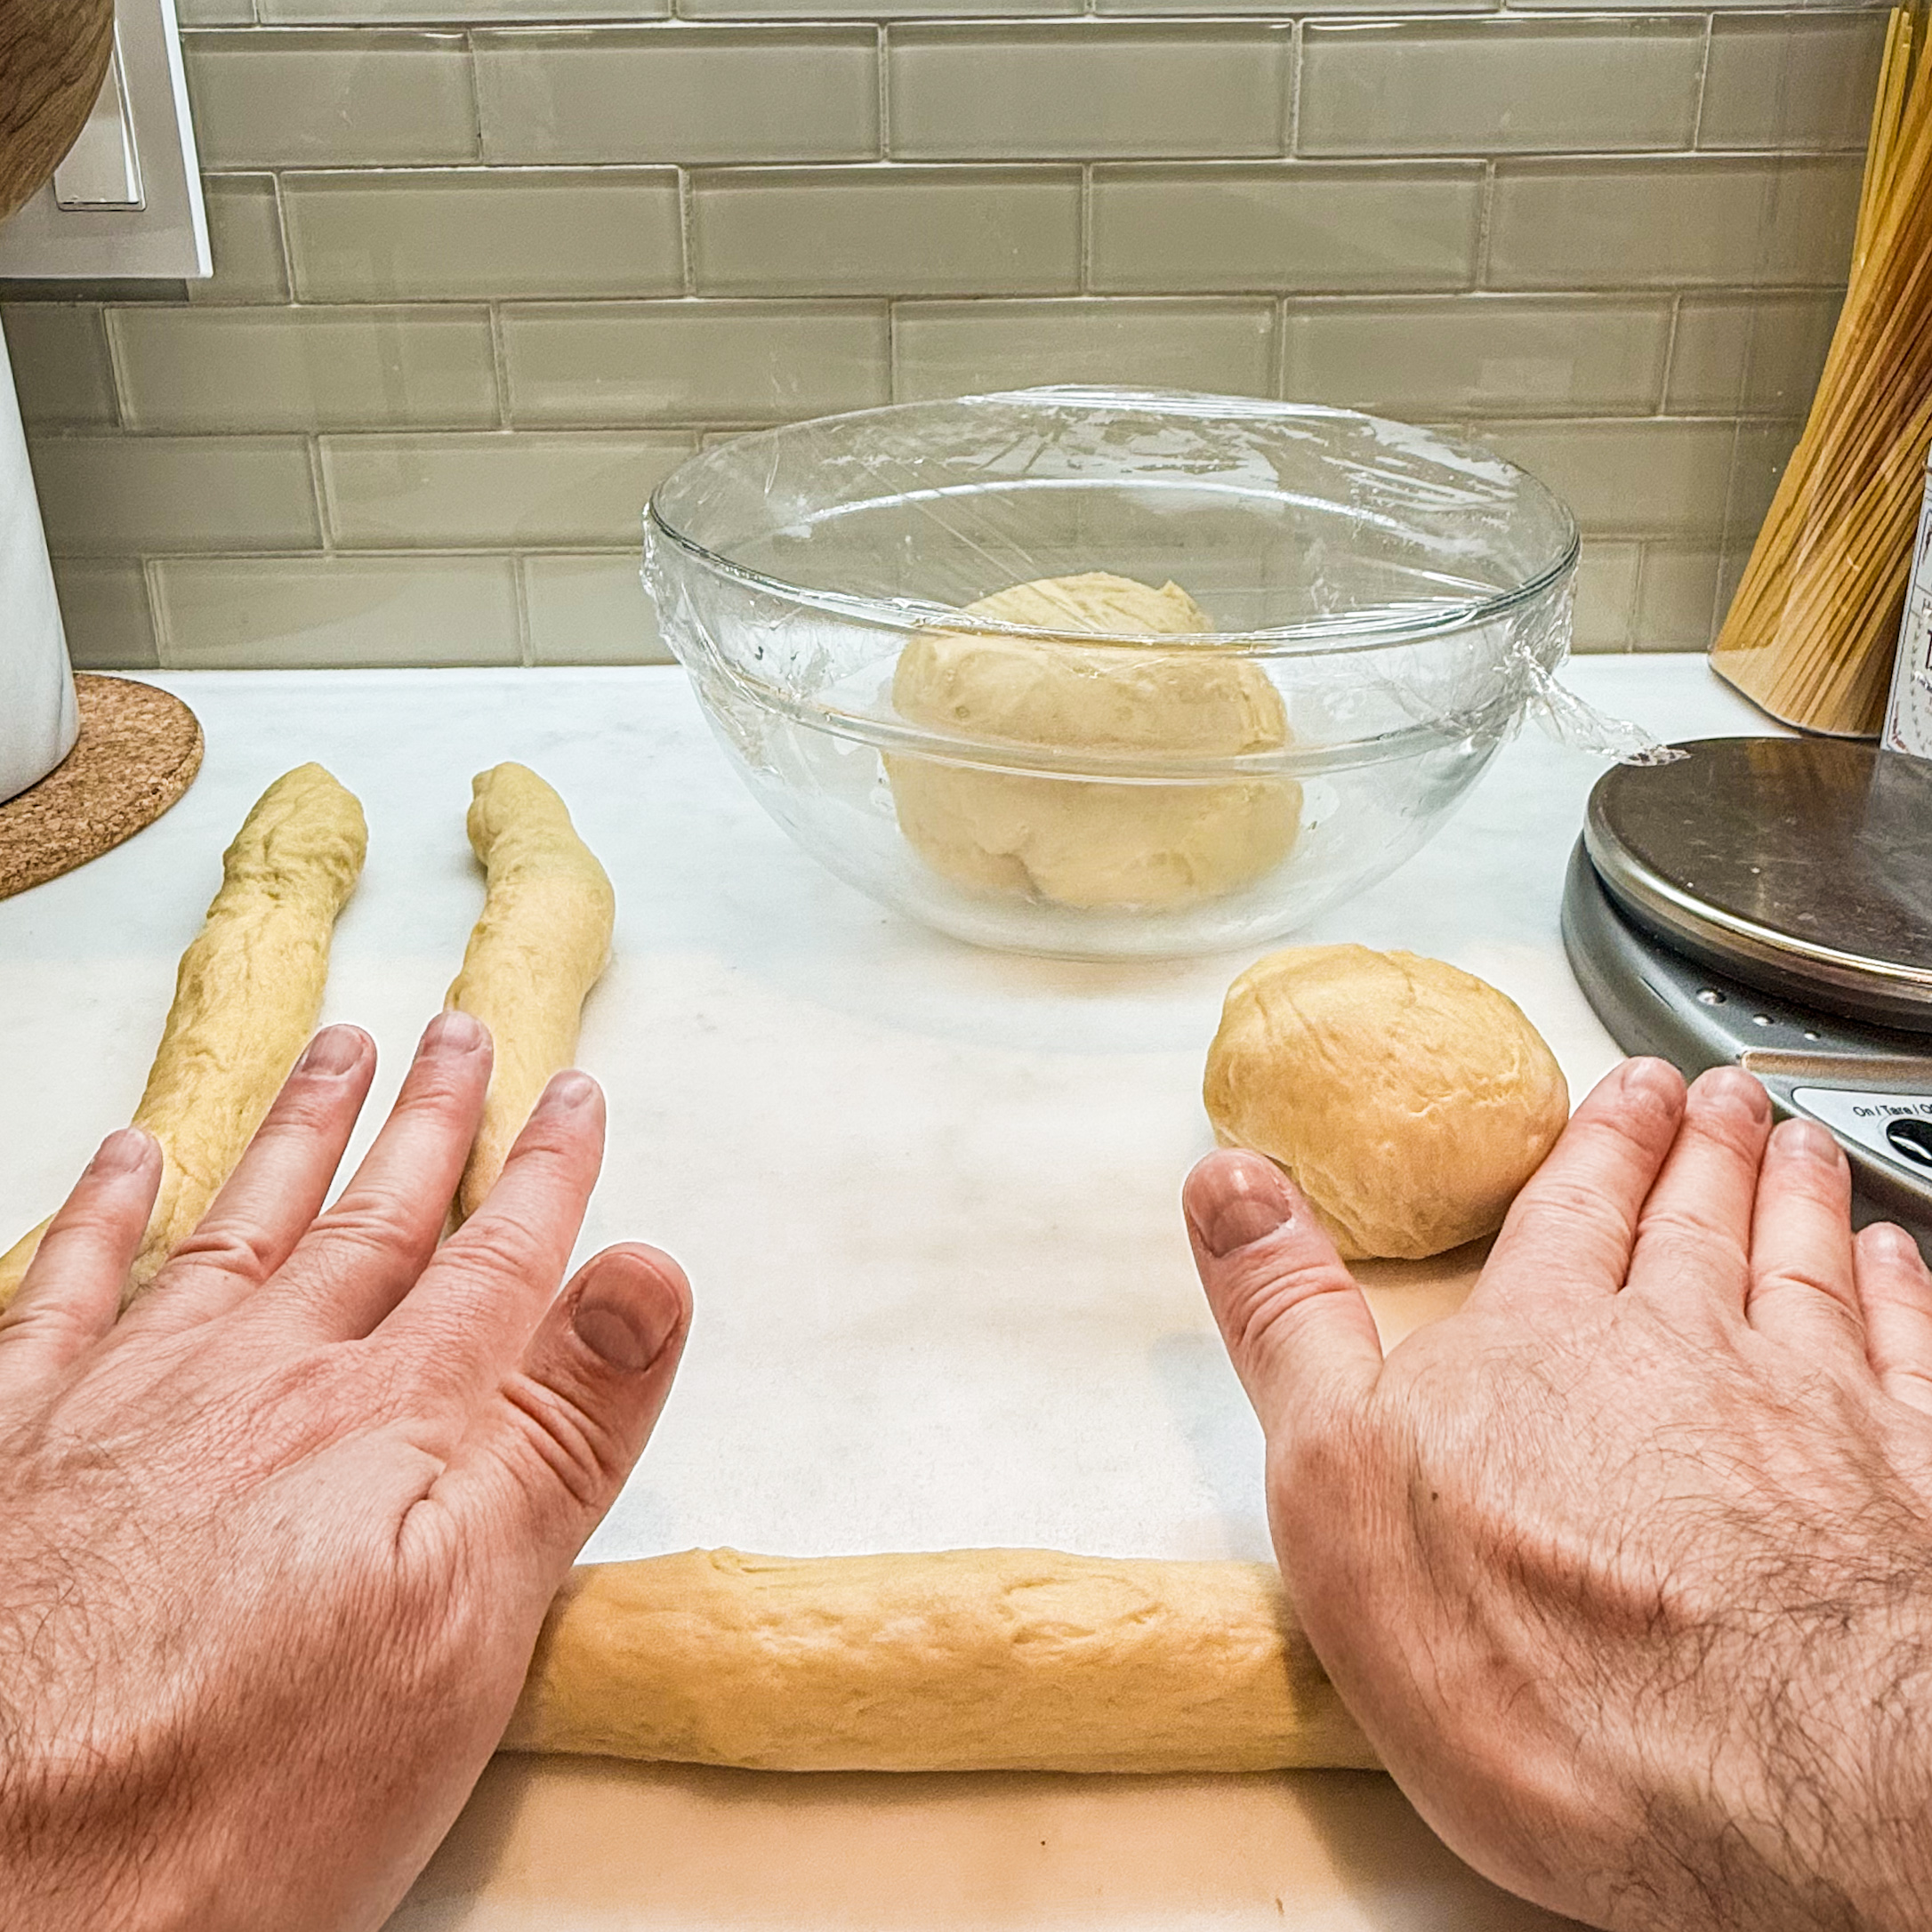
Tip #7: Divide the Dough and Create Equal Strands
Divide the dough into the number of loaves you are making. While you can just eyeball it, I highly recommend dividing the dough equally by weight for consistent results.
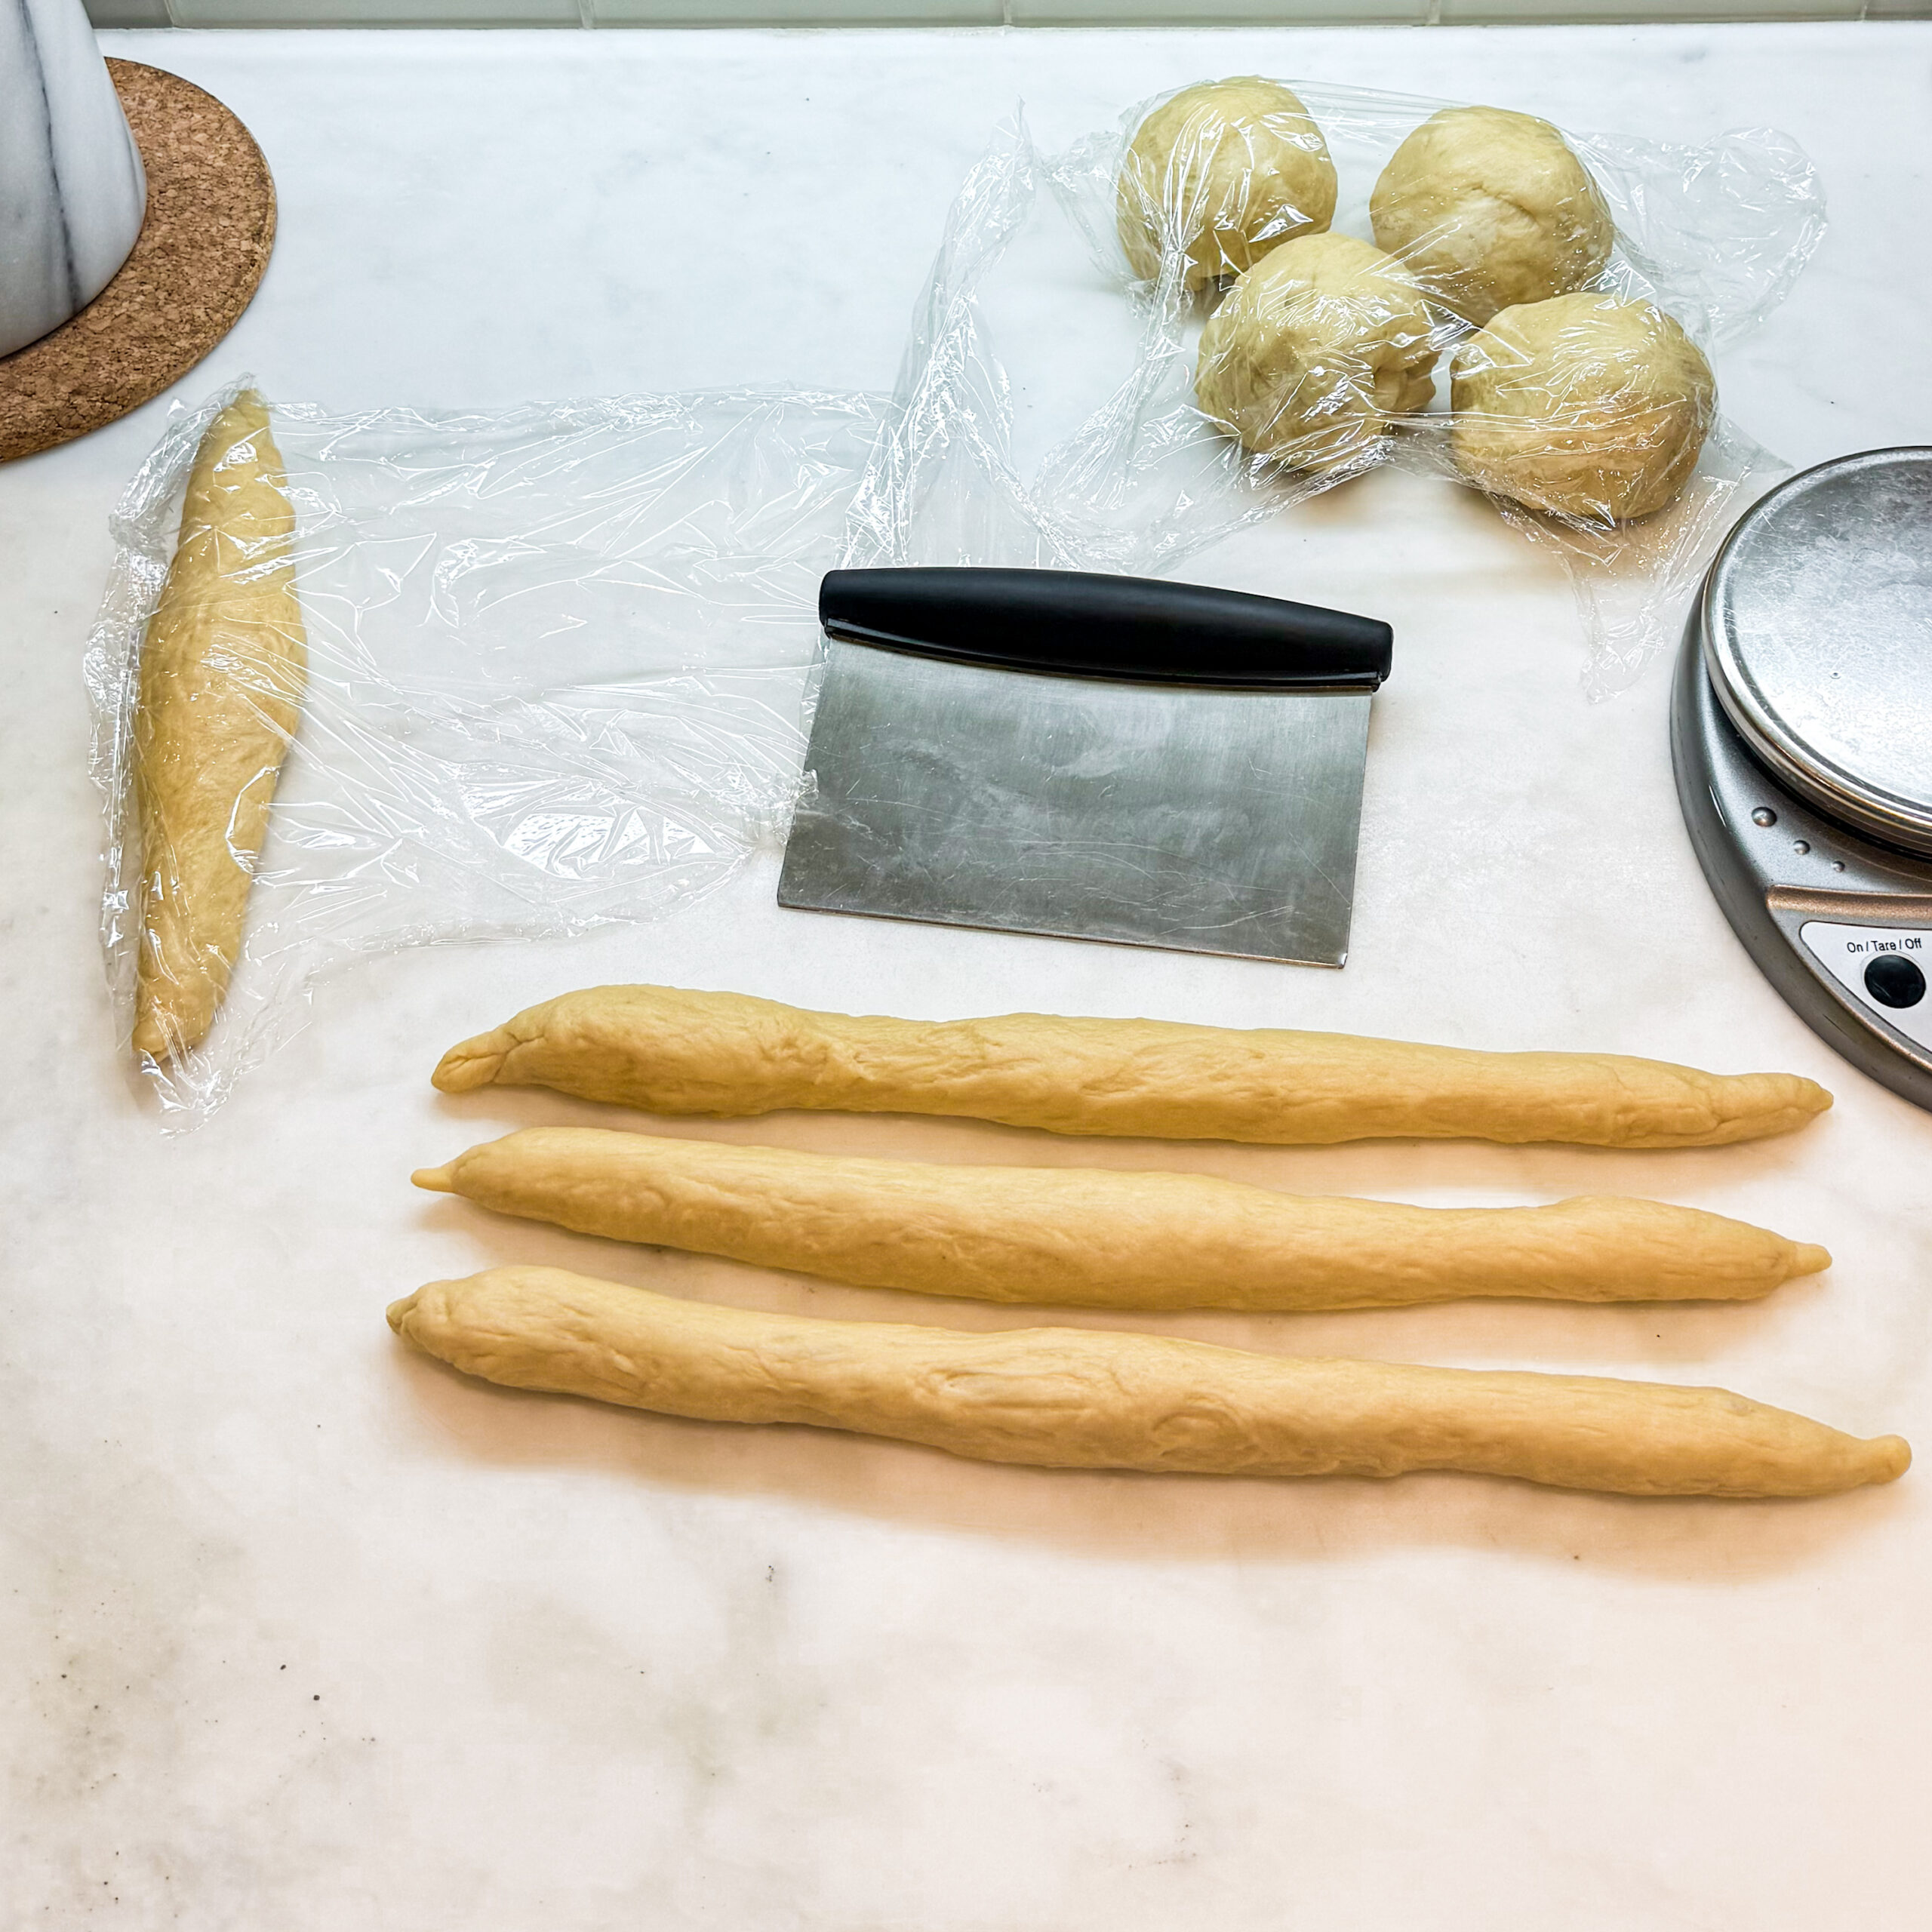
Next, portion each mound of dough into the number of strands needed for each loaf. Form each portion into a ball. Cover the balls with plastic wrap or a tea towel while you continue forming them and as you work with each one to avoid the dough from drying out.
Tip #8: Don’t Stress About Braiding the Dough
Braiding challah can be quite fun. It can also be quite aggravating.
I am no artist, and I tend to lack patience when it comes to patchkying around with the dough. And that is ok!
If you are patient and/or artistic, challah can be a fabulous medium to create works of art. There are endless videos online that show you how to create gorgeous braids. I have separate posts for a 4-strand round challah and for a Festive Challah, both with videos. The Challah Prince is probably the best known challah artist today, as he has tons of videos.
However you braid or shape your dough, there are three things to keep in mind:
Not all challah dough is created equal.
This is not to suggest that any particular recipe is better or worse than another. But, keep in mind that recipes higher in fat and sugar content (meaning eggs and sugar/honey) can be more finicky to achieve a baked result that looks as good and plaited as well as before going into the oven. For example, one of the reasons the Challah Prince is so successful in braiding and shaping (in addition to his obvious artistic talent) is that his recipe has no eggs in the dough and is not high in sugar. I say this so you better understand why your eggy, sweet challah may not look like the perfection someone achieves with a recipe like his. For me, I much prefer an eggy, sweet challah, and I am very willing to sacrifice the aesthetic of the final product for the eggy, sweet challah I love.
Tacky dough is ideal.
Challah dough should be slightly tacky when you divide it and form strands for braiding. Sometimes, however, the dough may be more than tacky to the point that it is a bit sticky. I find this happens with my Tangzhong Challah, and it does not bother me because it means the final product is going to come out really soft due to that higher hydration. If the dough is sticky, very lightly flour the dough as you roll out your strands. After rolling out each strand, lightly dust each strand with very little flour — just enough to coat the strands all over. This will prevent the braids from baking into each other so that the challah maintains defined plaits during the baking process.
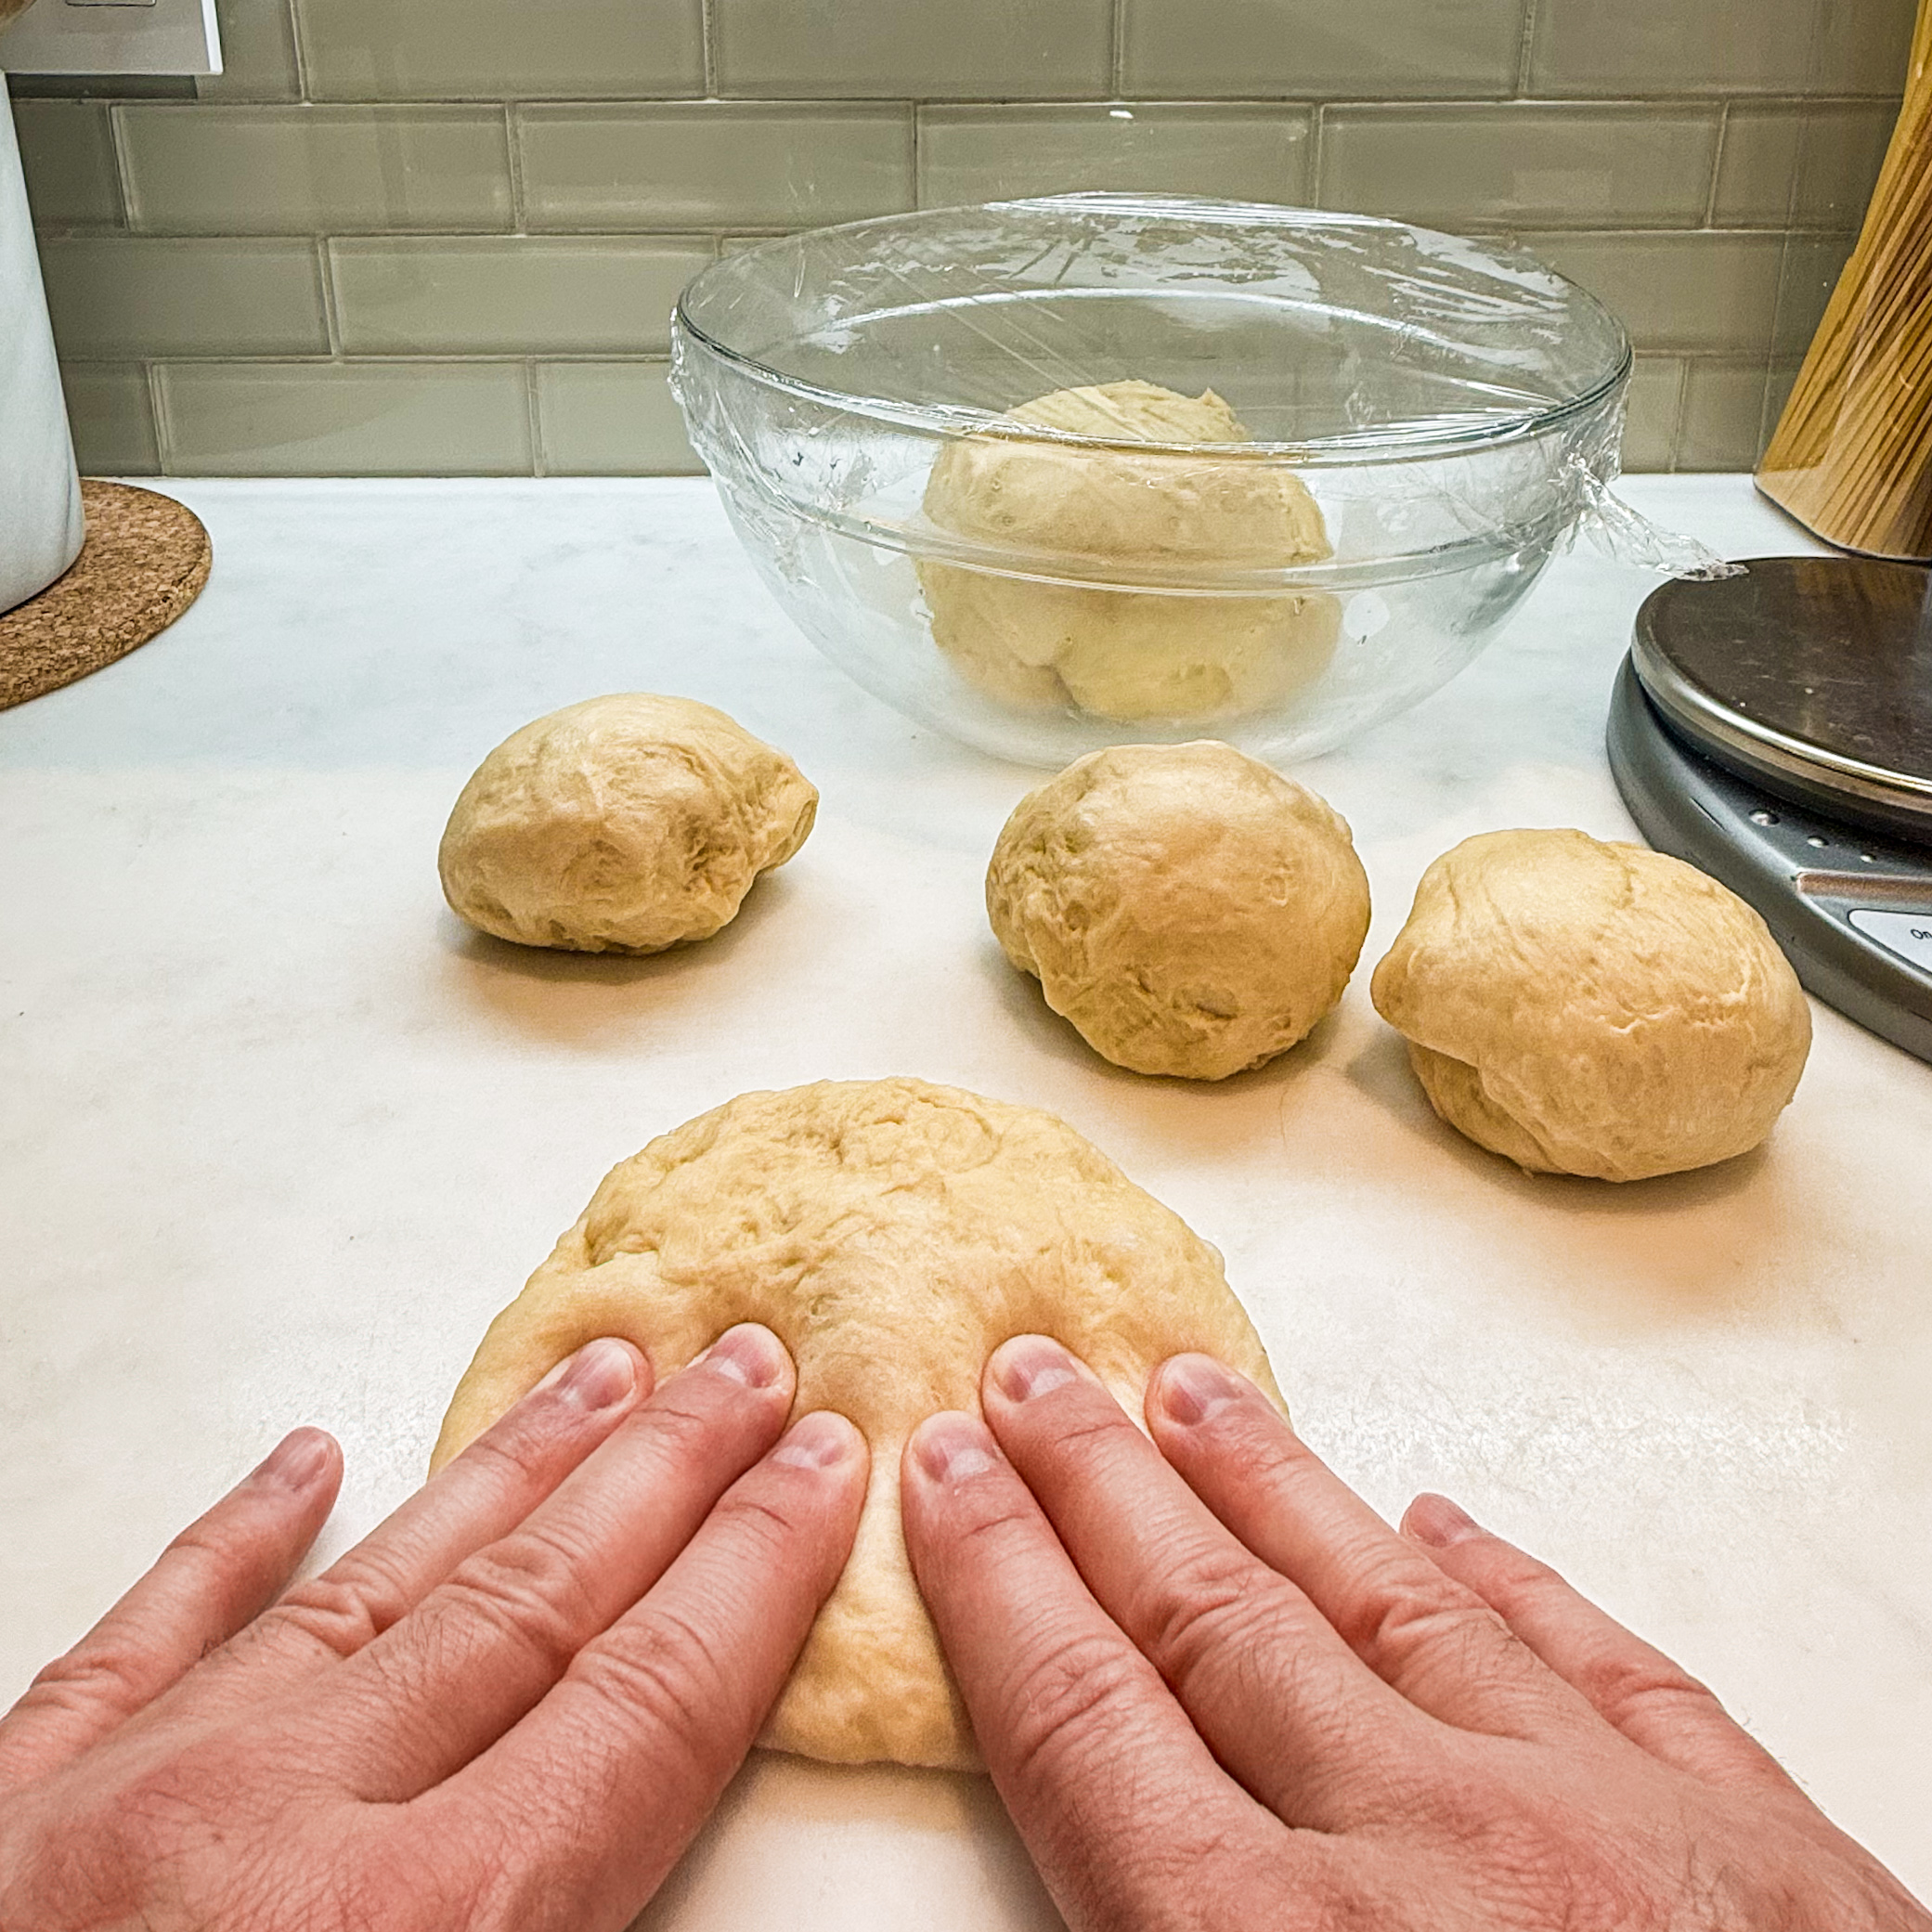
Budget 30 minutes to roll out the strands.
It may take you less than 30 minutes, but I strongly suggest having your mind set to devote 30 minutes to rolling out your strands. This is not 30 minutes of work. I suggest this amount of time because you will get nice strands if you let the dough rest one or two times when rolling them out. The rest time is how you get beautiful strands. Here is how to roll out the strands:
- Take one of your dough balls and flatten it with your fingertips against the countertop, forming an oval shape with the dough.
- Starting from the bottom edge closest to you, roll the dough up, like rolling cinnamon rolls.
- With the palms of your hands, press the dough against the counter while moving your hands away from you and back towards you. The friction against the counter will help create smooth strands.
- If you see the dough stretching and the strand is not looking smooth, STOP! Put that strand under plastic wrap or a tea towel for 5-10 minutes, and continue with the next dough ball.
- Keep rolling the strands out, stopping if the dough resists, is breaking, or pulling back, and allow it to rest for 5-10 minutes under plastic wrap or a tea towel.
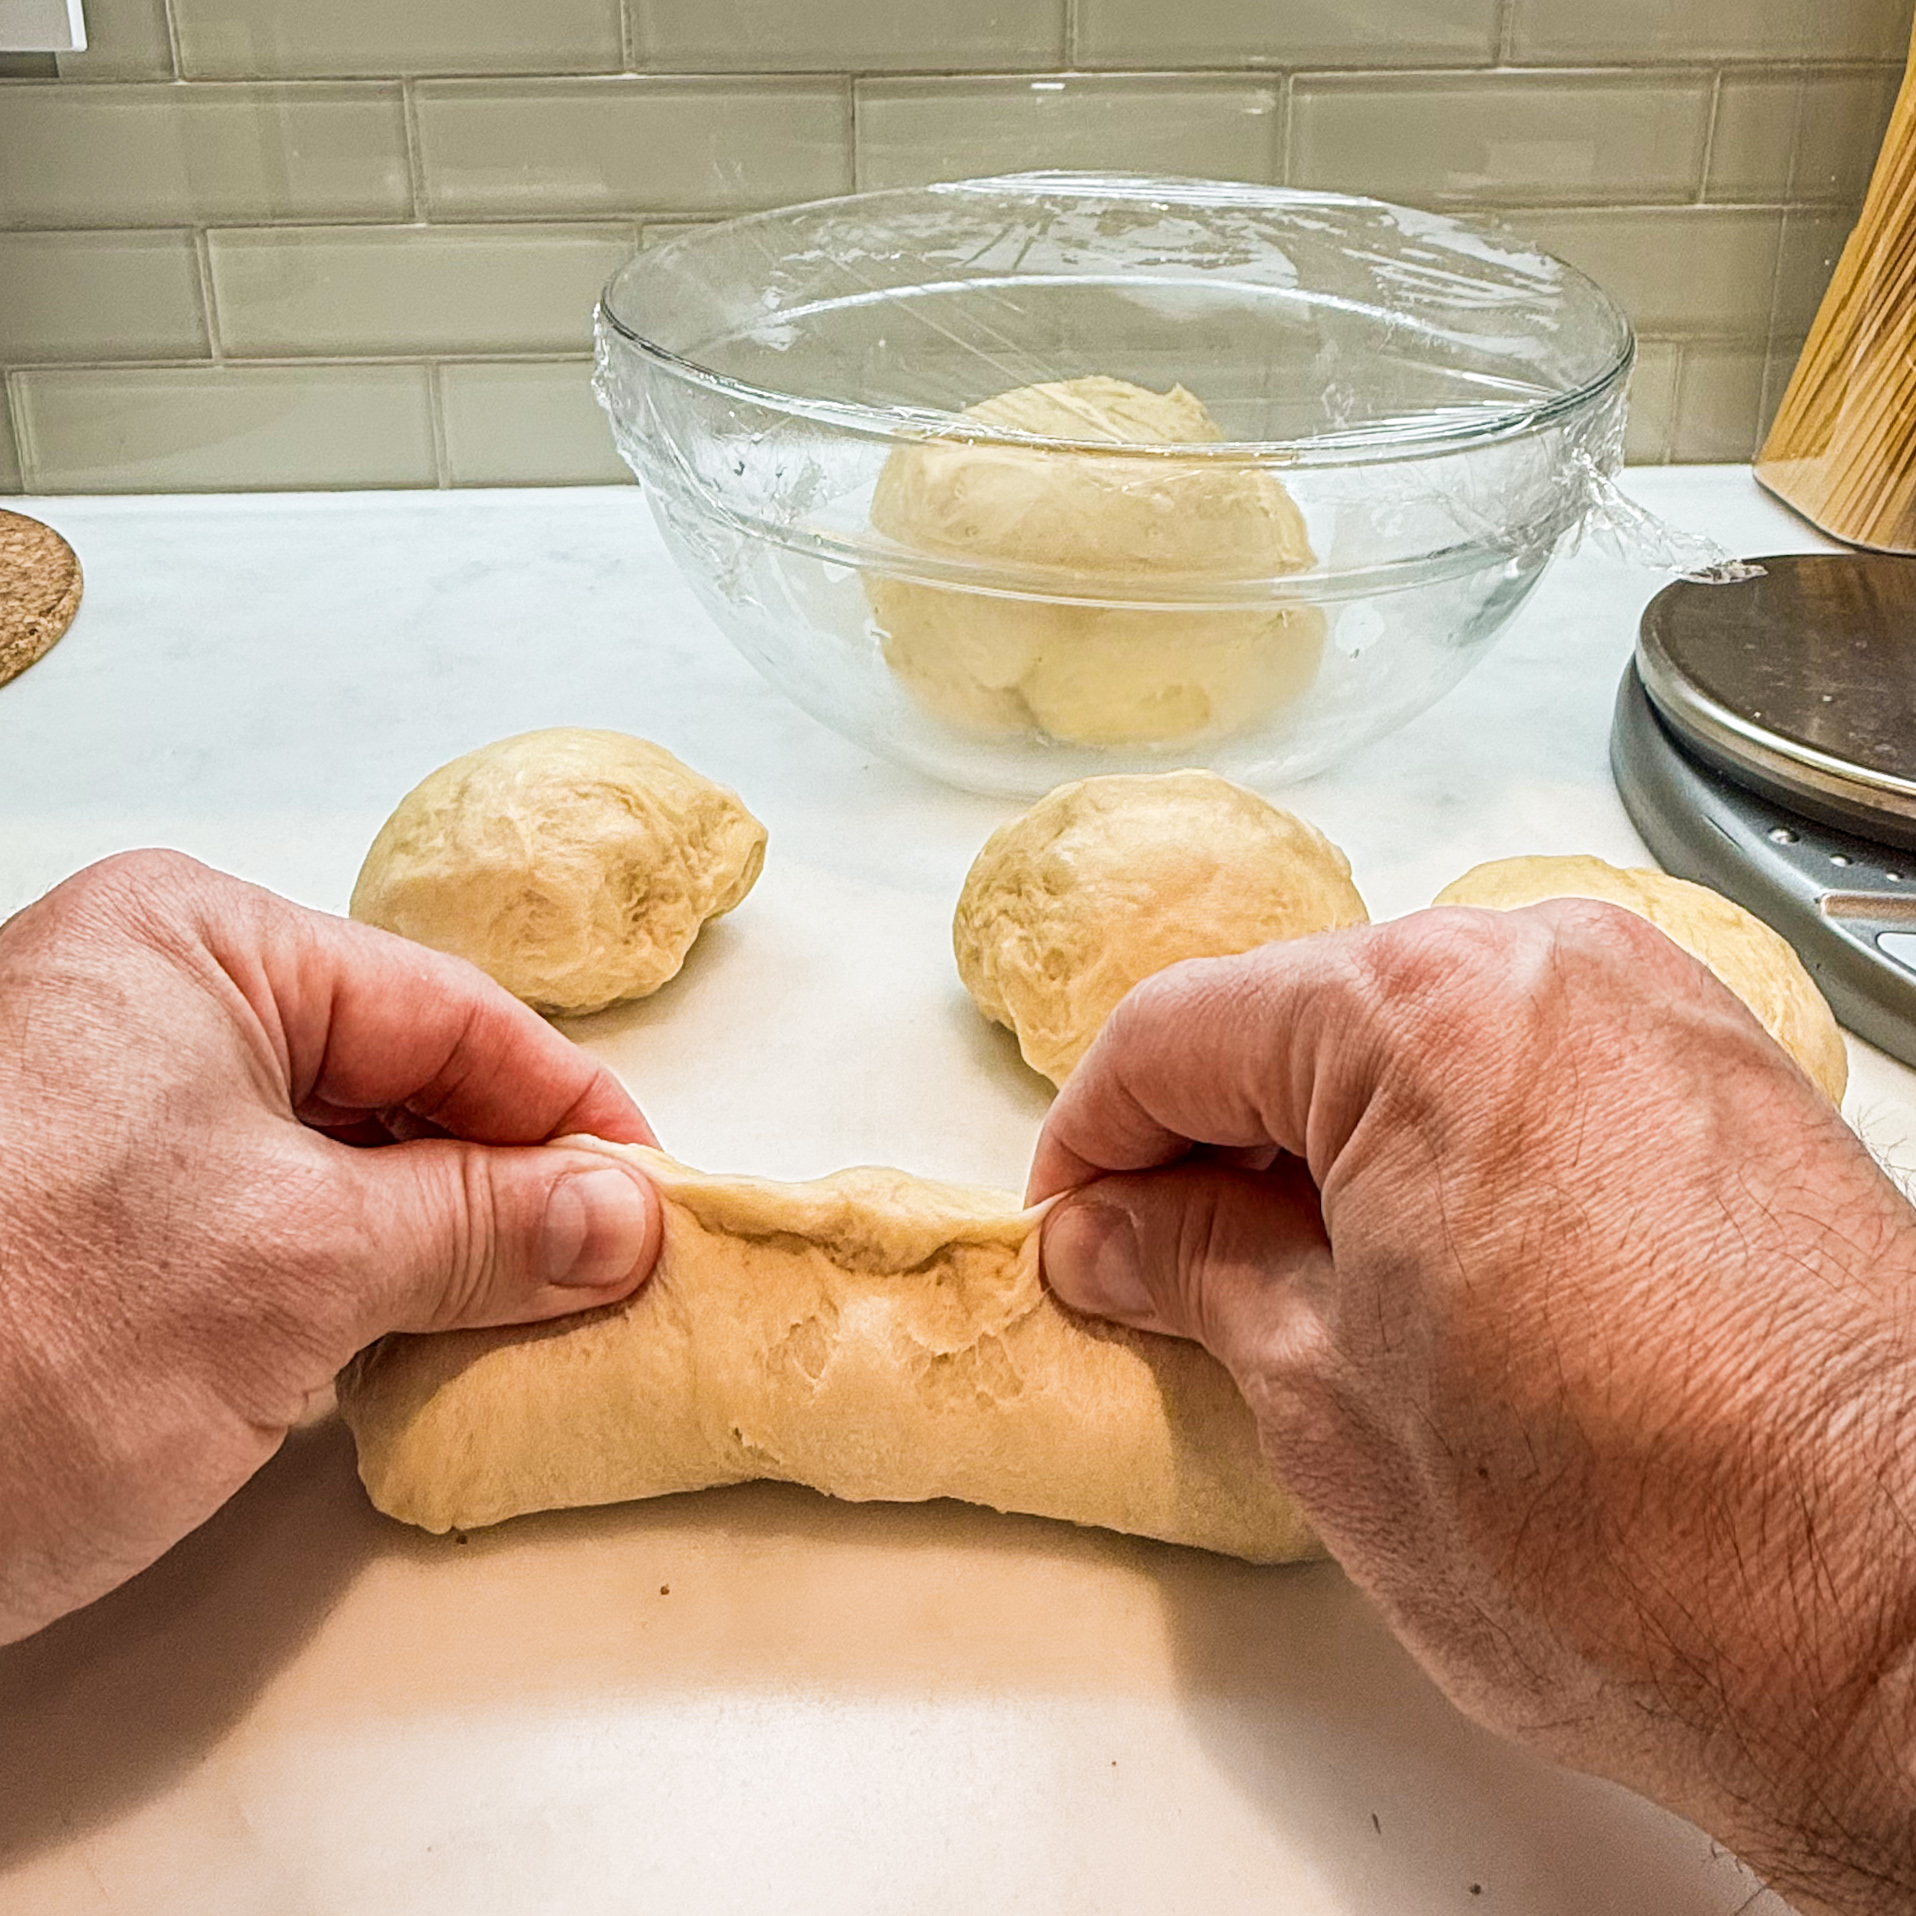
Don’t braid too tight.
When you braid, avoid making tight braids because the dough will rise before you bake it. If you braid the dough too tightly, there is not enough space for it to rise. That said, also avoid braiding too loosely. If there is too much space between the strands, it will bake up a bit wonky. You will learn the best tightness/looseness only by practicing.
Allow the challah to rise properly.
Use the time stated in the recipe as a guide for when to check your dough, taking into account the temperature of the room and humidity outside. Wet the tip of your index finger with water and make a small impression into the dough to do the “poke test”. If the dough springs right back, it needs more time, so give it 15 minutes before you check again. When the indentation in the dough holds its place, get it into the oven as soon as possible. If the indentation slowly fills up partially, the dough has risen to an ideal place.
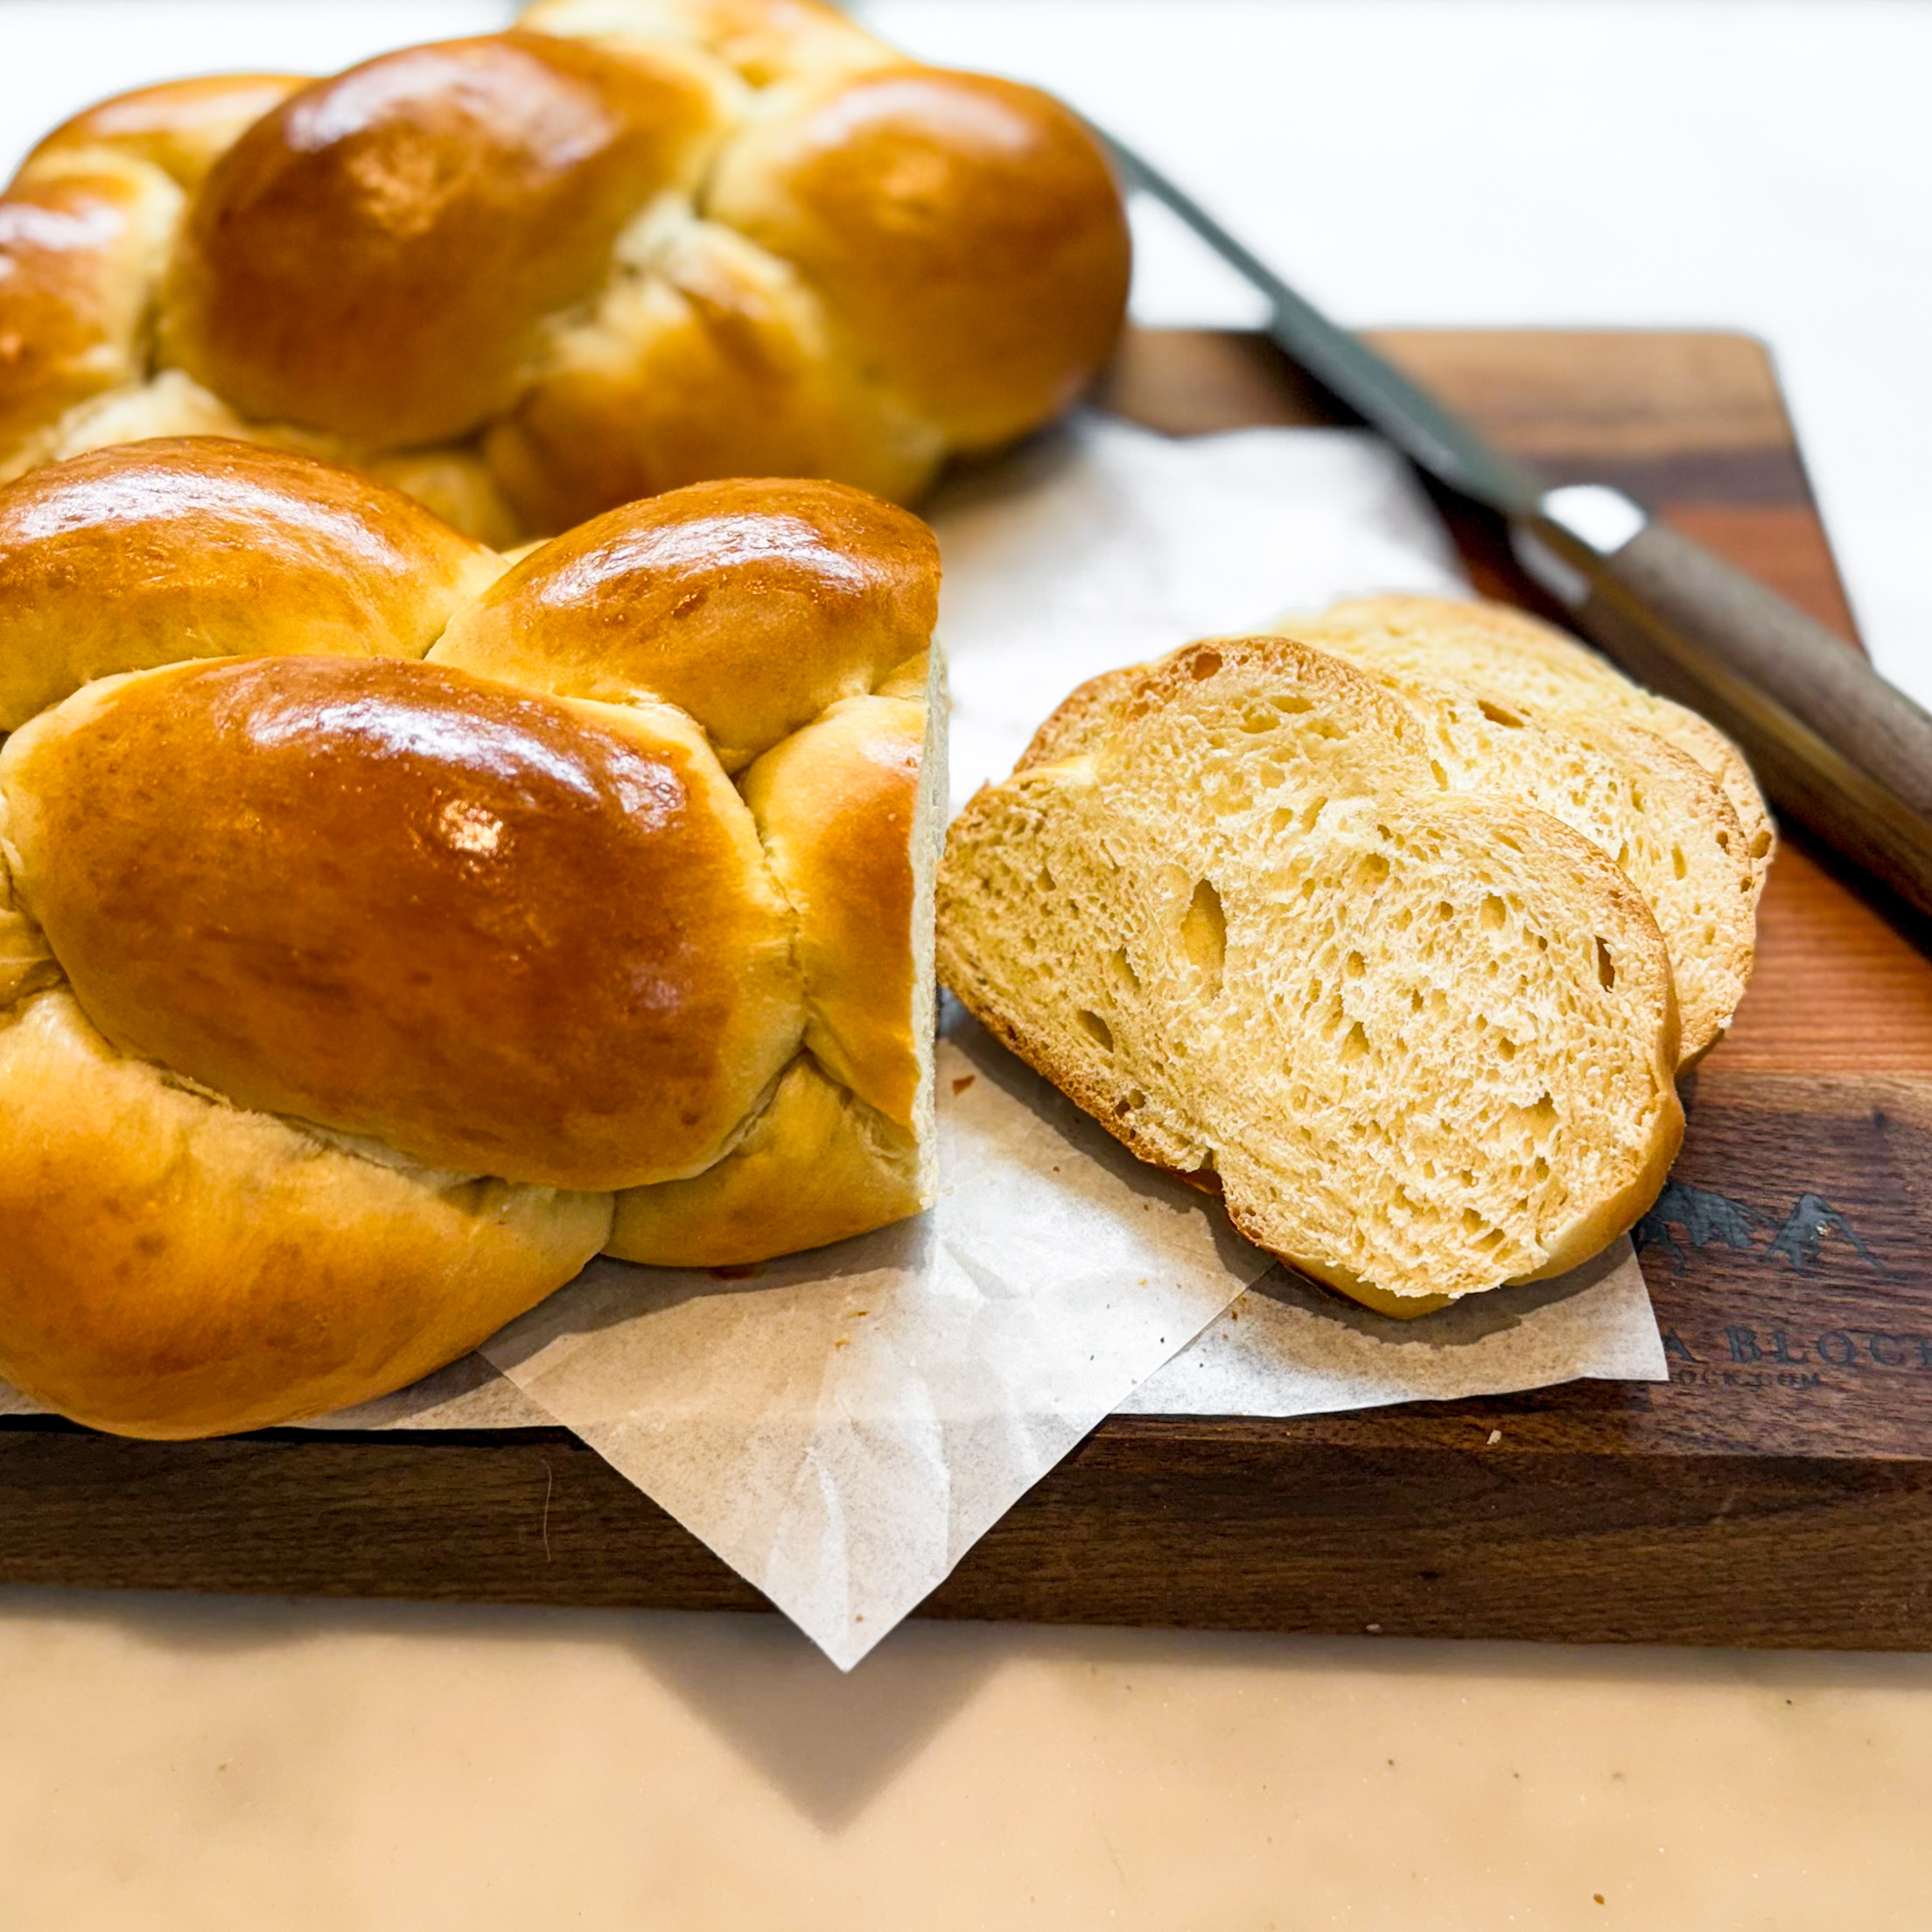
Tip #9: Avoid a Baker’s Tan
An egg wash on a challah is classic. The egg wash gives the challah an attractive, brown and glossy finish. Is an egg wash required? Of course not. You do you.
I generally use a whole egg for my egg wash. That said, sometimes, when I am looking for a darker appearance, I just use egg yolk. On rare occasion, when I want a lighter look, I use a whole egg mixed with one teaspoon of water. Again, you do you.
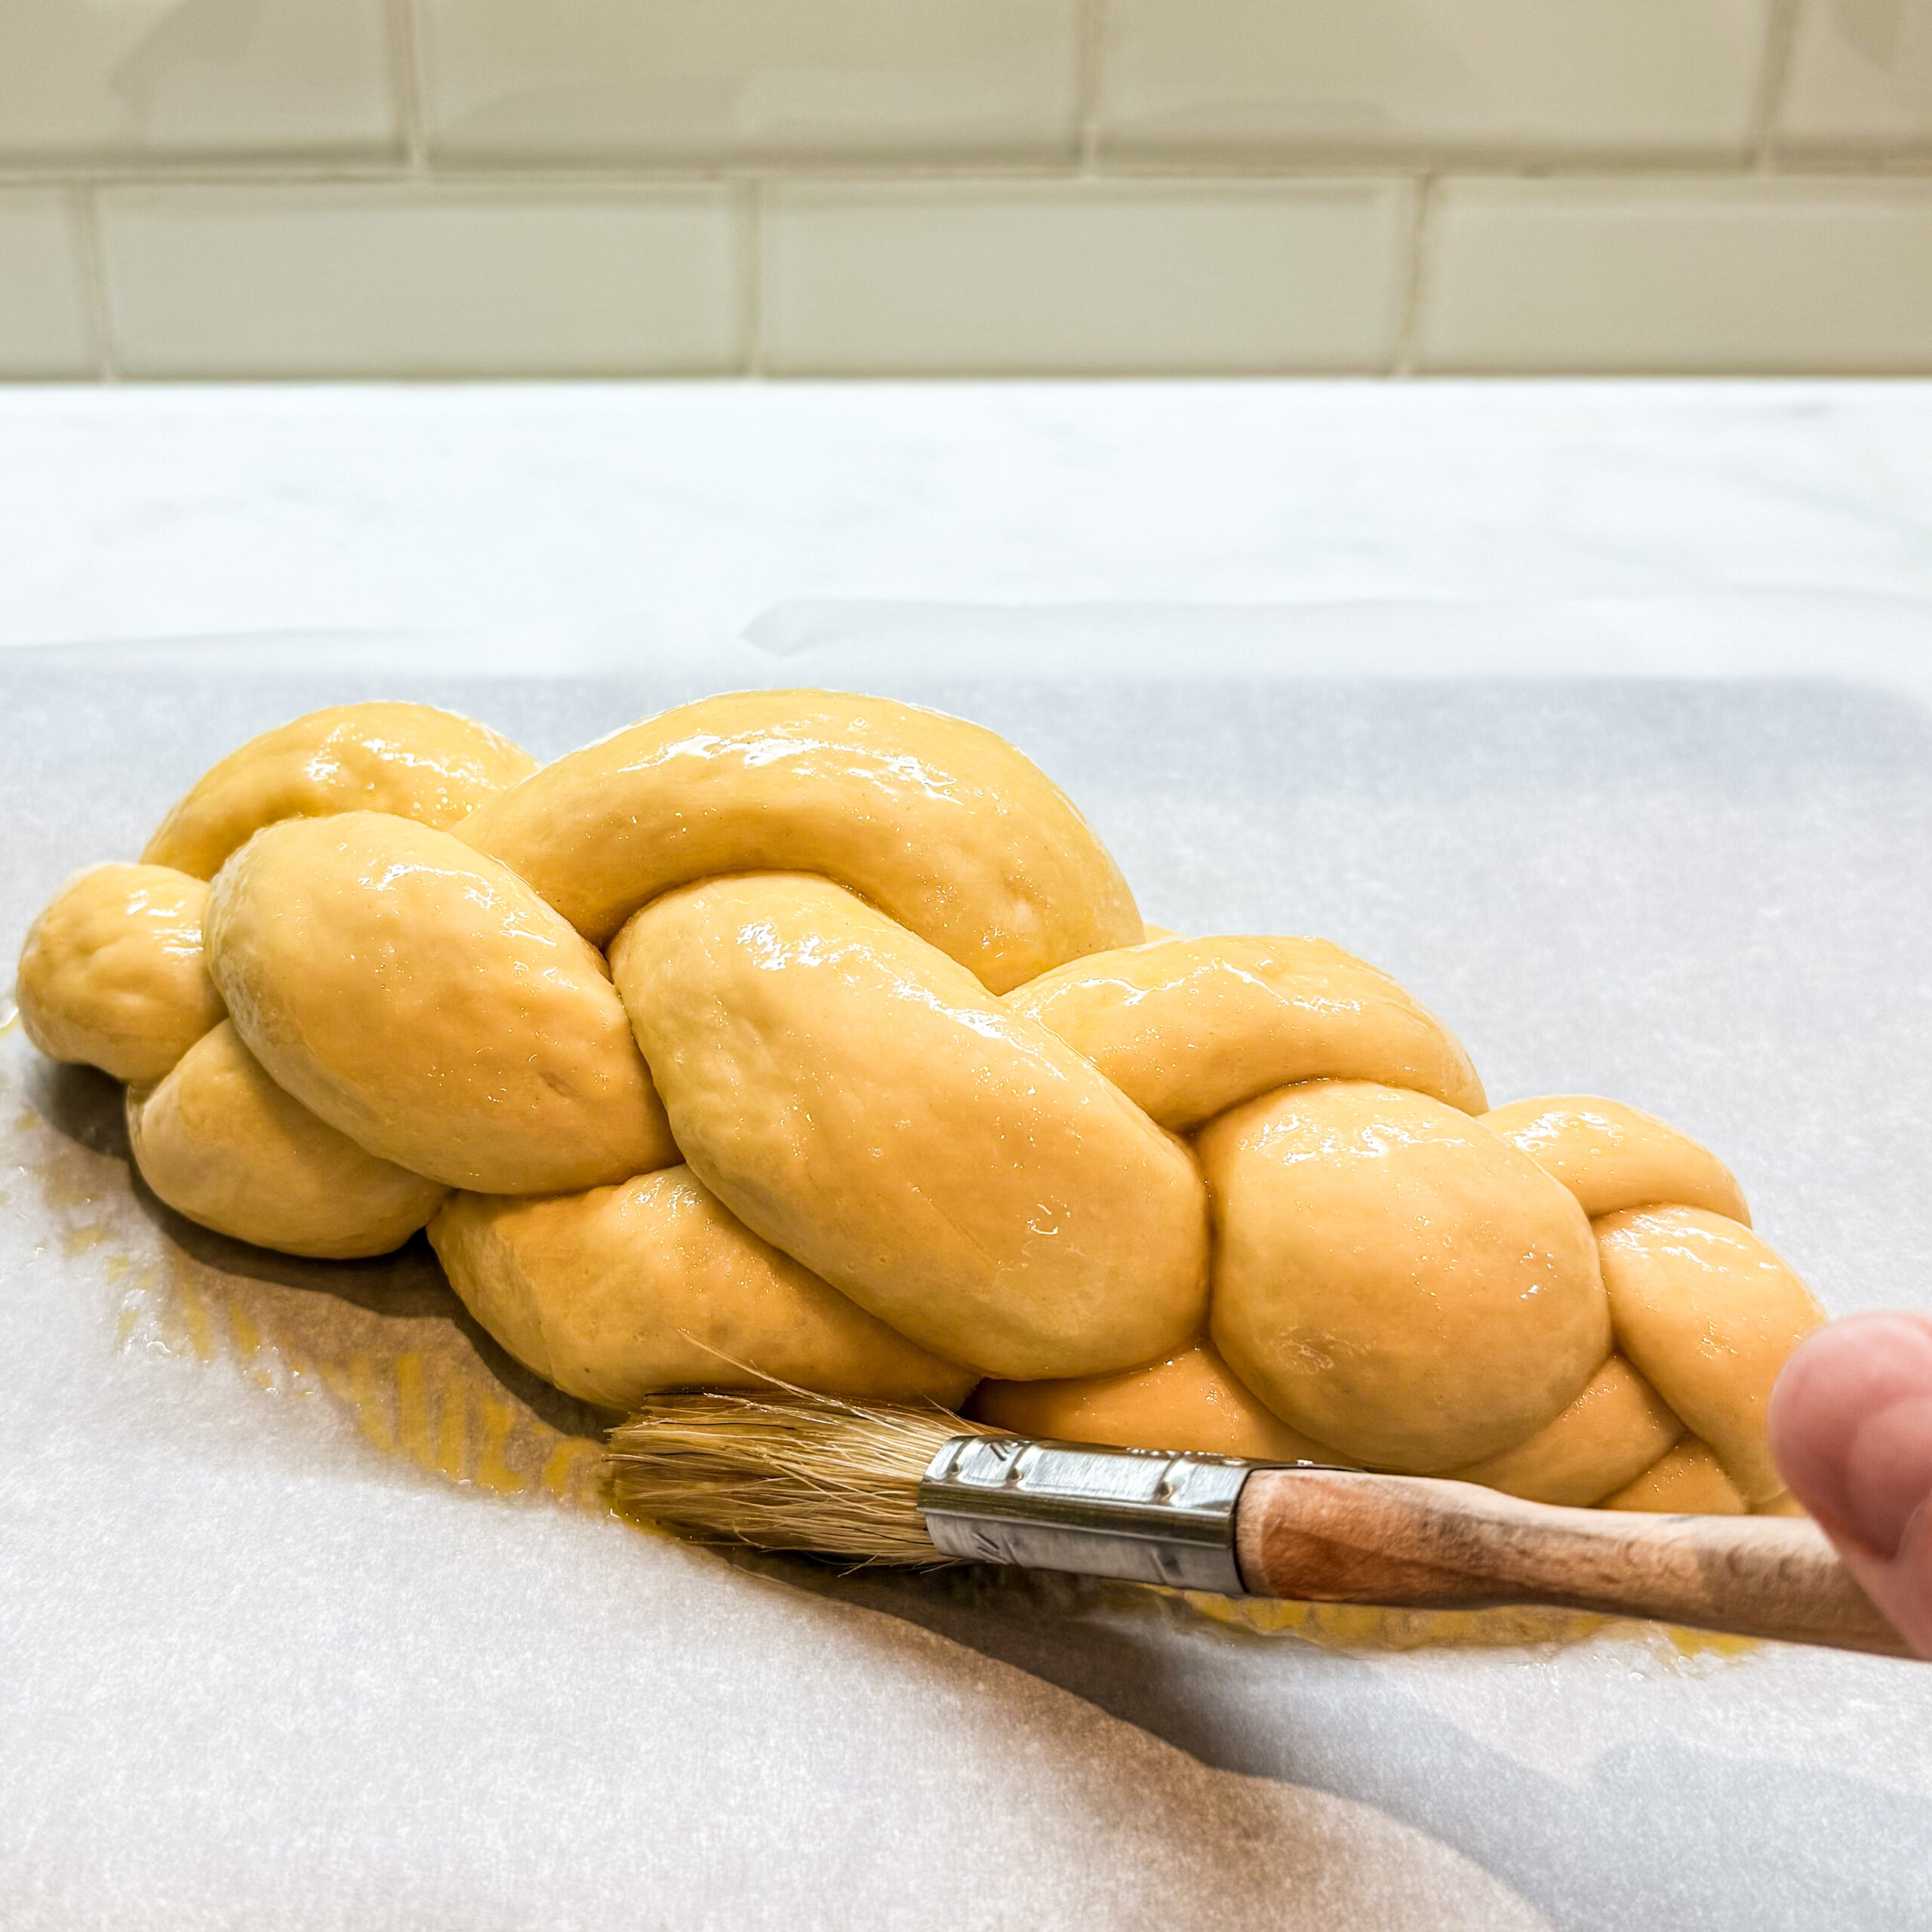
When applying your egg wash, use a pastry brush. Be careful to get the egg washed brush into every crevice, keeping in mind that the challah will rise and the braids will pull apart slightly when baking, resulting in lighter color where there was no egg wash. (Still looks pretty!)
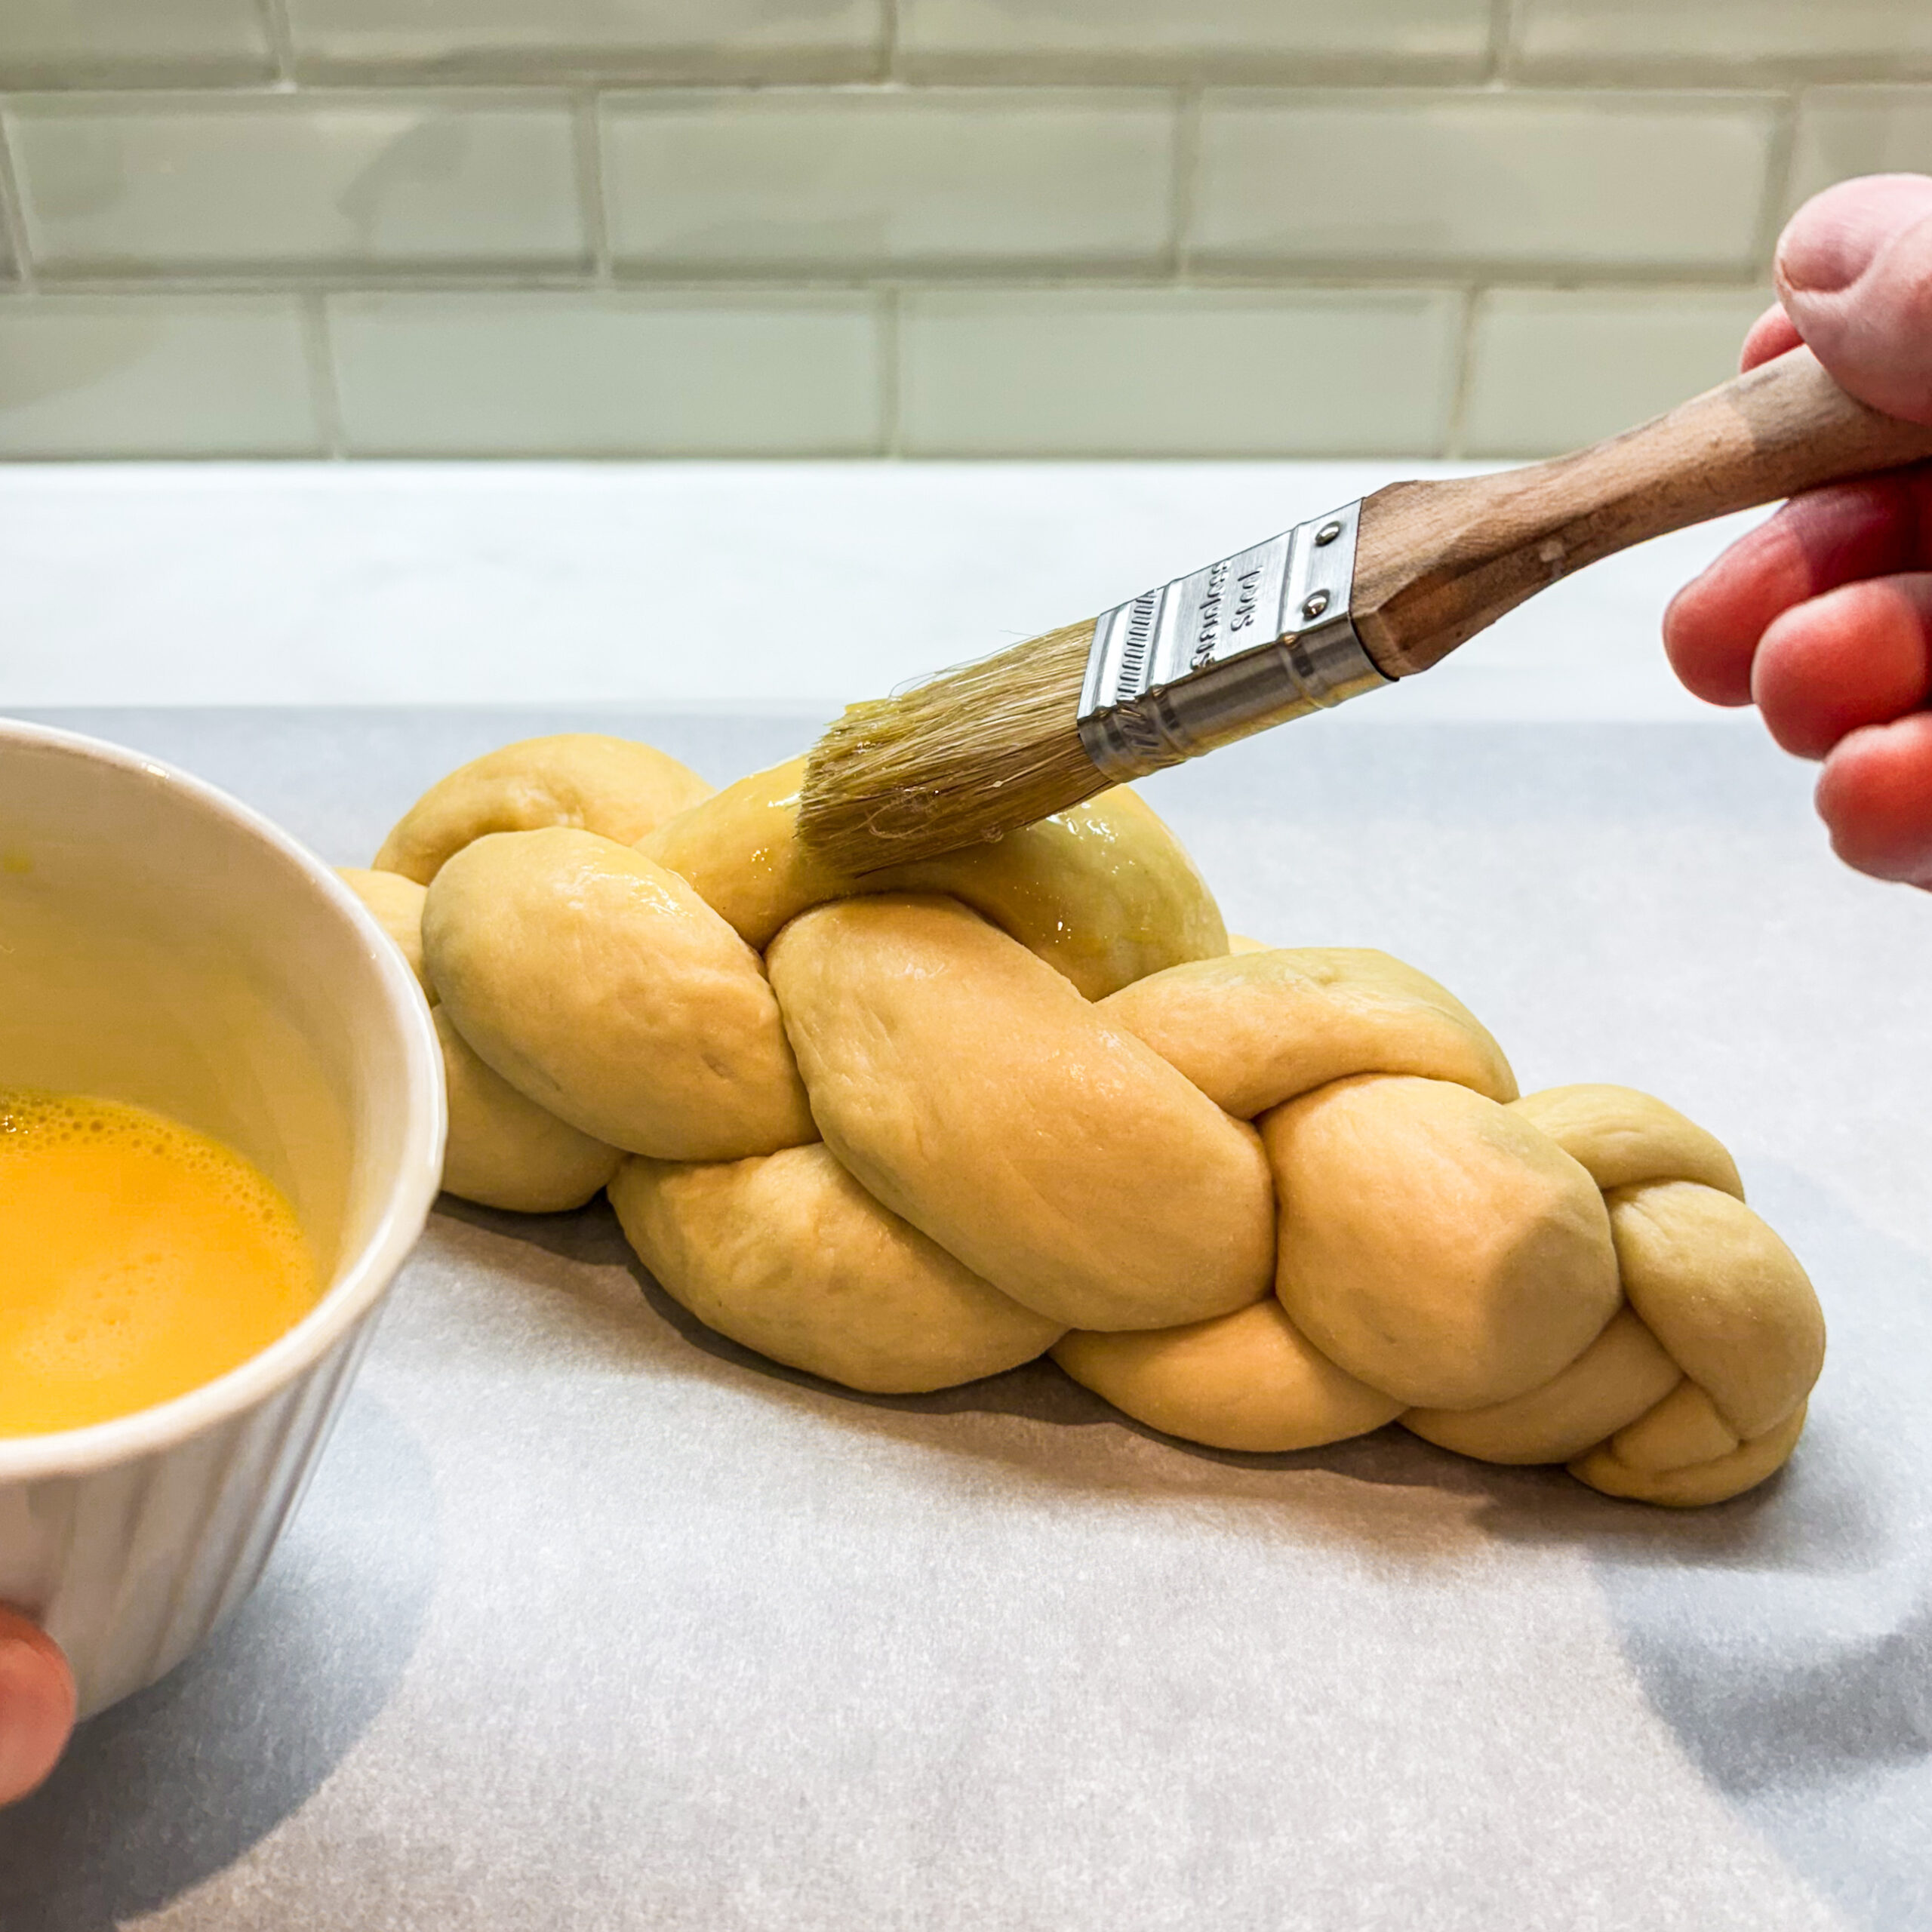
Apply the egg wash all the way down, painting to the very edges on the bottom where the challah meets the parchment paper/pan. (Yes, bake on parchment paper. Makes life much easier!) If you do not egg wash all the way down, the bottom will appear lighter, which is called a baker’s tan. (Think of a farmer’s tan when you wear a sleeveless shirt in the sun.)
Tip #10: Bake in the Center of the Oven to the Proper Temperature
Keep in mind that every oven is different and temperatures in the oven are not exact with some spots hotter than others. I bake in a convection oven for more consistent results. Generally, always place your challah in the center of the oven when baking. If I cannot fit my loaves on the middle shelf, I will bake and one and then the other immediately after. While you should always follow the recipe, I bake challah at 350° F, as that is a moderate temperature. I find that baking at 375° F causes the outside to bake much faster than the inside, resulting in too much of a crust.
You can also bake on two different racks (top third and bottom third), but be sure to swap them and rotate them half way through baking. I avoid doing this because I never want to risk the bottoms of the loaves from getting over-baked when on the lower racks, closer to the heat source.
Your challah is done when a thermometer inserted in the center (poke through the side) reads 190° F to 200° F. If you like the outside to bake darker, you can keep it in longer, but keep in mind that once the internal temperature reaches 212° F (the temperature at which water boils), you are losing moisture from the bread, which will result in dry challah. I never let the internal temperature go above 205° F.
Bonus Tips!
Don’t Feel Obligated to Make and Bake the Same Day
One of the beauties of working with bread dough is that, generally, you can elongate the dough preparation time by using the refrigerator.
For example, you can mix the dough and then place it in a bowl, covered well with plastic wrap and leaving room for it to rise, and tuck it in the refrigerator for up to 24 (or even sometimes up to 48) hours. For my Challah recipe, I suggest letting it rise at room temperature for approximately one hour, and then covering it and putting in the refrigerator. (I recommend this way for my recipe because it is egg rich and has lots of sugar, which elongates the time needed for the dough to rise.)
Alternatively, you can get to the point where you braid the challah (or shape the bread) and cover it with plastic wrap, but again leaving room for the dough to rise, and placing it in the refrigerator overnight. Allow it to come to room temperature for approximately 1-2 hours before baking, using the poke test, explained in Tip #8.
Cool Baked Bread Completely before Slicing
We all love bread that is warm, just out of the oven. However, when we slice warm bread, we are allowing steam to escape. That steam is what helps keep the internal part of the bread soft and moist. If you like your bread warm, you can always reheat it by wrapping it completely in foil and popping it in the oven at 350° F for approximately 10 minutes.
How to Defrost Challah
I am a big proponent of the freezer. I often bake breads and bagels and freeze them. To thaw challah and fool everyone at your table into believing it just came out of the oven before serving, wrap the entire challah in aluminum foil. Place it in the oven anywhere from 350° F to 400° F. If the challah went in frozen, check it at the 15 minute mark. (You can use a thermometer to gage whether it is defrosted or warm and that the temperature does not exceed 205° F.) If the challah was at room temperature, check it at the 10 minute mark. Allow to cool at least slightly (if not entirely) before slicing.
Challah Recipes
Cinnamon Shtick offers a number of challah and challah related recipes:
- Traditional Challah (eggy and sweet)
- Tangzhong Challah (super soft for days)
- Fluffy Sourdough Challah
- Whole Wheat Challah
- Spelt Challah
- Water Challah (sub in maple syrup to make it vegan challah)
- Blueberry Babkallah
- Cinnamon Crumb Babka
- Onion Rolls
Frequently Asked Questions
Should I sift flour when making challah?
There is no need to sift flour when making challah or any type of bread. Generally, recipes call for sifting flour to aerate it and remove any clumps. When making challah or any bread, you are working and kneading the dough thereby removing any added air and any clumps of flour will get incorporated from kneading.
Can I use all purpose flour instead of bread flour when making challah?
You can, but you will not get the same “bready” result. Bread flour has a higher protein content than all purpose flour, which means there is more gluten. Challah gets its “bready” texture from all that gluten. That said, you can definitely substitute in all purpose, but you may need slightly less water, as bread flour absorbs more water than all purpose flour.
1 Comment
Hi Rob! I wrote you a couple of weeks to tell you how my husband, “the taster,” loved the challah, (I can’t eat gluten myself.) Now I am back to say that it was also a hit with the judge(s) in the local town fair! There it was, amidst the many breads and rolls, with a shiny red, second-place ribbon. My braid was much better than the first time around, thougn one strand faintly resembled the boa constrictor that swallowed an elephant, if you’re familia with The Little Prince – still, an improvement from my first try. Thanks so much for giving me a very fun day baking, and a great entry for the fair as well.