
This post may contain affiliate links. As an Amazon Associate, I earn from qualifying purchases. For more information, please visit my Privacy Policy.
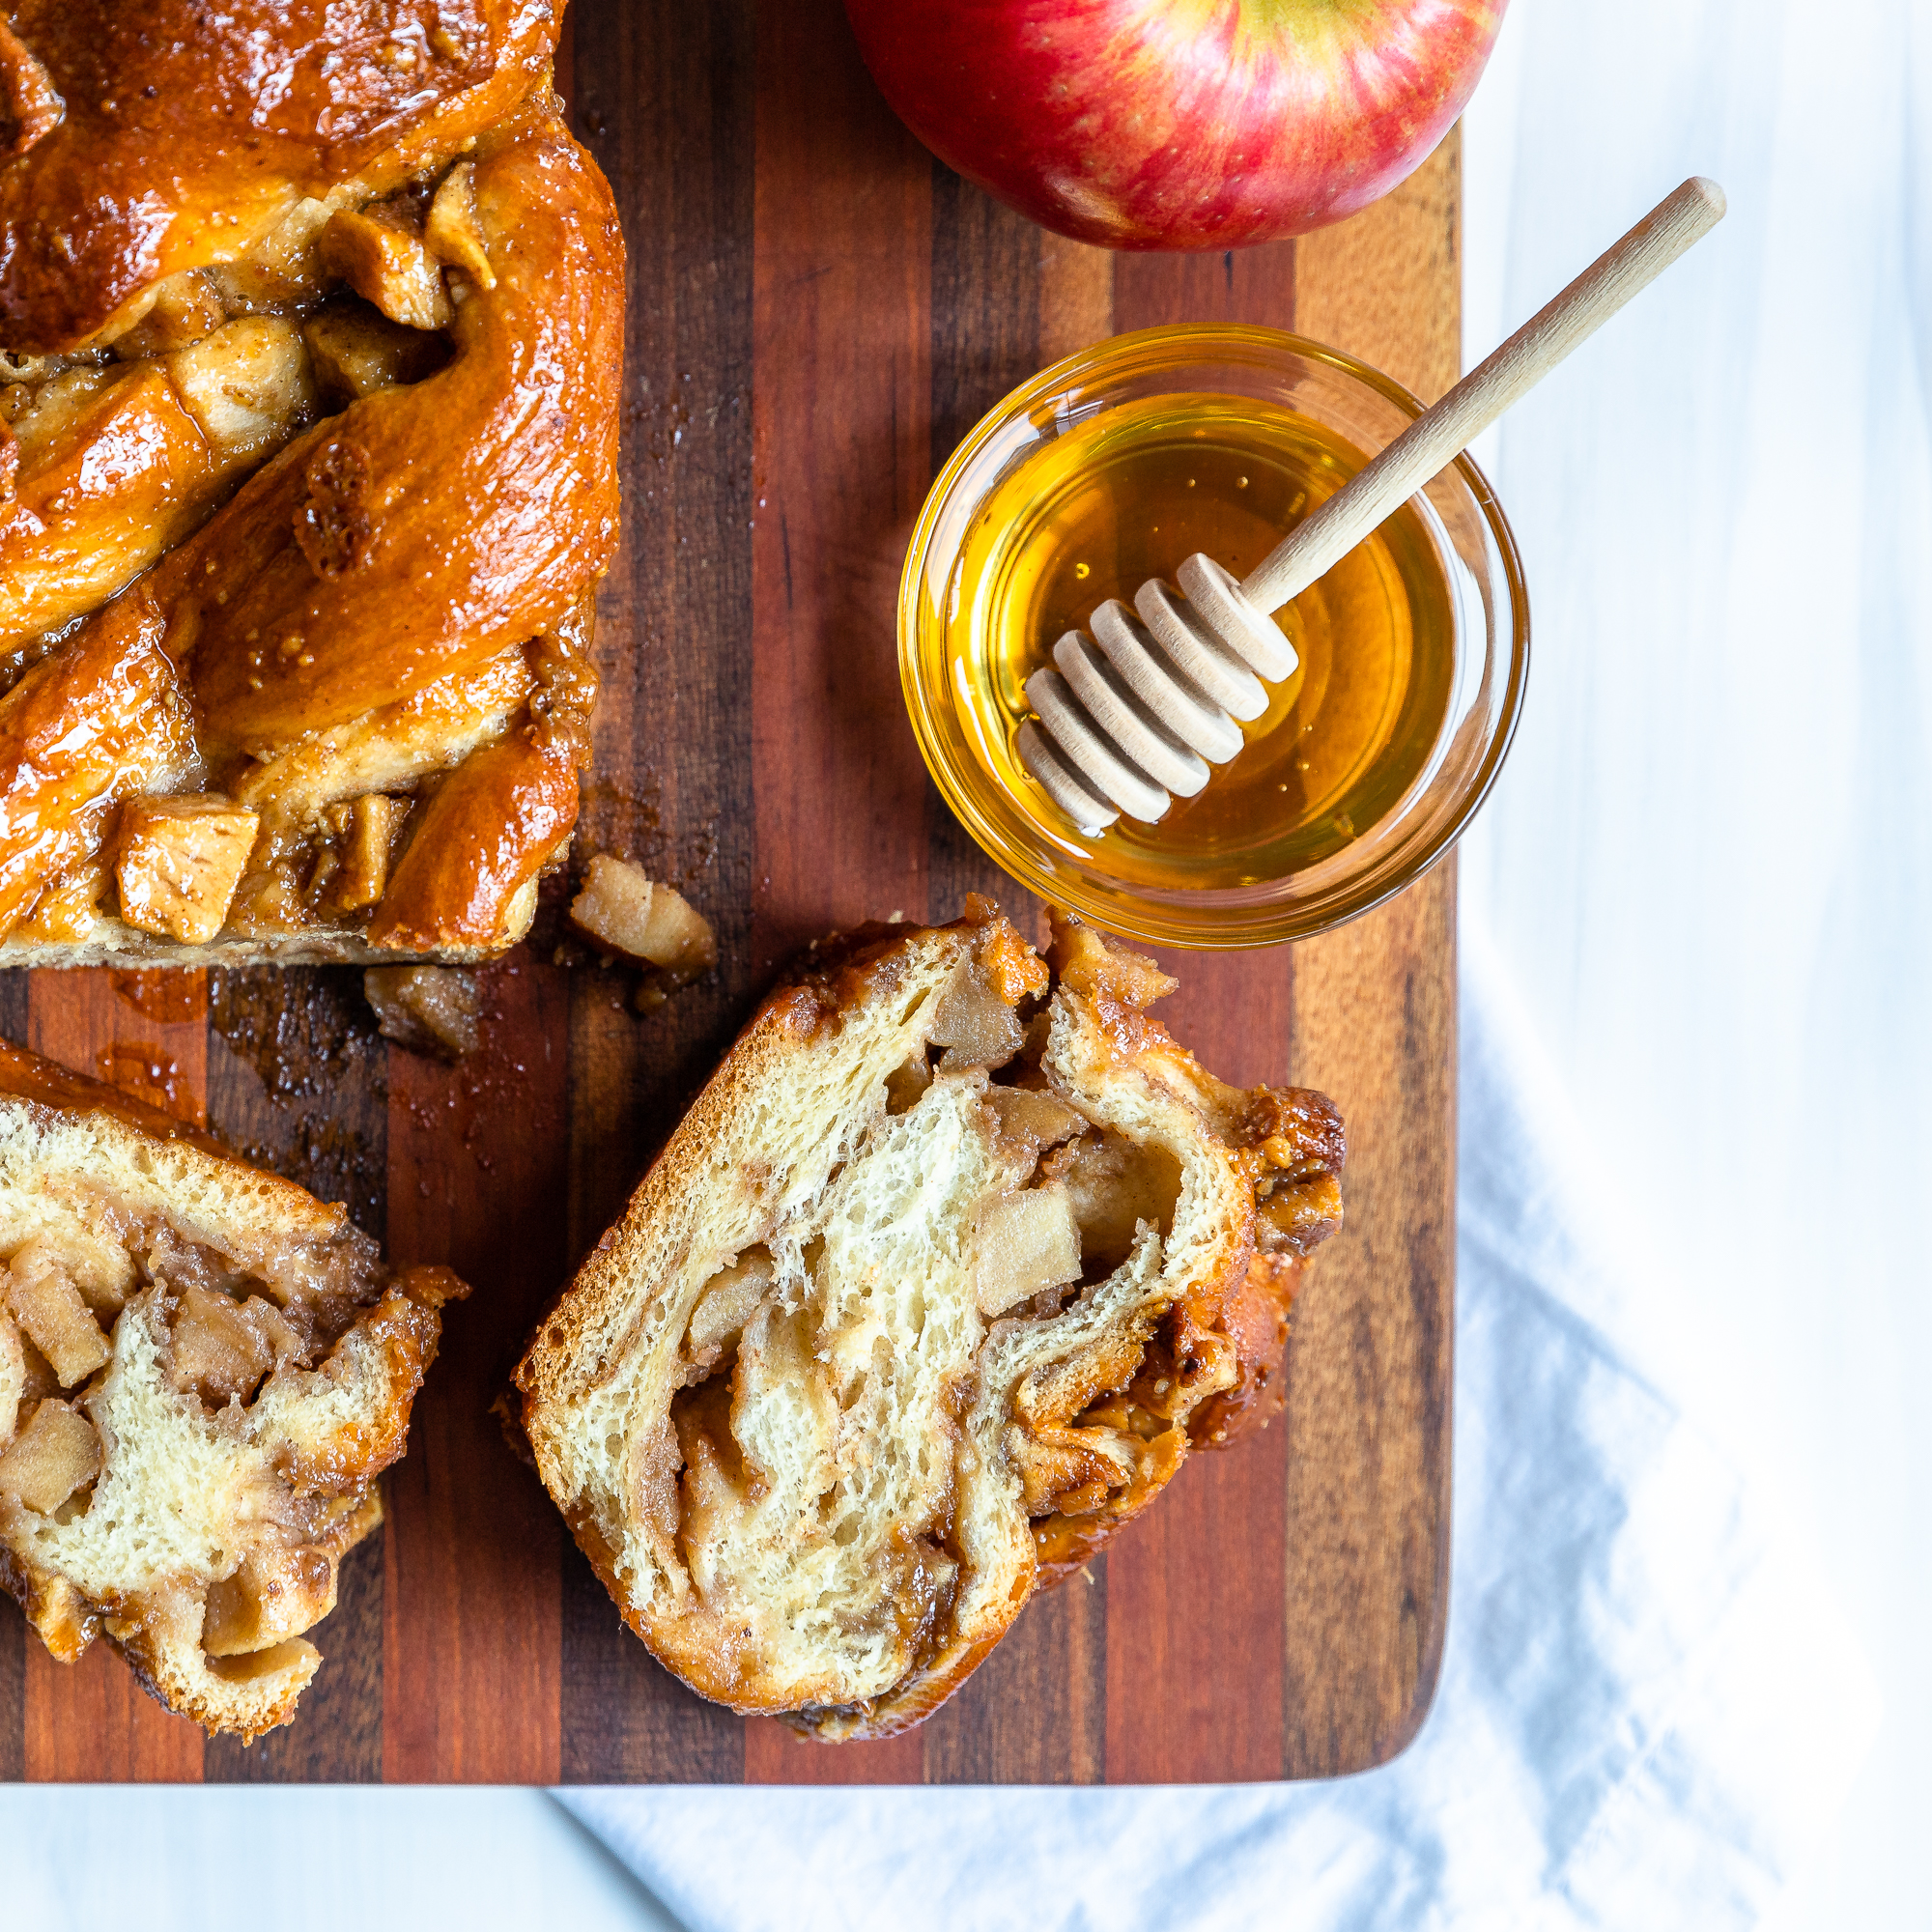
It’s fall baking season! Hooray! I must admit that this is my favorite baking season. Don’t get me wrong, I love a good summer pie and all, but autumn brings in the apples and my favorite spice. (Um, yeah, cinnamon. It’s in my blog’s name for a reason!) For me, this time of year is all about apples and honey, and I have been craving — needing — an Apple Honey Babka.
Why Apple Honey Babka?
I have been working on this recipe for a while. I wanted this recipe to be about the apples and honey in anticipation of the upcoming Jewish holiday, Rosh Hashanah, which marks the beginning of the Jewish new year. It is tradition to eat apples and honey together for a sweet new year. This article from Chabad explains it further.
How the Filling for this Babka Came to Be
It took several tries to reach the final version of this Apple Honey Babka recipe because I did not want it to simply be a version of my Cinnamon Toasted Pecan Babka with apples tossed in. (Although, that would, for sure, make for some fine eatin’!) The filling needed to stand separate from other babkas.
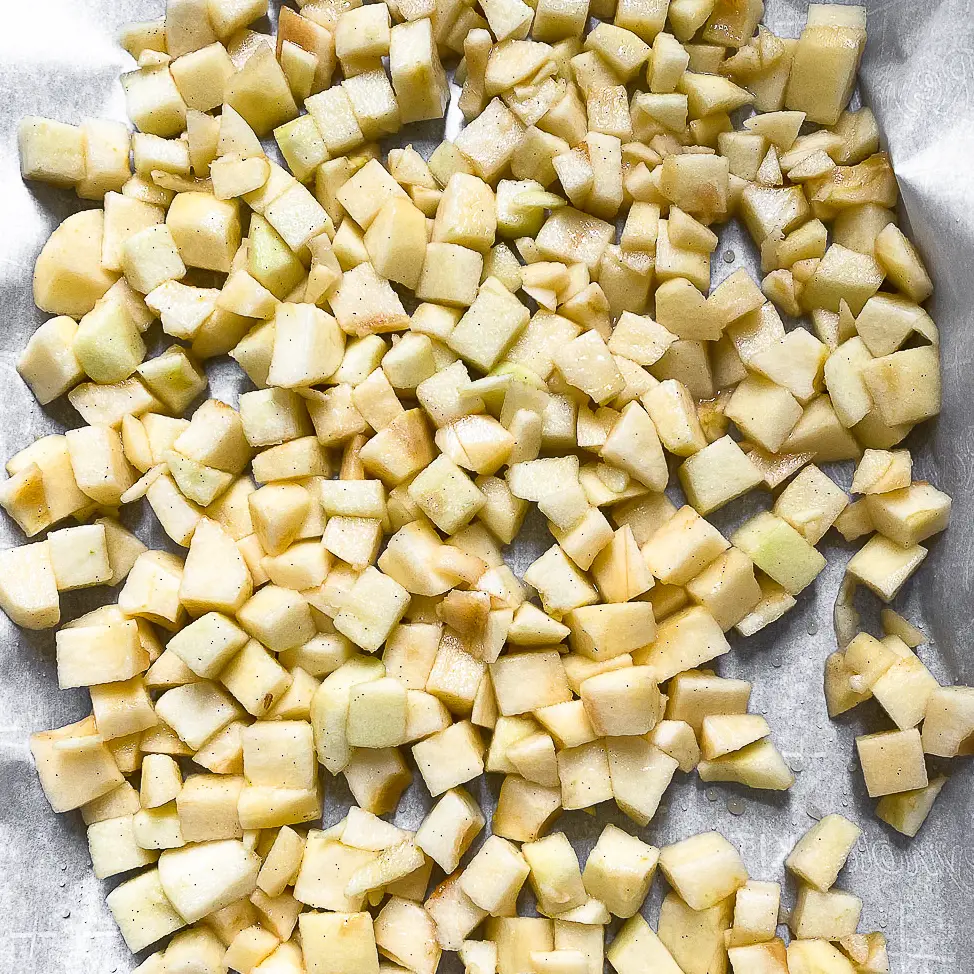
The first component I worked on was the apples. Tossing in uncooked apples to the dough was not an option for two reasons. First, they would not cook through enough during the babka’s bake time. Second, cooking the apples before incorporating them into the dough makes the apples more flavorful.
I debated between making an apple compote (on the stovetop) and roasting them, so I tried both. I found that roasting the apples brought out the apple flavor more and also made for less work and easier clean up. Rather than coat the apples in sugar and spices, they are kissed with honey and vanilla.
My earlier iterations of this Apple Honey Babka recipe just had the roasted apples. While it was delish, I felt the babka was just missing something. The filling needed more than just apples. Wanting to stay true to the honey, I incorporated honey into a walnut and brown sugar filling. It is reminiscent of baklava, which is also incredibly enjoyable!
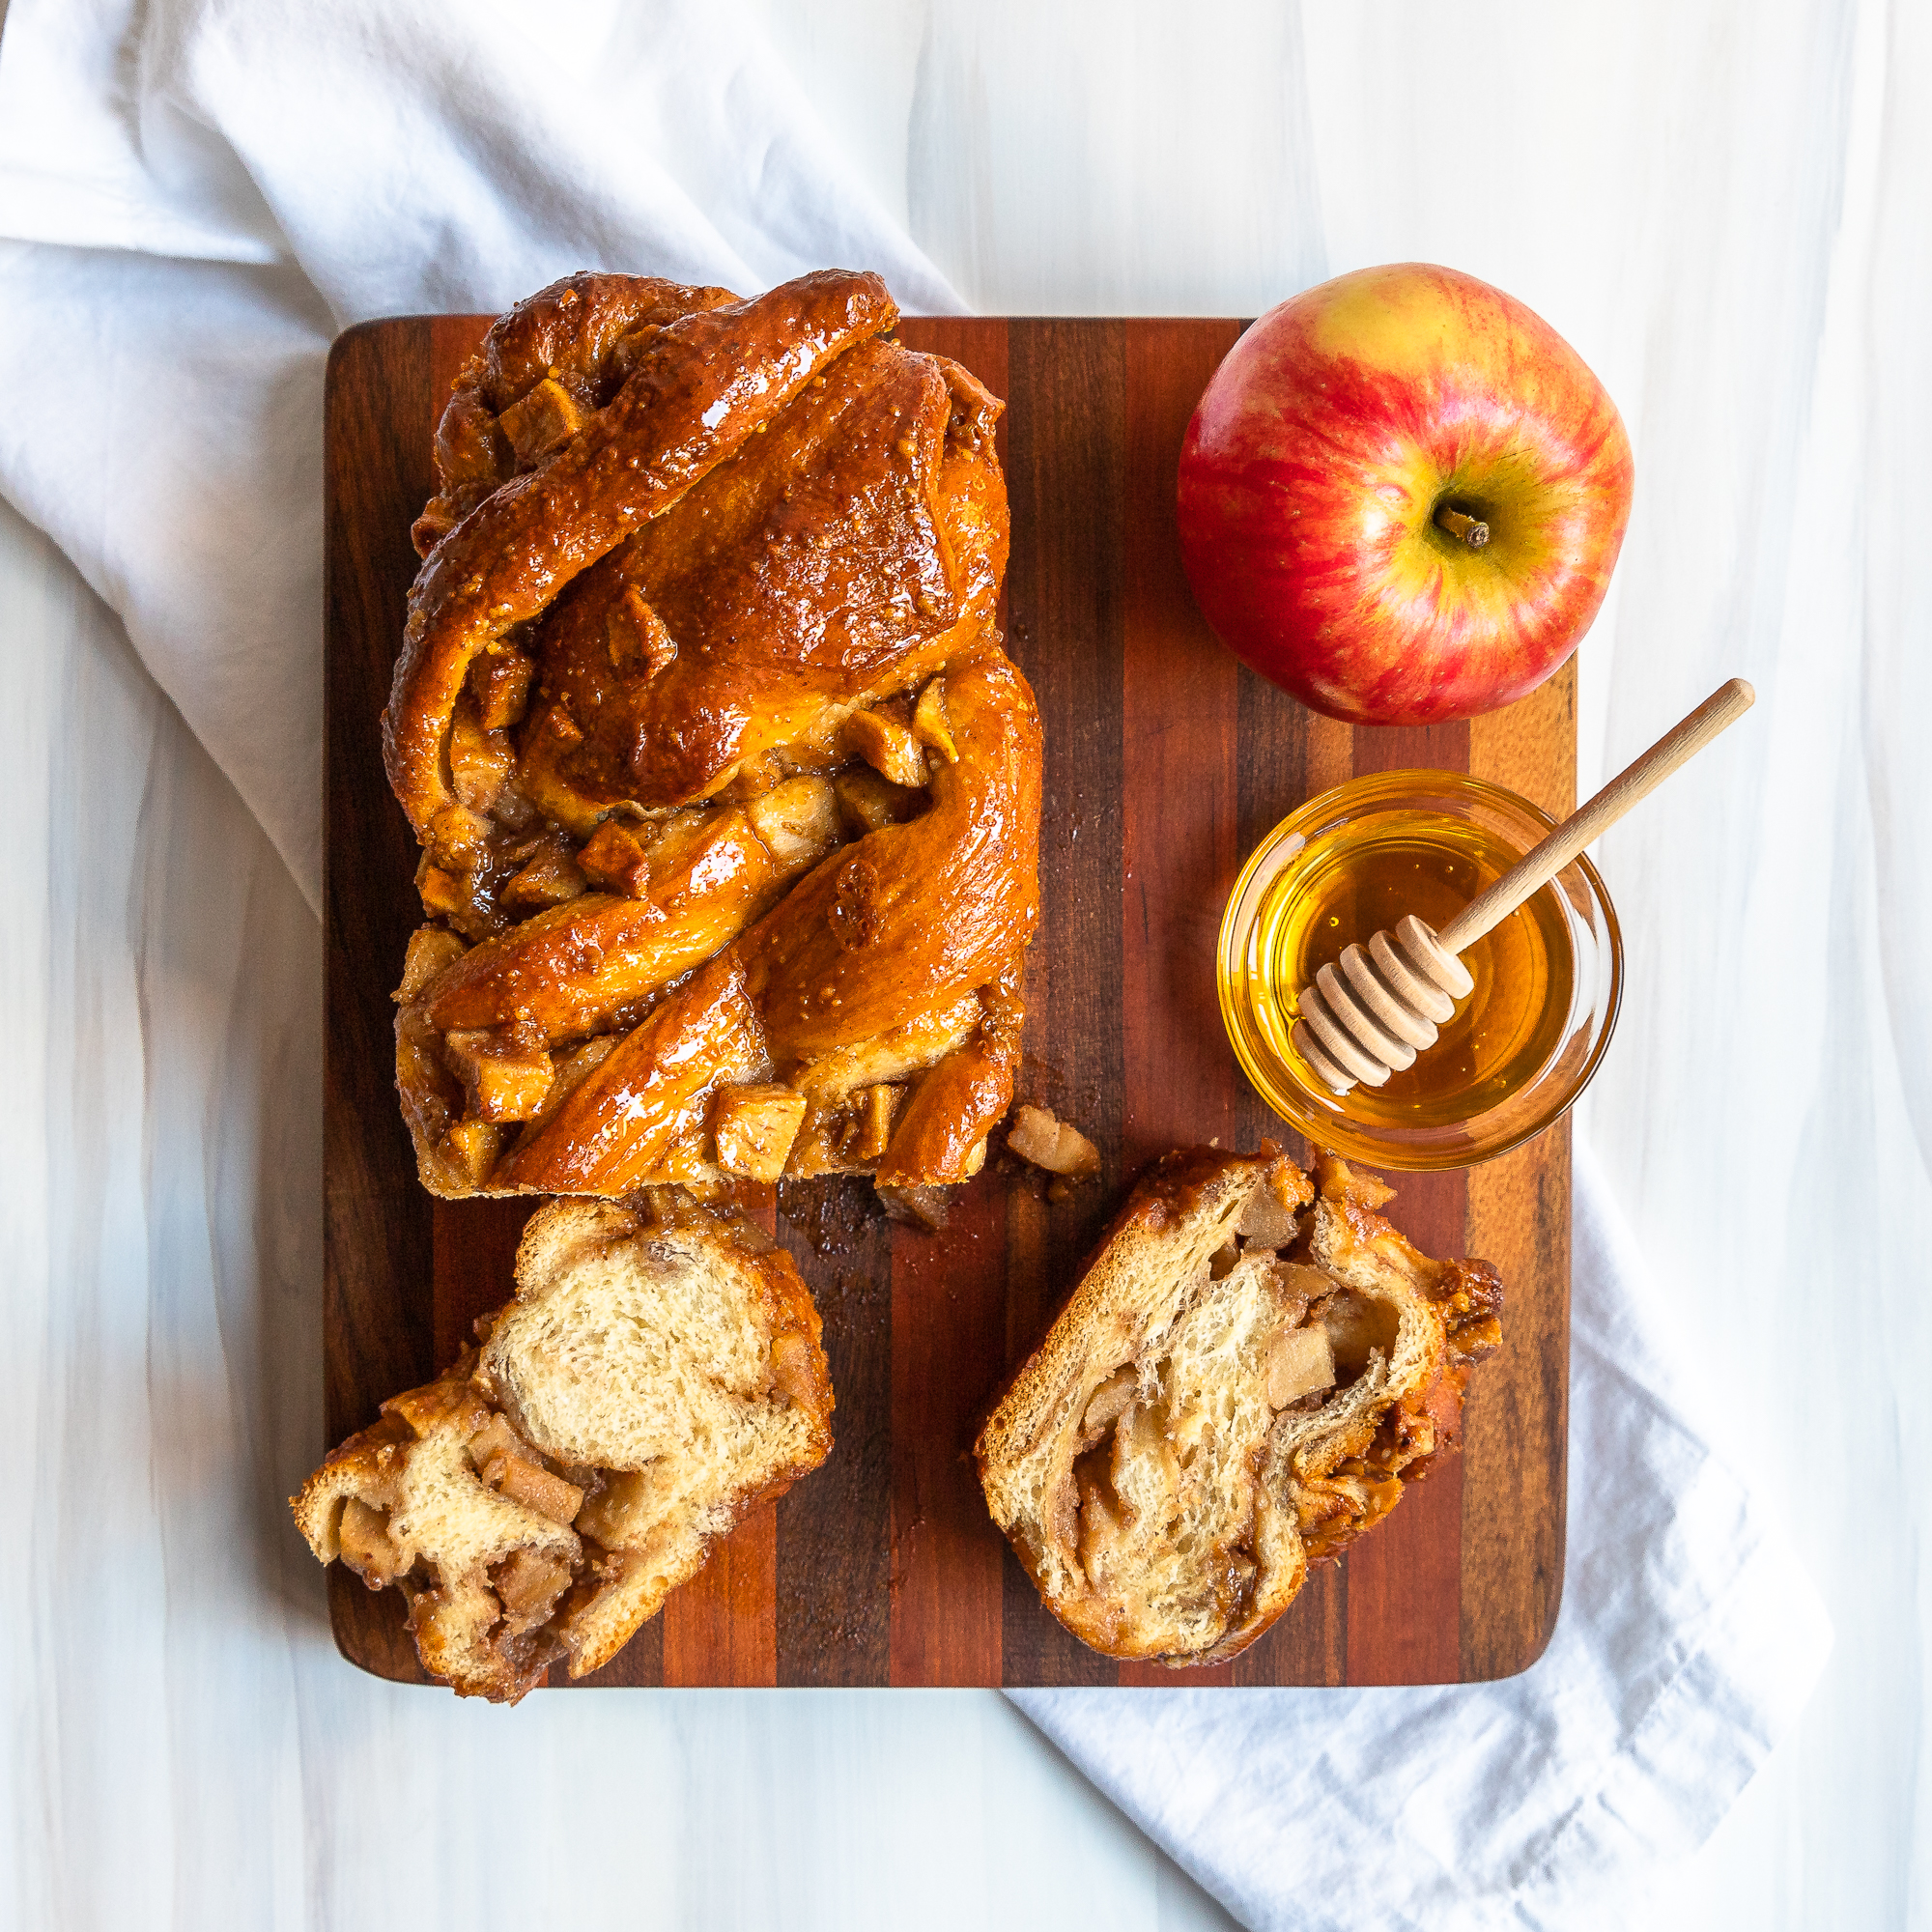
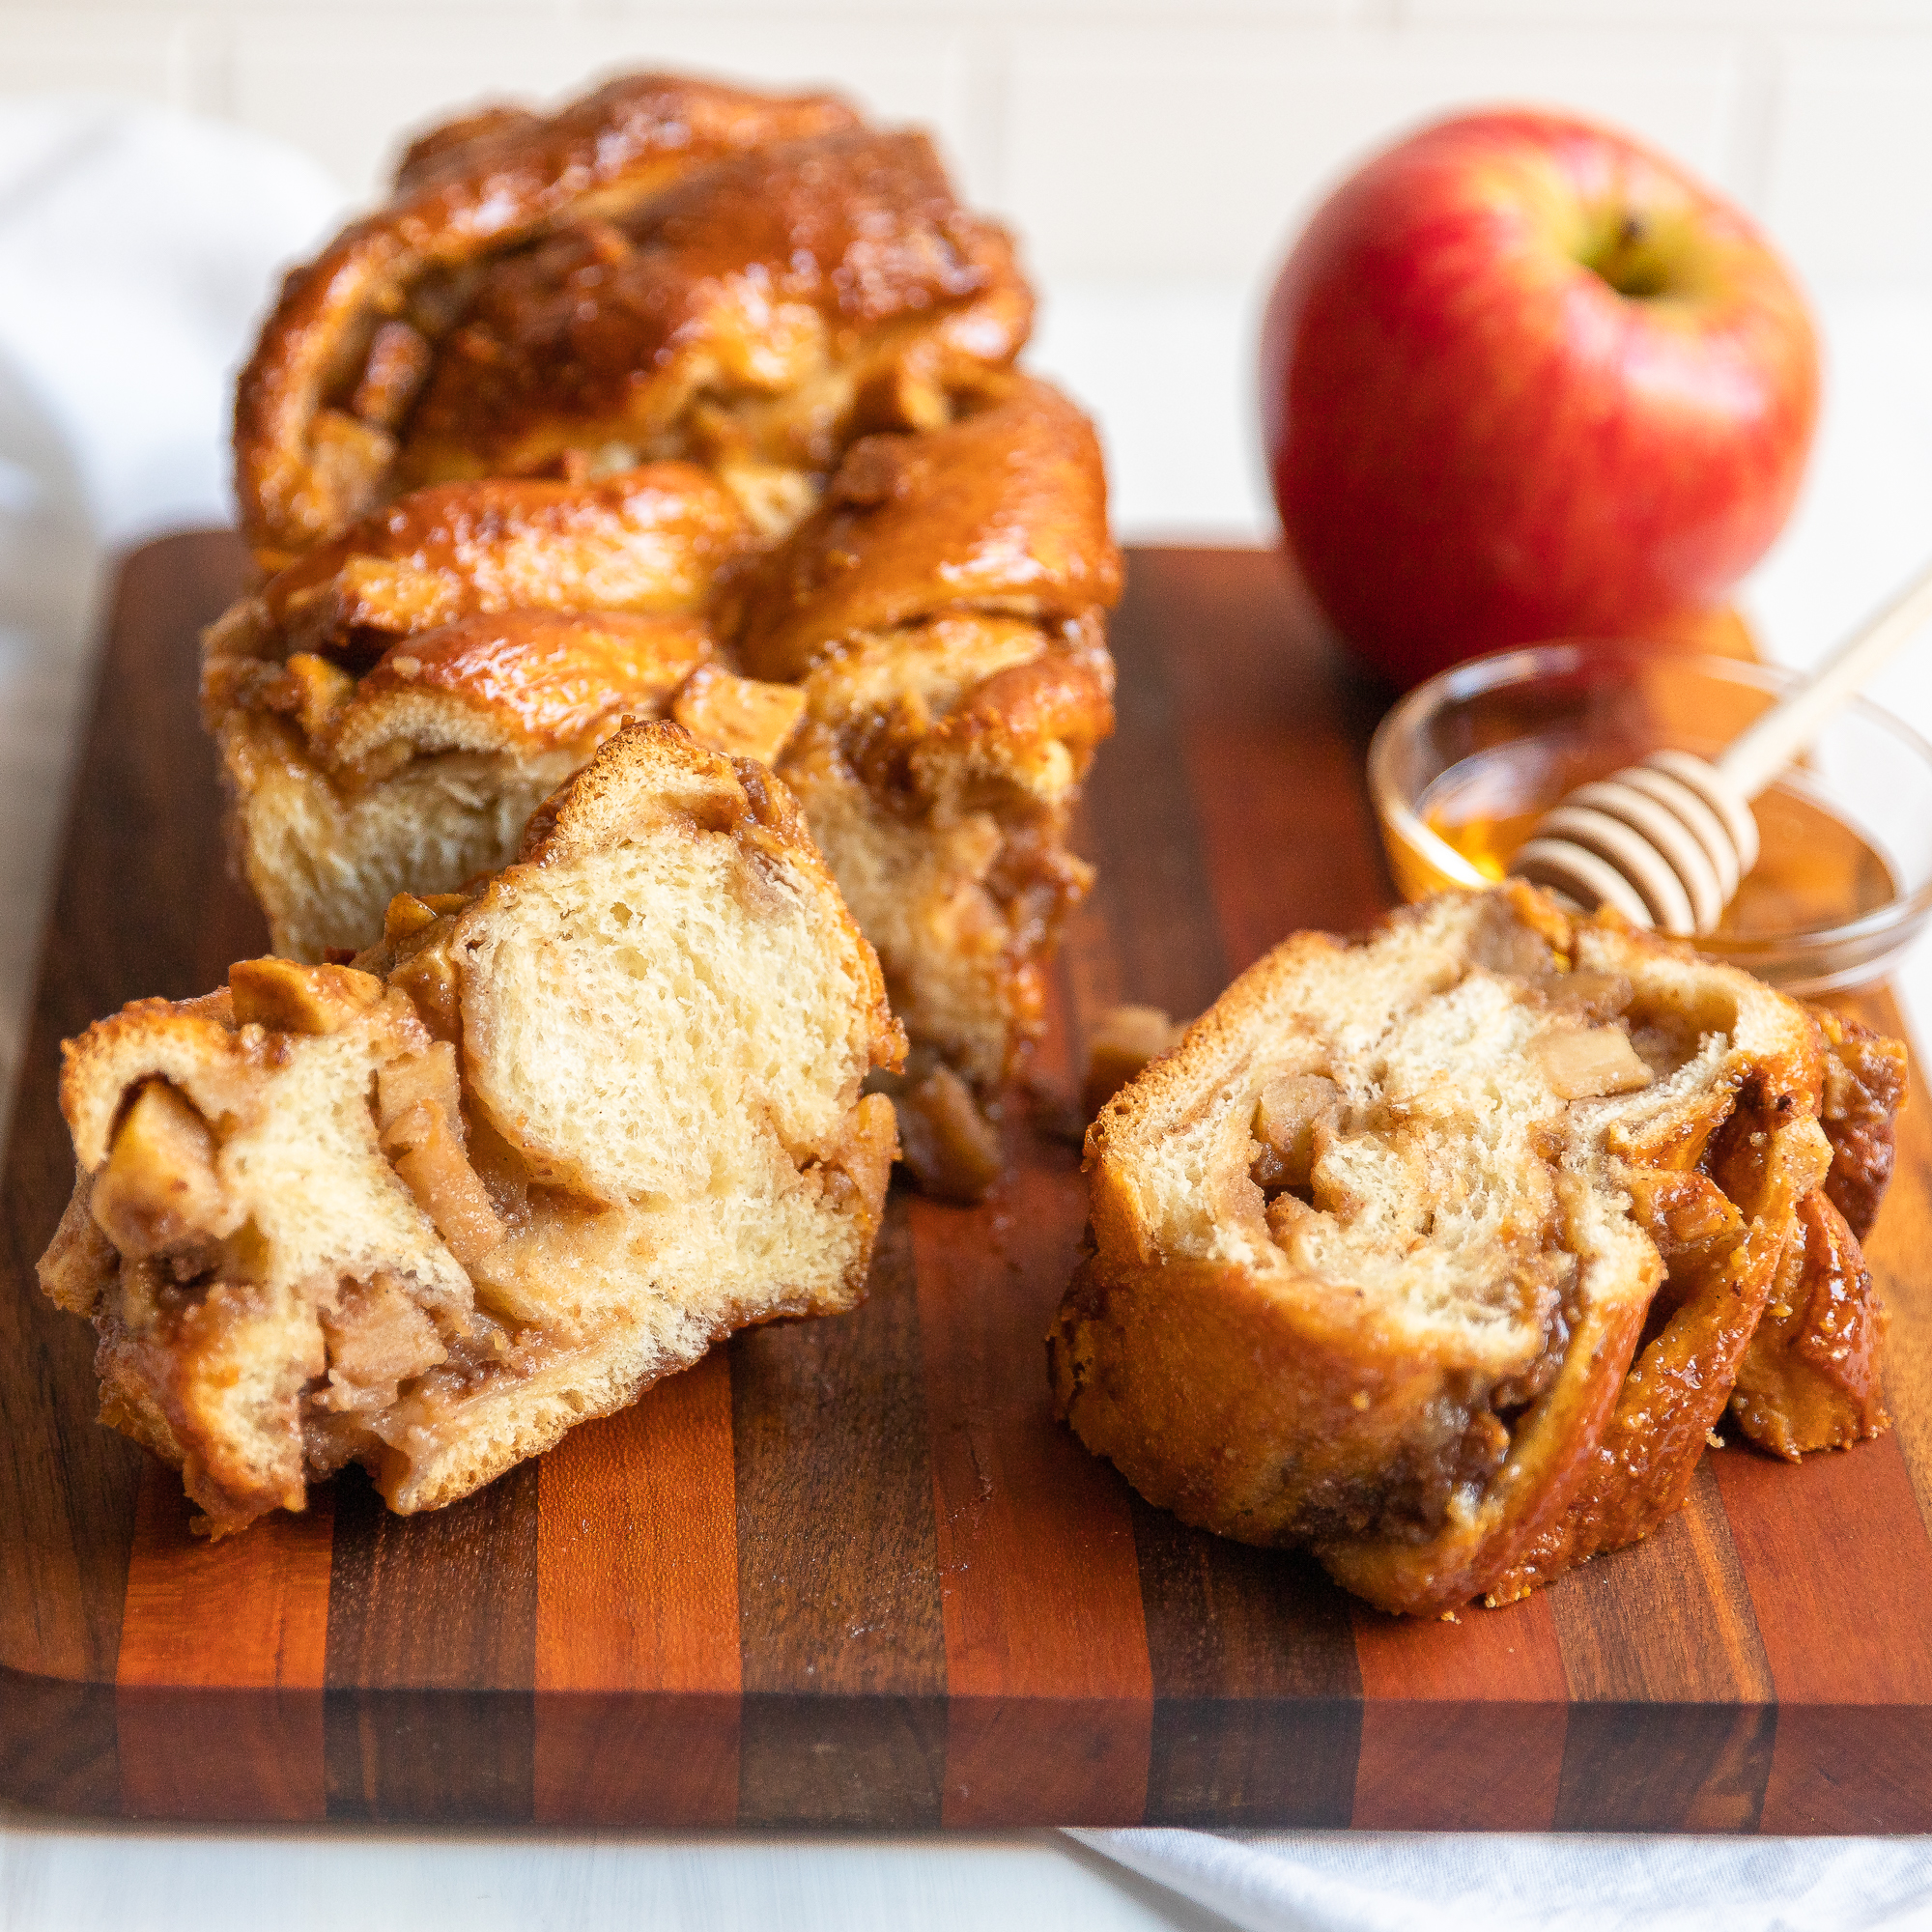
Likewise, I replaced the sugar in the dough with honey, and topped the whole shebang with a simple syrup made with honey.
For me, this Apple Honey Babka screams Happy Fall as much as Happy Rosh Hashanah!
How to Make Apple Honey Babka
My instructions in the recipe are detailed, but do not be scared of all the printed words! They are there to help you. Making this Apple Honey Babka is actually very easy!
Here are a few tips:
- You can absolutely make the Apple Filling and the Walnut Honey Filling in advance. Store them in airtight containers in the refrigerator. I am a big fan of making components of a recipe in advance. It makes baking day move seamlessly and seem almost effortless. In addition to the fillings, you can make the babka dough the day before and let it rise in the refrigerator overnight. The dough is actually easier to roll out when it is cold.
- The Walnut Honey Filling should be a spreadable consistency. If it seems too wet, let it sit in the refrigerator for 20-30 minutes. If it seems too dry, add more milk, 1 tsp. at a time.
- Shaping a babka can look fancy and stressful. Don’t sweat it! Just know that when you cut the rolled logs down the middle, it’s going to be messy. Such is life. If some of the apples fall out, just stick them back in once you place the babka in the baking pan.
- Use a local honey. Honey tends to lose many of its subtle properties once baked. It’s therefore not worth spending a fortune on some fancy shmancy honey. That said, I definitely recommend buying a local honey rather than some national brand. If raw honey is more expensive, there is no need to splurge on it. Once the babka is baked, the honey in it is no longer raw anyway.
Frequently Asked Questions to Make Apple Honey Babka
What type of apples are best in babka?
Use any standard baking apple, but ones that tend to keep their shape when heated. Some examples are honeycrisp, Granny Smith, pink lady, Jonagold, and golden delicious. There are many other varieties out there that do not get mushy when heated. Depending on your taste buds, you may want a more tart apple in this apple babka rather than a sweet one.
What type of honey is best for baking?
I like to use a local honey in my baking. That said, honey tends to lose many of its subtle properties once baked. It’s therefore not worth spending a fortune on some fancy shmancy honey. I recommend buying a local honey rather than some national brand, but make sure there are no other ingredients in it. If raw honey is more expensive, there is no need to splurge on it. Once the babka is baked, the honey in it is no longer raw anyway. I have made this babka with the cheapest honey I could find at Costco and it was delicious.
Apple Honey Babka
Ingredients
Apple Filling:
- 500-530 grams apples (approximately 4 medium sized apples, weighed after peeled and cored)
- 1½ teaspoons cornstarch
- 63 grams honey (3 Tablespoons)
- ¼ teaspoon vanilla bean paste (or vanilla extract)
Walnut Honey Filling:
- 120 grams walnuts (1 cup)
- 42 grams unsalted butter, melted (3 Tablespoons)
- 2 teaspoons ground cinnamon
- 10 grams vanilla extract (2 teaspoons)
- 110 grams light brown sugar (½ cup)
- 170 grams honey (½ cup)
- 23 grams heavy cream or milk (1½ Tablespoons)
Dough:
- 7 grams active dry yeast (1 envelope) (2¼ teaspoons)
- 245 grams milk* (1 cup, warmed to 110℉)
- 75 grams honey (2 Tablespoons plus 1½ teaspoons)
- 1 large egg, at room temperature
- 1 large egg yolk, at room temperature
- 10 grams vanilla extract (2 teaspoons)
- 480 grams all purpose flour (4 cups)
- 5 grams salt (1 teaspoon)
- 113 grams unsalted butter, at room temperature (8 Tablespoons or ½ cup)
Glaze:
- 23 grams water (1 Tablespoon plus 2 teaspoons)
- 43 grams honey (2 Tablespoons)
- ½ teaspoon vanilla extract
- ⅛ teaspoon salt
Instructions
- Make the Apple Filling. Preheat oven to 350°. Line a rimmed baking sheet (a jelly roll pan) with parchment paper or aluminum foil. Cut the apples into ¼ of an inch squares. Toss apples with remaining ingredients in a large bowl. Lay the apples on the prepared baking sheet in one layer. Bake until apples are slightly tender, 25–30 minutes, just until a fork inserted comes out easily. Let cool, then transfer apples and any accumulated juices to a bowl.
- Make the Walnut Honey Filling. Line a baking sheet with parchment paper or aluminum foil. Spread walnuts evenly on sheet. Bake for 6 minutes. Stir the walnuts, flipping them over. Bake an additional 2-3 minutes. Be careful not to burn them. You just want them toasted. Remove from oven and set aside until the walnuts are cooled completely and at room temperature, at least 20 minutes.
- While the walnuts are cooling, melt the butter in a saucepan on low. Once melted, set aside to cool to room temperature.
- Once both the walnuts and butter are cooled to room temperature, place them with the remaining ingredients in a food processor and pulse until fully incorporated.
- Cover with plastic wrap until ready to use.
- Prepare Dough. If using active dry yeast, place warmed milk into bowl of electric mixer. Sprinkle yeast and approximately 1 teaspoon of the honey over the milk. Using a fork, stir the mixture to distribute the sugar and to ensure all the yeast granules are hydrated. Allow to sit for approximately 3-5 minutes until the mixture gets foamy.
- If using instant yeast, combine the yeast, milk, and honey in the bowl of an electric mixer.
- Once the yeast mixture is foamy, add the room temperature egg, the room temperature egg yolk, and the vanilla to the mixture. Using the dough hook, turn the mixer on at a low speed and add the rest of the honey. With the mixer running at the lowest speed, add the flour. As the flour starts to get absorbed by the liquid mixture, raise the mixer to a medium speed. You may need to turn the mixer off once or twice to wipe down the sides of the bowl with a rubber spatula. Allow to knead for approximately 3 minutes. The dough should clean the sides of the bowl. If it is too wet (sticking to the sides and bottom of the bowl), add some flour, no more than 1 Tablespoon at a time. If the mixture is too dry, add a little milk, 1 teaspoon at a time.
- Lower the mixer speed to low (1 or 2 on the KitchenAid) and slowly add the salt, allowing it to knead into the dough, an additional 3 minutes. Stop the mixer and take a small piece of dough and stretch it between your fingers. It should form a “window pane”, meaning is should get thin enough that it is translucent without ripping. If it is not at that point yet, continue kneading in the machine at 1 minute intervals. (It may just need an additional minute or two to reach the window pane stage.)
- With the mixer running at medium speed, add the butter a few pieces at a time until fully integrated into the dough before adding more. You may need to turn off the mixer once or twice to scrape down the sides of the bowl, and it could take up to ten minutes for the butter to become fully integrated into the dough. The dough should look shiny and be slightly sticky. If, after several minutes, the butter is still not fully incorporated, do not panic. Just keep kneading. If you completely lose patience, you can just move to the next step – having some unincorporated butter is not problematic in this recipe.
- Lightly grease a bowl (with a little butter or nonstick cooking spray). Form dough into a ball and place it in the bowl. Turn the dough over to coat it in the butter or nonstick cooking spray and cover tightly with plastic wrap.** Let the dough sit in a warm area on the counter until doubled in size, approximately one hour.
- Prepare two loaf pans, 8 or 9 inches long, and 3 to 5 inches wide, by coating with nonstick cooking spray or butter. (Using butter imparts more flavor on the edges of your babkas.) For an even easier pan removal, use parchment paper on the bottom and/or sides of the pan, but be sure to coast the parchment with nonstick cooking spray or butter.
- Once dough has doubled in size, remove the plastic wrap and de-gas it by folding it over onto itself and knead it a few times by hand. Divide it in half, preferably by weight. Cover one half with plastic wrap until you are ready to work with it.
- Roll dough out to three inches longer than the length of your pan. (If you are using a 9 inch long pan, roll it out to 12 inches, to form a rectangle of 12 inches by approximately 16-18 inches. The dough should be approximately ⅛ inch thick.
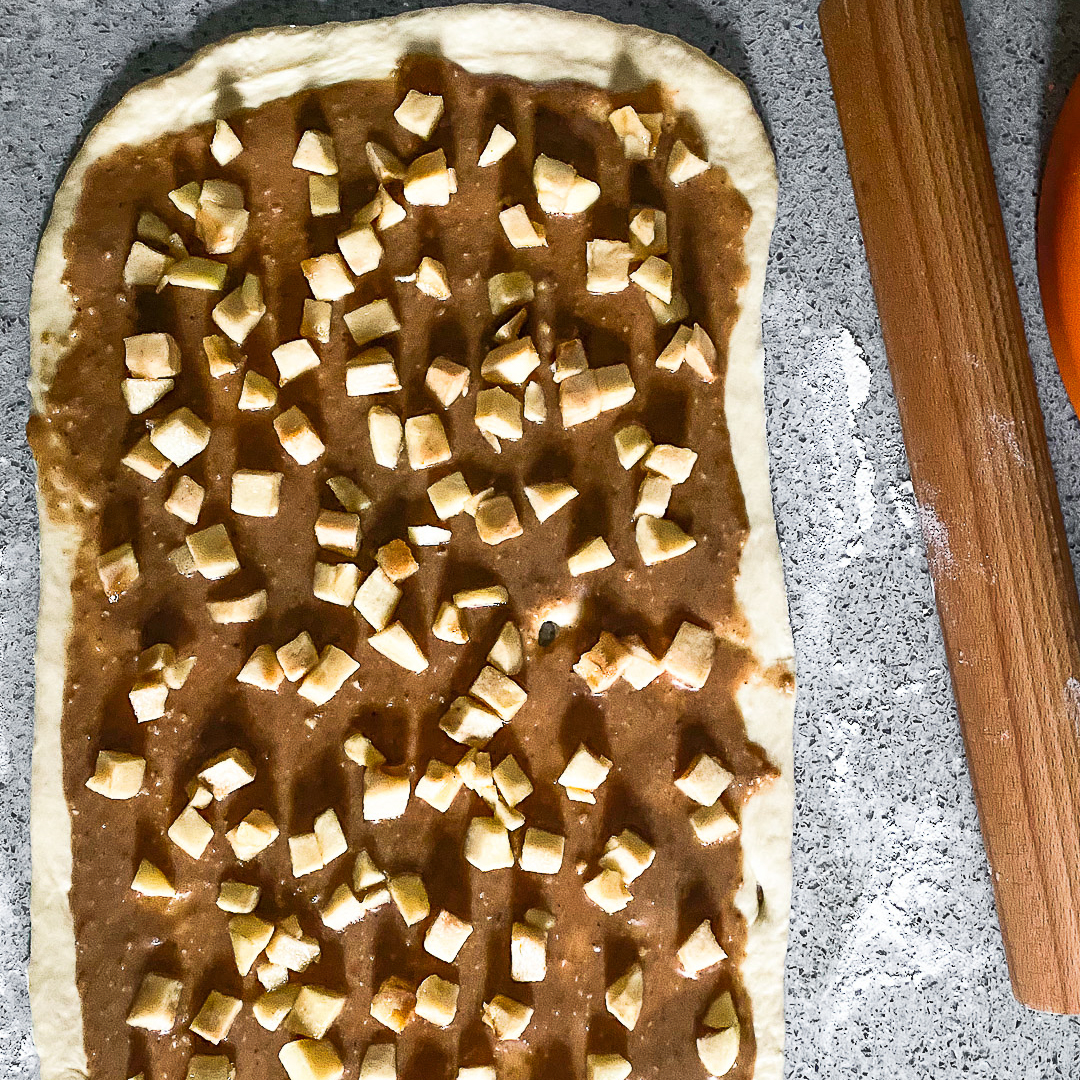
- Leaving a border of ½ an inch on every side, spread ½ of the walnut honey filling on the dough. Spread half of the apples on top.
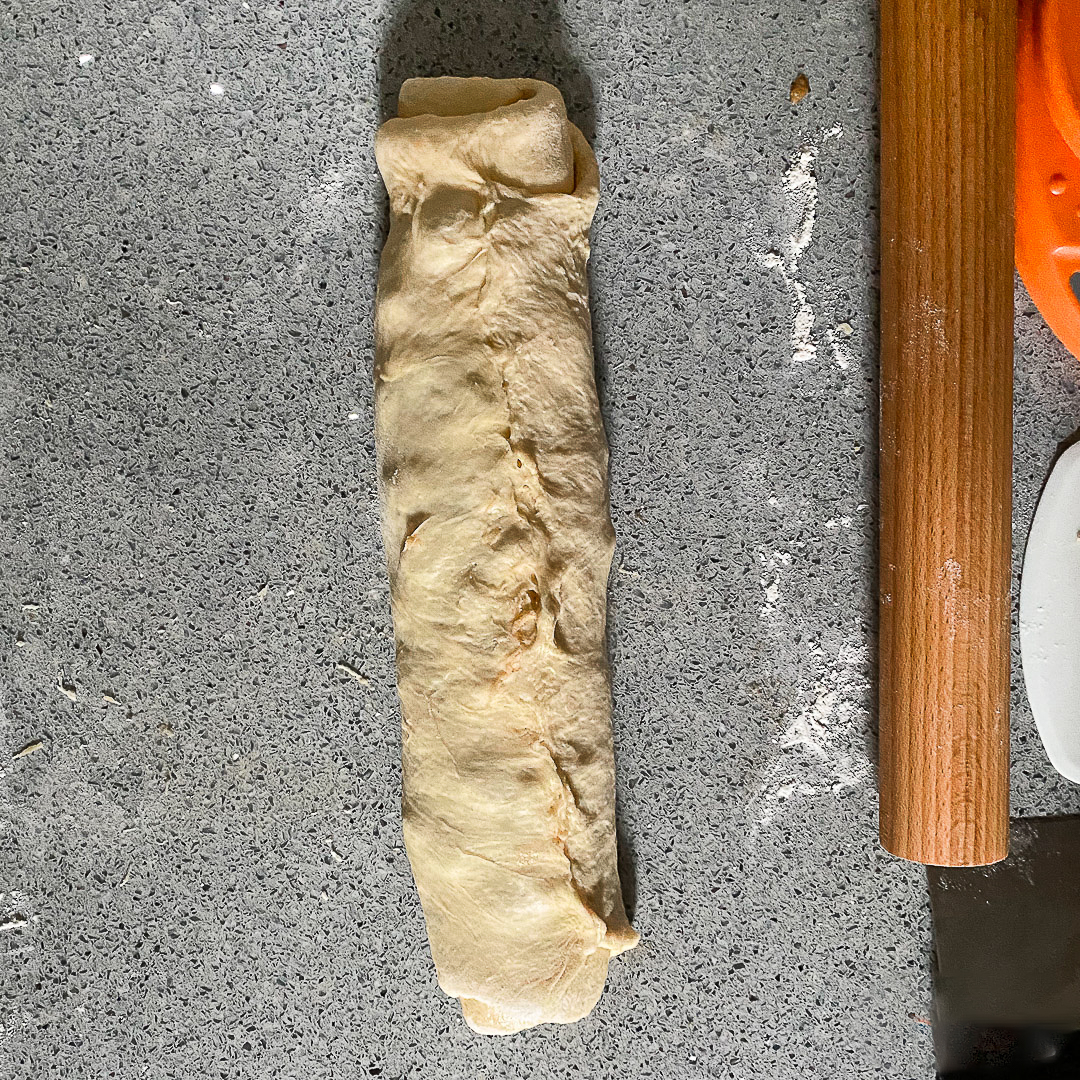
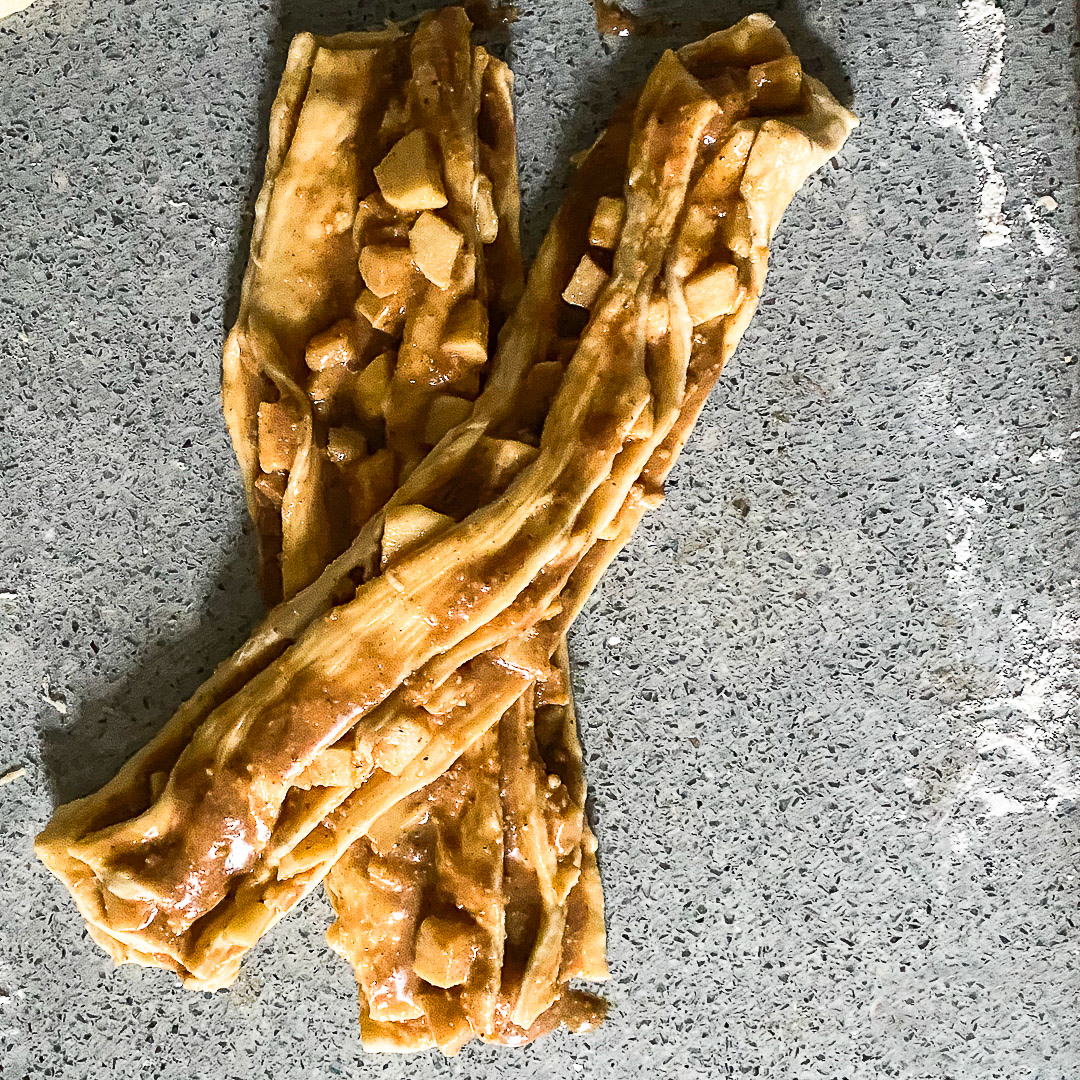
- Have the dough facing you the long way so that the side of the dough that is three inches longer than the length of your pan is facing you. For example, if your pan is 9 inches long, the side of the dough that is 12 inches long should be in front of you. Roll the dough upward so that you have a 12 inch long log. Trim ½ inch to an inch from both sides of the log. (Tip: Save these trimmings and bake in a separate greased pan with trimmings from second log. This is the “mini babka” you get to taste so you can present the two babkas to your guests and already know how good it tastes!)
- Slice down the middle in half, exposing the layers of filling. Form an X with the two pieces, and cross the two over each other starting from the middle. Turn dough around and cross the other side. Place dough in prepared pan. Cover loosely with plastic wrap and allow to sit until doubled in size, approximately one hour.
- Repeat steps 14-17 with second portion of dough from step 13.
- Approximately 30 minutes into the second rise, preheat oven to 350°F.
- Once the babkas have doubled in size, bake for 45-50 minutes. The babkas are done once the tops are golden brown. (If taking the babka’s temperature, the internal temperature should be at least 205°F).
- Make the glaze. While the babkas are in the oven, stir the water, honey and vanilla in a small pan over medium-low heat, just until the mixture comes to a simmer.
- Immediately after coming out of the oven, brush the honey syrup on top of the babkas. Return them to the oven for 1-2 minutes. Remove the babkas from the oven and cool them in their pans for 10-15 minutes and then remove them from their pans onto a wire rack. (Use a metal spatula or flat knife against the sides of the pans before turning the pans over.) If using paper baking pans, leave babkas in the pans to cool completely. Once at room temperature, if not eating immediately, cover in plastic wrap. If they actually last so long, they stay fresh for several days wrapped in plastic and stored at room temperature and even longer stored in the refrigerator. They also freeze beautifully, wrapped in plastic wrap, for up to 3 months.
17 Comments
This looks so yummy!
I love babka and this recipe is so good with the honey and apple together!
I don’t even really bake and this recipe I read twice! It looks and sounds so incredibly good.
Time consuming, but I love the idea of prepping ahead for bake day
This is how I want to start my morning – with a slice of warm apple honey babka! So delicious
Excited to add apples with my babka!
Fall really is the best baking season! I can’t wait to make some apple babka!
This was wonderful! The babka was so soft and pillowy, and the apple gave it such cozy fall vibes. This has me ready for fall baking!
I will be making this on repeat all fall! So good. The walnut filling is genius.
Delish….definitely making this for Rosh Hashanah.
This looks delicious! Question: is there a way to freeze the second babka BEFORE baking? Thanks!
I have not done it, and I generally do not recommend freezing a yeasted dough for more than one month, as the yeast will die. In theory, you should be able to freeze the shaped babka (wrap in plastic wrap). I would remove it from the freezer and defrost it in the refrigerator overnight. Next morning, allow it to get to room temperature before baking. If you do this, please let me know how it works out! (Also, once baked, these babkas freeze beautifully, if you don’t want to freeze the dough.)
If someone has a nut allergy – how would the filling be compensated for the missing one cup of walnuts? Thank you in advance – I can’t wait to try this.
Substitute the same amount (by weight) or 1⅓ cups of oatmeal (not the quick oats version). Use a blender to grind it up to a fine, flour consistency.
Thank you so much! I made this last night. I was a little confused at the – you can use cold milk, instant yeast and honey and skip to step 7, which states put your warm milk….I simply warmed the milk anyway – like i would normally bloom yeast. Thank you again, it’s delicious – the honey filling is amazing, and now I can offer nut-free. Brilliant!
Wonderful! Thanks for the feedback too. I updated the recipe by deleting the cold milk. Cold milk generally works well with instant yeast, but it is a better practice to heat it up.
Can I sub a plant based milk to make this pareve? What do you recommend? Thanks!
I haven’t done it myself, but I’m told that oat milk and vegan butter works great to make this parve.