
This post may contain affiliate links. As an Amazon Associate, I earn from qualifying purchases. For more information, please visit my Privacy Policy.
Of all the berries, blue is my favorite. There, I said it. That’s why my first galette post must be a Blueberry Galette.
I love anything blueberry — so long as it is not contaminated with anything like the heinous raspberry, which I passionately refer to as “the Devil’s fruit”. (I think that the taste and texture of the raspberry are reprehensible, so I firmly believe that it is the fruit of the Devil.)
On top of it all, raspberries are deceptive! You order a lovely plated dessert at a restaurant. The presentation is outstanding with a red sauce carefully decorated on the plate. You assume, given the color, that the taste will be a lovely, sweet strawberry. Then, BAM! It’s the Devil’s fruit! That’s where they get ya.
But I digress. Where was I? Oh, right…blueberries…YUM!!!!
If asked what type of pie is my fave, blueberry is the clear winner. Don’t get me wrong — you put an apple pie in my face, and I will go to town! But, if asked to choose between the two, blueberry is my jam. (Yeah, pun intended.)
I usually make my blueberry treats in the summer when the blueberries are in season, local, and super fresh. Today, I made an exception and grabbed some frozen blueberries. Why? Because I had a hankering for a blueberry pie. Since we are in quarantine and can’t have guests over, I realized that making an entire pie for myself may be a bit much. (Even I have the wherewithal to admit it.) So I decided to go with the pie’s little buddy — the galette.
Galettes are, to be perfectly honest, sheer brilliance. You basically get what you would get in a pie, but it’s easier to make and more sensible for a smaller crowd. Using the same basic pie dough (in French, it’s called a pâte brisée) and the same type of pie filling, the idea of a galette is to look rustic and craftsy. While you can certainly trim the edges of the dough to make it look extra pretty (I have done that), people do not expect that from a galette. Galettes are fabulous for a weeknight dessert or a small dinner party. And they are completely versatile — use whatever kind of fruit is in season and make up whatever filling you want.
You can also make savory galettes. (If using my pâte brisée recipe, I recommend using 2 tsp. instead of 2 tbsp. of sugar for a savory galette.) There are tons of different filling recipes out there if you need some inspiration.
You can make the pâte brisée in one of three ways:
By hand
I recommend this way. While you can use the food processor or mixer (I often use either of those), you have more control over the dough doing it by hand. You also get a feel for how the dough should, well, feel. More importantly, there are no parts to clean up — just a bowl.
By food processor
If using the food processor, it is best to cut up your butter, then place it back in the freezer so that you can add it to the food processor while it is frozen. While using the food processor is very simple, you need to be careful not to overmix the dough, as the dough forms very quickly. You also need to be careful not to add too much water.
By mixer
This is how I learned to make a pâte brisée in culinary school. While using a mixer keeps your hands clean, for one galette, it seems a little silly to crank up the mixer. If clean hands is more important to you, make sure to watch the mixer carefully so you do not overmix the flour and the butter and so you do not overhydrate the dough.
As for this blueberry filling, if you Google around, you will find that many blueberry fillings have lemon juice and/or zest. Some say that lemon brings out the flavor of the blueberries. It is certainly a nice pairing, and I love it with a lemon blueberry cake. For me, when the star of my treat is the blueberry, I like my filling in a pie or galette to carry tones of cinnamon and ground cloves, as those spices really bring out the blueberry flavor. If lemon is more your jam, you can replace the spices with 1-2 teaspoons of lemon juice.
A quick word about the thickening options. I generally prefer using instant clear gel over cornstarch. Clear gel generally thickens without baking and helps a pie filling freeze better if you end up freezing leftovers. It is a modified cornstarch that does not clump like cornstarch can. It can be difficult to find, which is why I include cornstarch as an alternative in the recipe. I get instant clear gel from King Arthur Baking Company. You can also order it from Amazon.
For a video tutorial on how to make the pâte brisée, please visit the saved video in my Instagram profile.
Blueberry Galette
Ingredients
Pâte Brisée:
- 210 grams all-purpose flour (1¾ cups)
- 25 grams sugar (2 Tablespoons)
- ½ teaspoon fine sea salt (or table salt)
- 113 grams refrigerator cold unsalted butter, cut into ¼ inch pieces (if mixing in a food processor, place your cut up butter in the freezer for at least 15 minutes before using)* (8 Tablespoons)
- 5-9 Tablespoons ice water
Blueberry Filling:
- 340 grams fresh or frozen blueberries (See Notes below if using frozen) (12 ounces or 1 pint or 2 cups)
- 50 grams sugar (¼ cup)
- 1 Tablespoon instant clear gel or cornstarch
- ½ teaspoon cinnamon
- Small pinch of ground cloves
- 2 Tablespoons milk or heavy cream**
- Coarse sugar (or regular granulated for dusting)
Instructions
- Dough by hand. In a mixing bowl, whisk together the flour, sugar and salt. Add all the butter. Using your hands, coat each piece of butter with the flour mixture. Pinch the pieces of butter to flatten them a bit. Keep working the mixture for a couple of minutes until the mixture resembles coarse sand with most of the clumps of butter the size of peas and some larger pieces the size of walnuts. Make a well in the middle. Add 2 Tablespoons of ice cold water. Using your hands, scoop the flour from the sides and the bottoms to hydrate the flour with the water. Repat, making a well and adding 1 tbsp. of ice cold water at a time. You know you are done when the dough is slightly clumpy when flattened in your palm it is smooth. Pour the entire mixture onto a sheet of plastic wrap. Push down on the plastic wrap to flatten the dough together into a disc, making it as circular as you can. Place the wrapped dough in the refrigerator for at least 30 minutes and up to 24 hours. Continue with Step 4, below.
- Dough by Food Processor. Combine all the dry ingredients in a food processor and pulse several times. Add all of the frozen butter. Pulse until the mixture resembles coarse sand with most of the clumps of butter the size of peas and some larger pieces the size of walnuts. Add 3 Tablespoons ice cold water and pulse a few times to combine. If the mixture is too dry, add more of the ice cold water a couple tsps. at a time. You know you are done when the dough is slightly clumpy when flattened in your palm it is smooth. Pour the entire mixture onto a sheet of plastic wrap. Push down on the plastic wrap to flatten the dough together into a disc, making it as circular as you can. Place the wrapped dough in the refrigerator for at least 30 minutes and up to 24 hours. Continue with Step 4, below.
- Dough by Mixer. Combine all dry ingredients in a mixer bowl fitted with the paddle attachment and mix on low until combined. Add the refrigerator cold butter and mix until the mixture resembles coarse sand with most of the clumps of butter the size of peas and some larger pieces the size of walnuts. With the mixer on low, slowly add 2 Tablespoons of ice cold water. If the mixture is too dry, add 1 tbsp. of ice cold water at a time. You know you are done when the dough is slightly clumpy when flattened in your palm it is smooth. Pour the entire mixture onto a sheet of plastic wrap. Push down on the plastic wrap to flatten the dough together into a disc, making it as circular as you can. Place the wrapped dough in the refrigerator for at least 30 minutes and up to 24 hours.
- Remove the dough from the refrigerator and lightly flour the countertop. Also lightly flour a rolling pin. Place the dough on the lightly floured countertop. Lightly flour the top of the dough. Roll the dough out so that it is a circle (or circle-ish), approximately 12 inches in diameter. (If the dough cracks when you first start rolling, let it sit on the counter for a couple minutes. It just means the dough is too cold.) Once rolled out, dust off any excess flour and move the dough to a piece of parchment paper placed on a rimmed baking pan like a jelly roll pan. Refrigerate for 30 minutes.
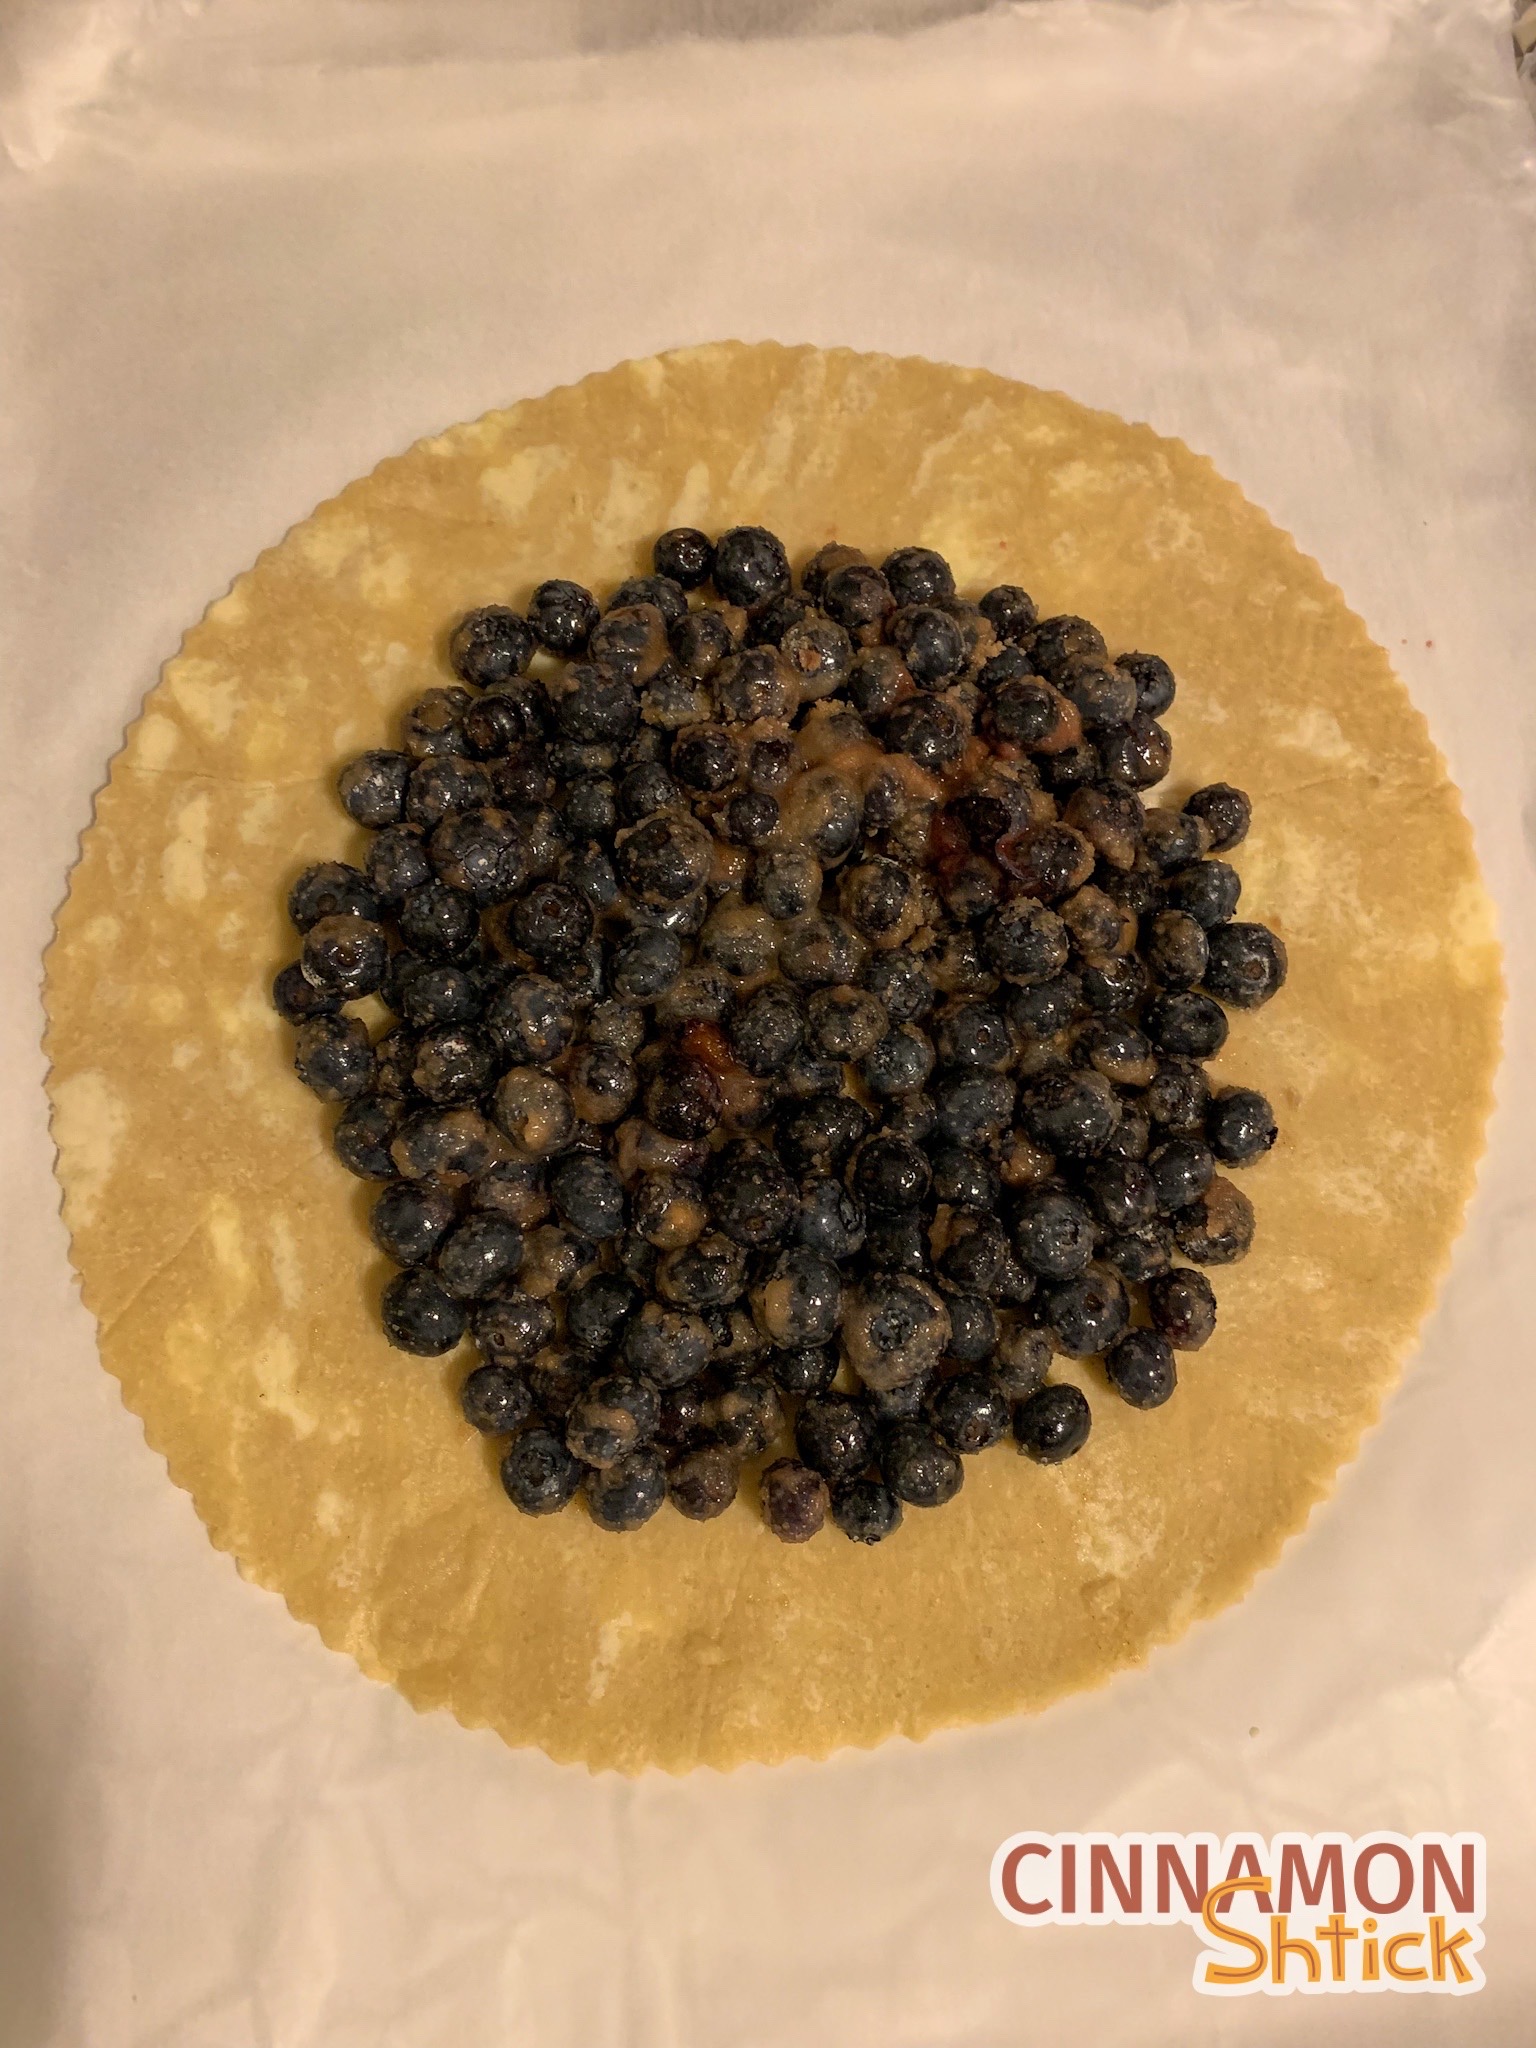
- Prepare Filling: In a bowl, mix the sugar, clear jel (or cornstarch), cinnamon, and ground cloves. Pour in blueberries and mix to coat them.
- Preheat the oven to 400°F.
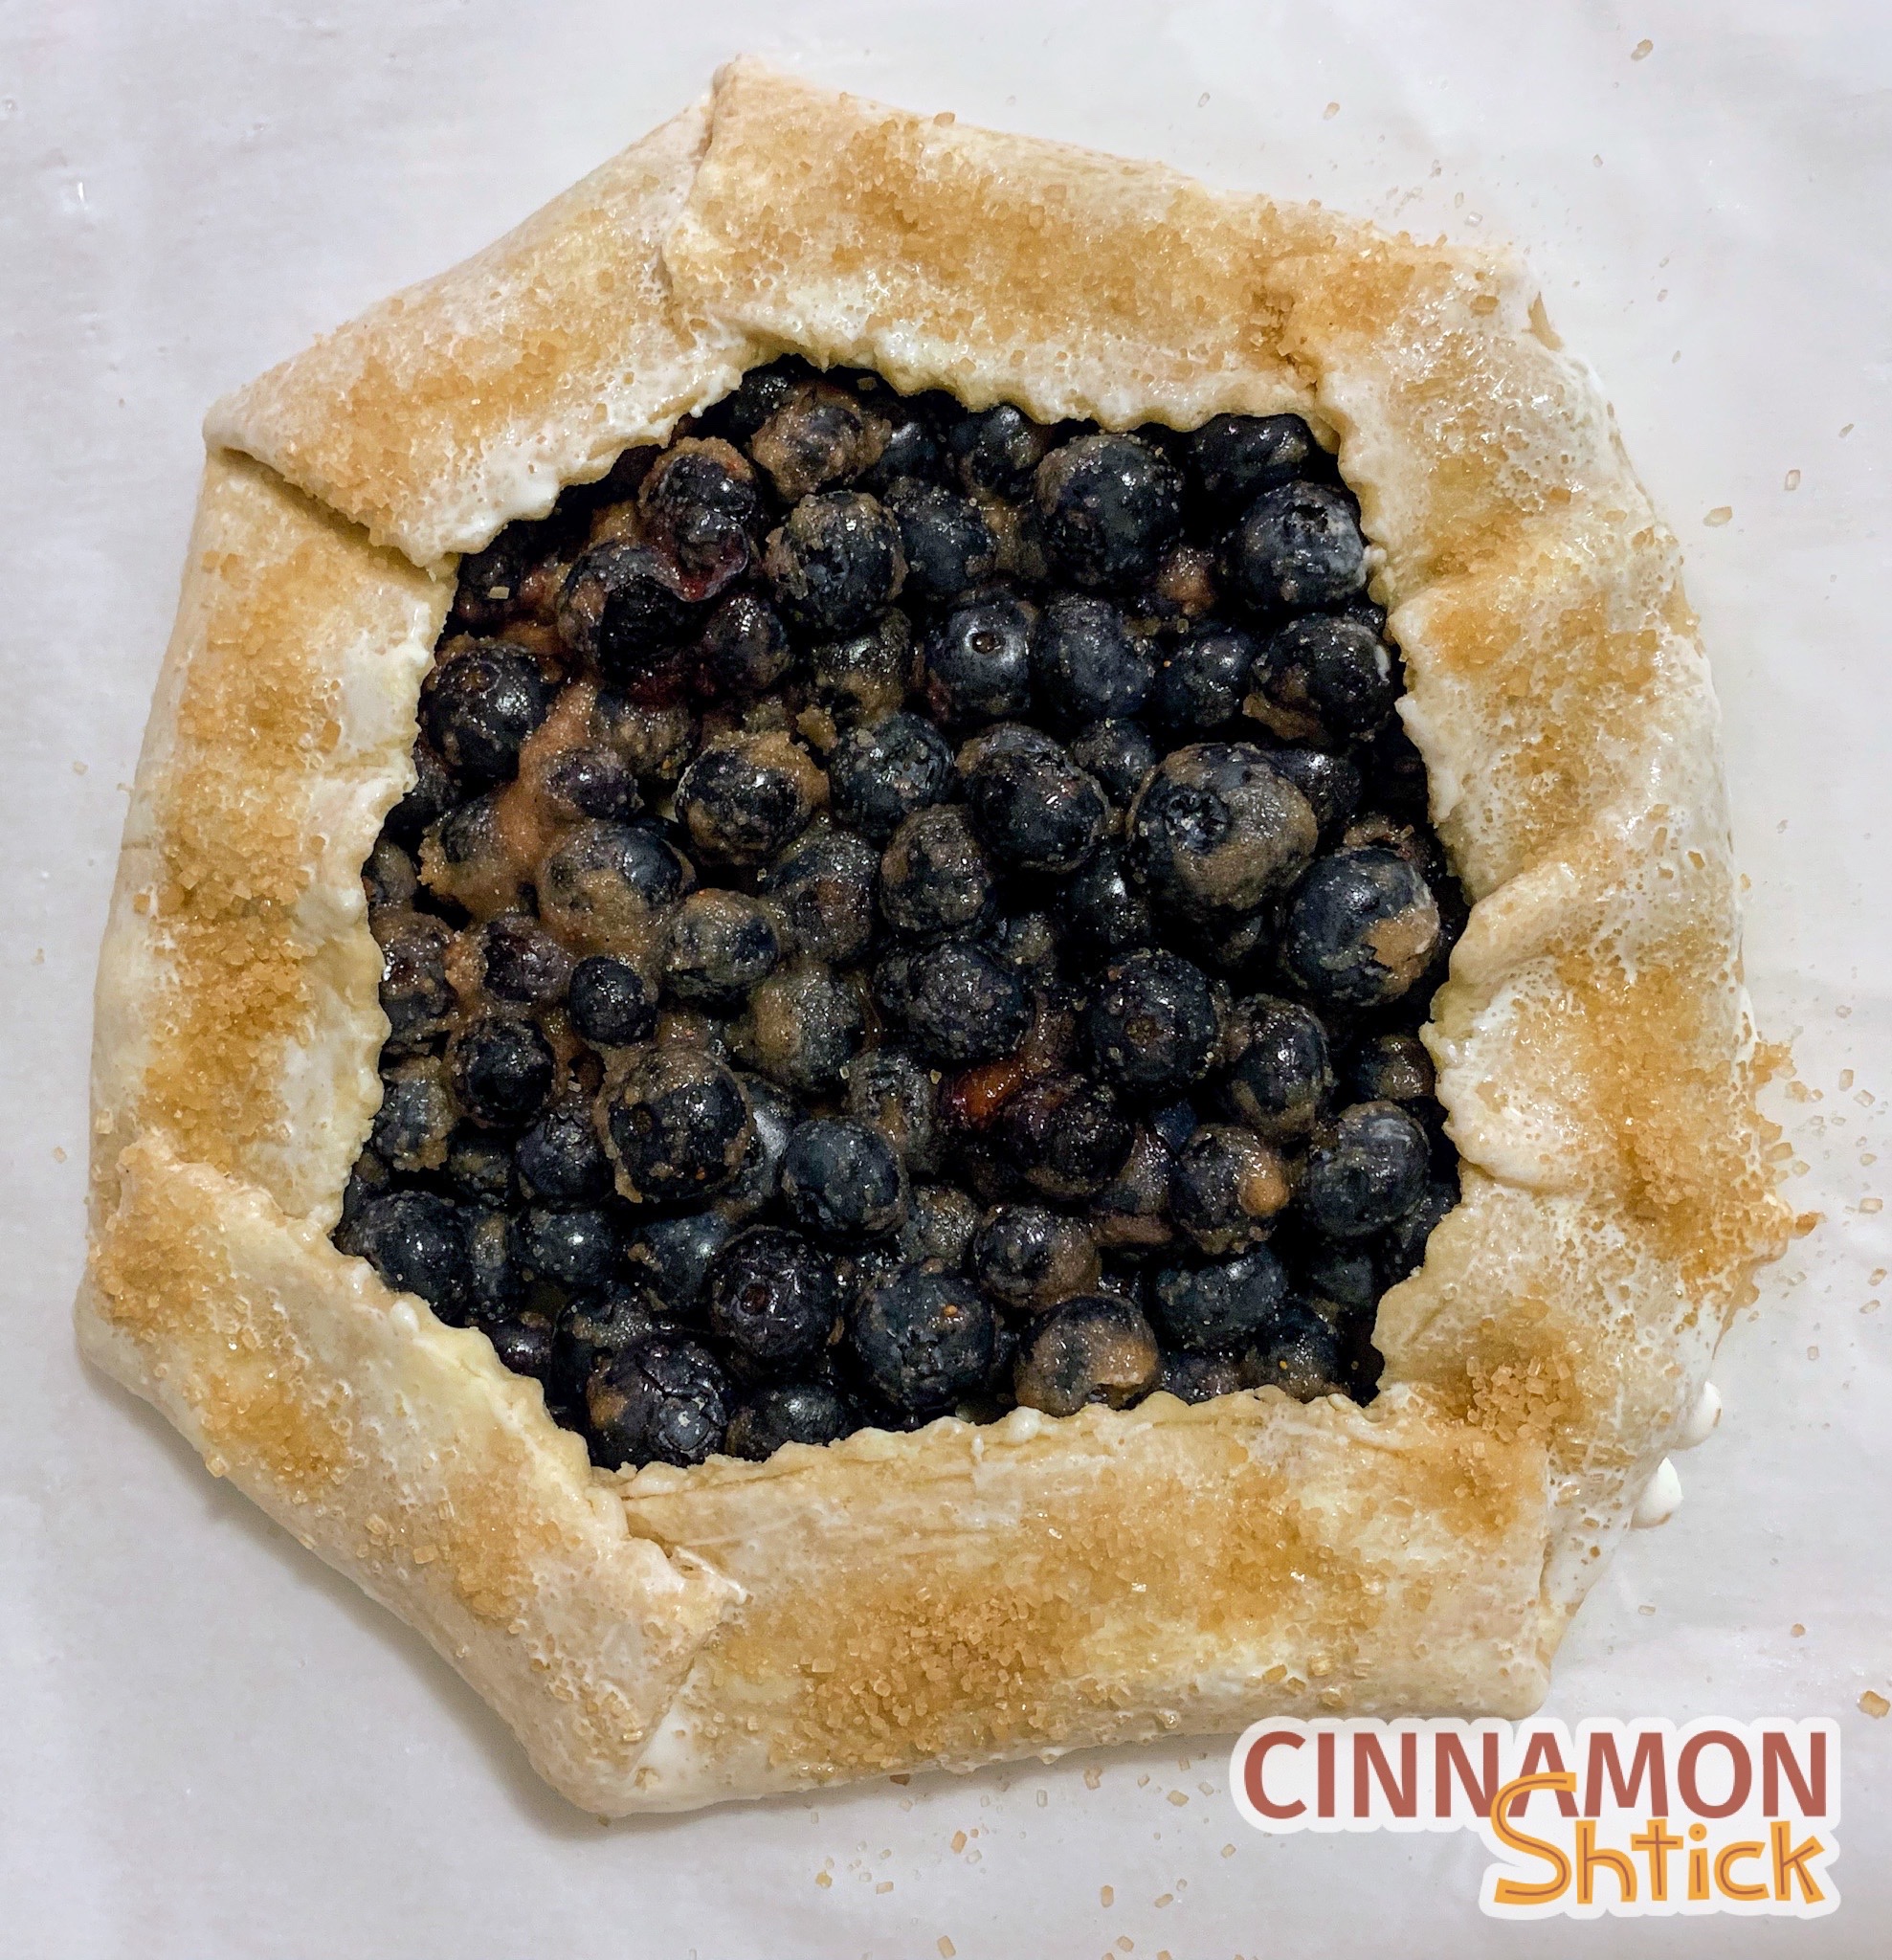
- Pour the blueberry mixture into the center of the dough, leaving approximately a 2 inch border around the circle. Fold the border towards the center so that they are covering approximately 2 inches of the blueberry mixture. Refrigerate the prepared galette for at least 20 minutes. (Or place in freezer for 10 minutes.)
- Brush the border of the pastry with milk or cream. Sprinkle a coarse or regular granulated sugar on top of the pastry.
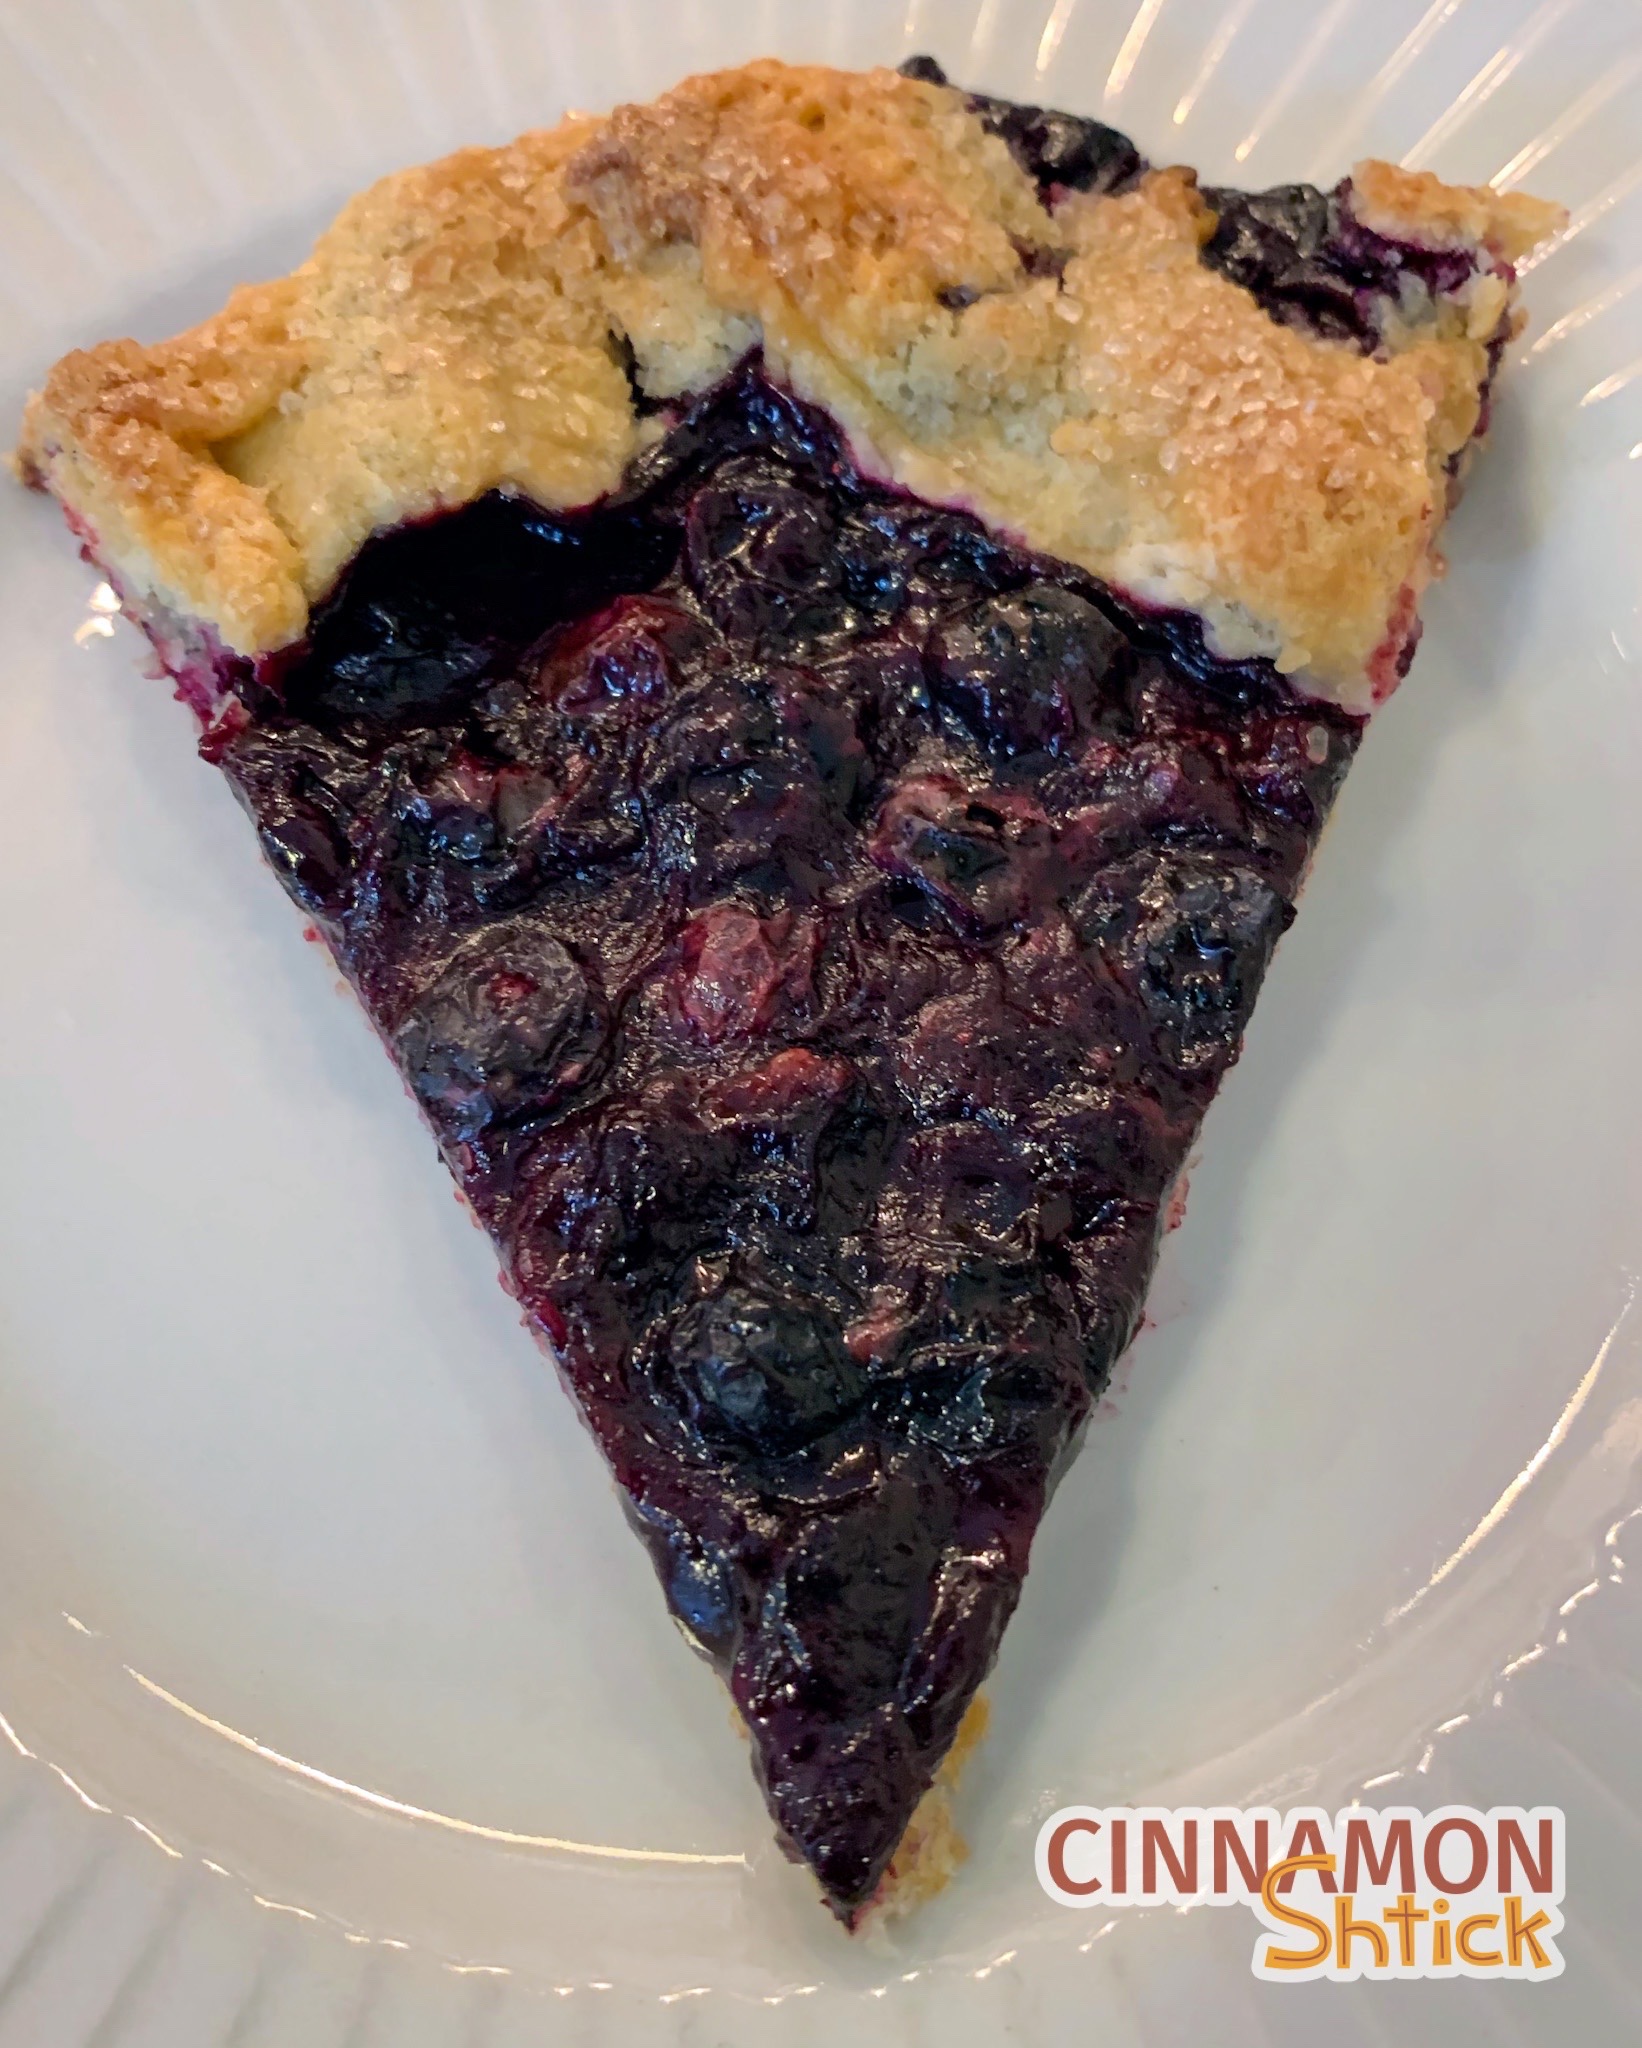
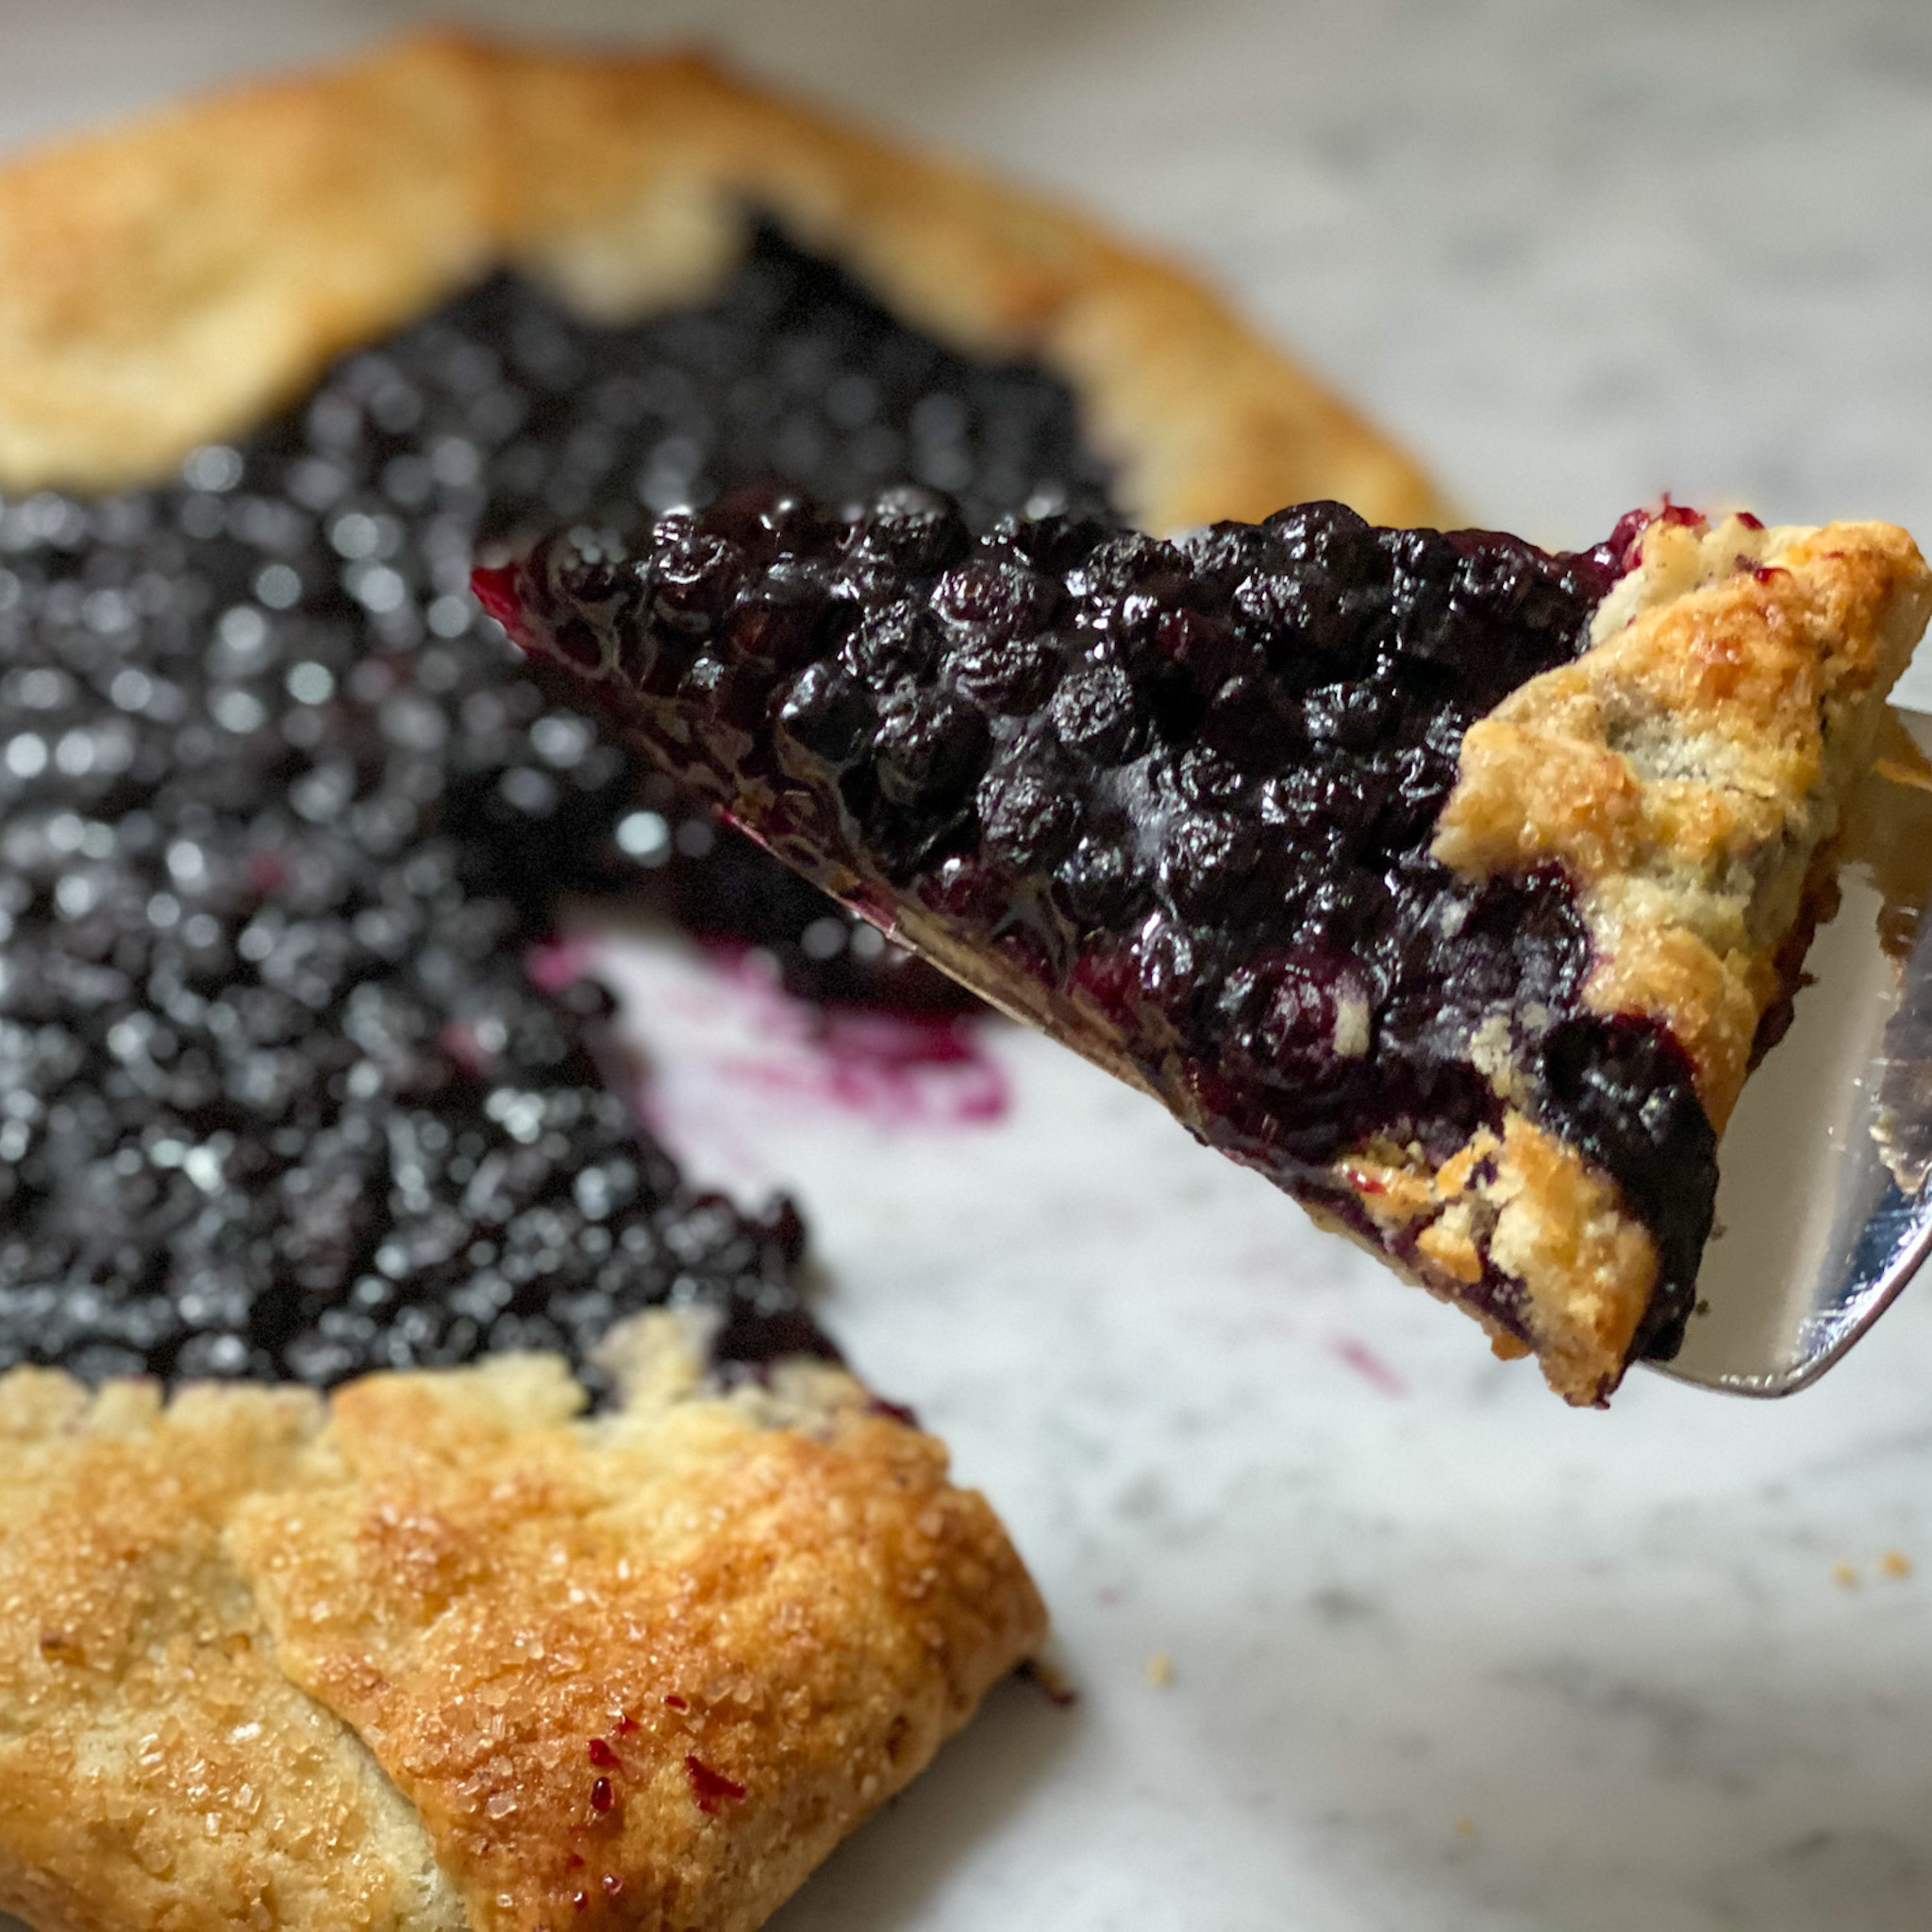
- Bake for 45-50 minutes. The galette is done when the top borders are golden brown and the blueberries are bubbling. Allow to cool completely for cleaner cutting. (It is also delicious served warm, especially with some Cinnamon Stick Ice Cream.)
Notes
- If using frozen blueberries, feel free to use an entire 15 ounce package. Mix the frozen berries with the sugar mixture just before pouring them onto the dough.
- It is important to keep the dough cold at all times so that you prevent gluten development from the flour. This will result in a flakier dough.
- The galette will stay fresh for at least several days covered in plastic wrap on the counter or even longer in the refrigerator.
Nutrition
3 Comments
Pingback: Apple Oatmeal Galettes - Cinnamon Shtick
This is amazing! I love blueberries in everything.
This blueberry Galette is one of my favorite ways to use blueberries!